

You will find the original tutorial here :

This tutorial is a personal creation.
Any resemblance with another one would be only pure
coincidence.
It is stricly forbidden to modify tubes, to change
their name or take off the matermarks,
To present them on your sites or blog,
To share them in groups,
to make a bank of images, or to use them on lucrative purposes.

Thank you to respect Shawnee’s work and the tubers
work.
Don’t hesitate to warn me if you have any trouble
with this translation,
and I’ll try to fix the problem as quickly as I can

I used PSP 2020 to create my tag and make the translation
you can follow this tutorial with another version
of PSP, but the result might be slightly different

Supplies
color palette
1 selection T24-sel1
1 tube FV016 – Bouquet
2 chains Ob068 et Ob069
1 tube A043 bird
1 tube A044 butterflies
1 tube A045 ladybird
Shawnee’s watermark

TIP 1 -> if you don’t want to install a font -->
open it in a software as « Nexus Font » (or
other font viewer software of you choice)
as long as both windows are opened (software and font),
your font will be available in your PSP
TIP 2 -> from PSPX4, in the later versions of PSP the
functions « Mirror » and « Flip » have
been replaced by -->
« Mirror »has become --> image => mirror => mirror
horizontal
« Flip » has become --> image => mirror => mirror
vertical

Plugins needed
Unlimited > Toadies > Weaver
Unlimited > ICNET > Distorsion Filters > Deformer
Unlimited > ICNET > Paper Textures > Canvas Medium
Unlimited > Penta.com > Dot and Cross
Thank you Renée Salon for sharing your plugins page


Use the pencil to mark your place
along the way
hold down left click to grab and move it
 |

Prepare your work !
duplicate all the tubes and work with the copies
to preserve originals
save your work often in case of problems with your psp
use the Dropper tool to pick up your colors into your tubes
and misted images
Shawnee chose these :

don’t hesitate to change blend modes and opacities
of the layers to match your personal colors and tubes
place the selection into the dedicated folder of My Corel
PSP General folder
1
open a new image => transparent => 900 * 650
px
prepare a linear gradient => 90 / 1 / tick « invert »
flood fill selection with the gradient
effects => plugins => Unlimited 2 => Toadies
=> Weaver

effects => texture effects => mosaic / Antique

effects => image effects => seamless tiling

effects => plugins => Unlimited 2 => Toadies
=> Weaver (default settings)

2
layers => duplicate
image => resize => untick « resize all layers » => 75%
3
effects => plugins => Unlimited 2 => Distortion
Filters => Déformer (default settings)

4
enable the Pick tool
stretch to the right and left to the edges
hit the « M » key of your keyboard to disable
the tool

effects => 3D effects => drop shadow => 0 /
0 / 80 / 20 / black

5
effects => plugins => Unlimited 2 => Paper Textures
/ Canvas Medium (default settings)

6
layers => new raster layer
selections => load-save selection => from disk => selection
#1

copy / paste « FV016 » into selection
selections => invert
hit the DELETE key of your keyboard => 3 times
selections => select none
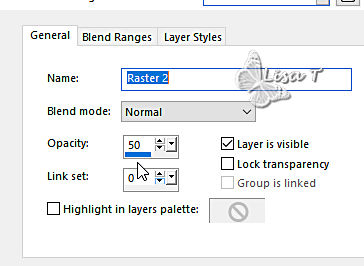
opacity of the layer : 50%
7
layers => duplicate
image => mirror => mirror horizontal
layers => merge => merge down
8
effects => plugins => Unlimited 2 => Paper Textures
/ Canvas Medium (default settings)
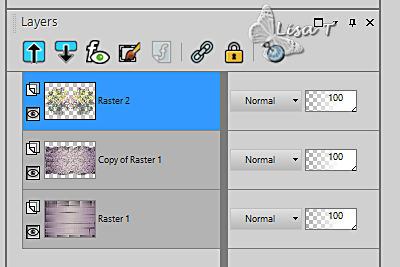
layers => merge => merge down
enable the Pick tool with the following settings, to move
the layer acurately => position X : 0 / position Y
: 71
hit the « M » key of your keyboard to disable
the tool
9
choose one of the chains provided
Shawnee resized to 75% but you do as you like
place on the 3 places (see final result)
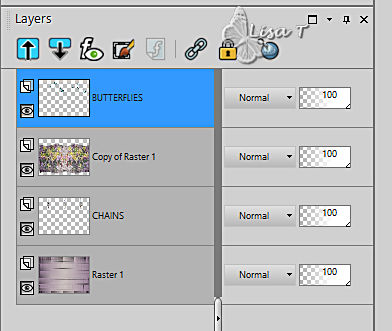
layers => merge => merge the 3 layers together
layers
=> arrange => move down
effects => 3D effects => drop shadow => 1 / 1
/ 80 / 8 / black
blend mode of the layer : Luminance (Legacy) or other (optional)

10
highlight top layer
copy / paste « A044 Papillons » as new layer
enable the Pick tool with the following settings, to move
the layer acurately => position X : 185 / position
Y : 20
layers => duplicate
enable the Pick tool with the following settings, to move
the layer acurately => position X : 591 / position
Y : 36
layers => merge => merge the 2 layers together
effects => 3D effects => drop shadow => 1 / 1
/ 80 / 8 / black
blend mode of the layer : Luminance (Legacy) or other (optional)
11
open the bird tube and resize to 72%
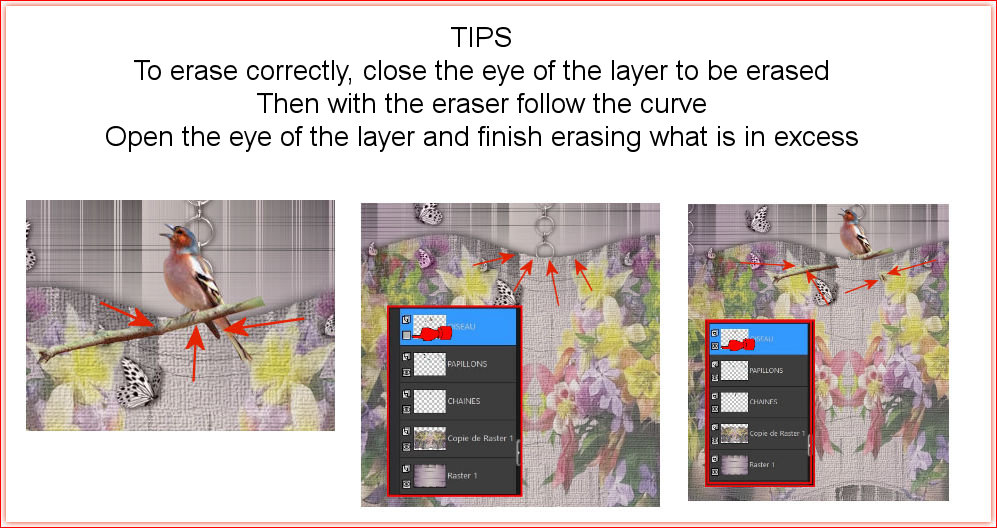
place where you like, but the bird must be perched on the
edge of the wavy border
erase what is in excess
effects => 3D effects => drop shadow => 1 / 1
/ 80 / 8 / black
12
highlight « Copy of Raster 1 »
edit => copy
image => add borders => tick « symmetric » => 2
px color 2
selections => select all
image => add borders => tick « symmetric » => 40
px white
selections => invert
edit => paste into selection
13
effects => plugins => Unlimited 2 => Penta.com
=> Dot and Cross => 72 / 10 / 2
selections => invert
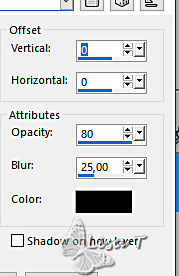
effects => 3D effects => drop shadow => 0 / 0
/ 80 / 25 / black
selections => select none
14
image => add borders => tick « symmetric » => ...
2 px color 2
5 px color 1
2 px color 2
edit => COPY
selections => select all
image => add borders => tick « symmetric » => 40
px white
selections => invert
edit => paste into selection
adjust => blur => radial blur

15
effects => plugins => Unlimited 2 => Penta.com
=> Dot and Cross => 72 / 10 / 2
effects => 3D effects => drop shadow => 0 / 0
/ 80 / 25 / black
selections => select none
image => add borders => tick « symmetric » => 1
px black
16
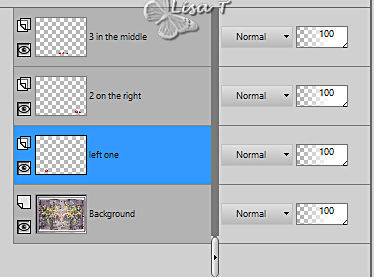
copy / paste the ladybird (see final result)
duplicate and resize as you like
merge the ladybirds creating « groups » and
drop shadow to each group
Shawnee dropped thes shadows
the two ladybirds on the right => 2 / 2 / 65 / 8 / black
the 3 in the middle => -3 / 2 / 65 / 8 /
black
the one on the left => -6 / -3 / 45 / 10 / black
17
apply your watermark or signature
write your licence number if you used a licenced tube
apply Shawnee’s watermark
layers => merge => merge all (flatten)
image => resize => tick « resize all layers » => 800
px width (or other size if you prefer)
file => save your work as... type .jpeg

Don't hesitate to write to me if you have any trouble
with this tutorial
If you create a tag (using other tubes than those provided)
with this tutorial
and wish it to be shown, send it to Shawnee !
It will be a real pleasure for her to add it to the gallery
at the end of the tutorial


back to the boards of Shawnee’s tutorials
20 tutorials on each board
board 2 => 
at the bottom of each board you will find the arrows
allowing you to navigate from one board to another


|