

You will find the original tutorial here :
Shawnee deliberately wrote the title this way, and not « Indian Spirit » as I suggested
so I respected her wishes.
This tutorial is a personal creation.
Any resemblance with another one would be only pure coincidence.
It is stricly forbidden to modify tubes, to change their name or take off the matermarks,
To present them on your sites or blog,
To share them in groups,
to make a bank of images, or to use them on lucrative purposes.

Thank you to respect Shawnee’s work and the tubers work.
Don’t hesitate to warn me if you have any trouble with this translation,
and I’ll try to fix the problem as quickly as I can

I used PSP 2020 to create my tag and make the translation
you can follow this tutorial with another version of PSP, but the result might be slightly different

Supplies

TIP 1 -> if you don’t want to install a font -->
open it in a software as « Nexus Font » (or other font viewer software of you choice)
as long as both windows are opened (software and font), your font will be available in your PSP
TIP 2 -> from PSPX4, in the later versions of PSP the functions « Mirror » and « Flip » have been replaced by -->
« Mirror »has become --> image => mirror => mirror horizontal
« Flip » has become --> image => mirror => mirror vertical

Plugins needed
Flaming Pear > Flood
Mura’s Meister > Perspective Tiling
Thank you Renée Salon for sharing your plugins page


Use the pencil to mark your place
along the way
hold down left click to grab and move it
 |

Prepare your work !
duplicate all the tubes and work with the copies to preserve originals
save your work often in case of problems with your psp
use the Dropper tool to pick up your colors into your tubes and misted images
don’t forget to erase the tuber’s watermark
open the mask(s) and minimize to tray
Shawnee chose these :
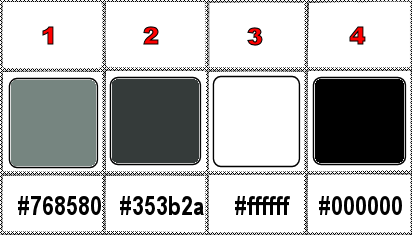
prepare colors 1 and 2 as FG and BG colors into the materials palette
don’t hesitate to change blend modes and opacities of the layers to match your personal colors and tubes
1
open a new image => transparent => 900 * 650 px
flood fill with color 1
2
selections => select all
2
layers => new raster layer
copy / paste « Manoir hanté » into selection
selections => select none
3
effects => image effects => seamless tiling => default settings
adjust => blur => gaussian blur => 10
layers => merge => merge down
4
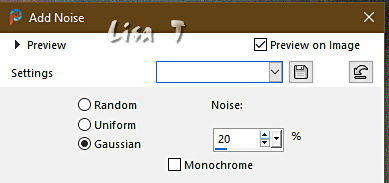
adjust => add-remove noise => add noise
5
layers => new raster layer
flood fill white
layers => new mask layer => from image => choose « 59ec64d42 »
layers => merge => merge group
optional => according to your colors => layers => duplicate
layers => merge => merge down
6
layers => new raster layer
flood fill with color 2
layers => new mask layer => from image => choose « Ildiko_autumn_leaves_mask01 »
layers => merge => merge group
layers => duplicate
layers => merge => merge down
7
copy / paste « Manoir hanté » as new layer
enable the Pick tool with the following settings, to move the layer acurately => position X : 150 / position Y : -30
hit the « M » key of your keyboard to disable the tool
8
highlight Raster 1
layers => duplicate
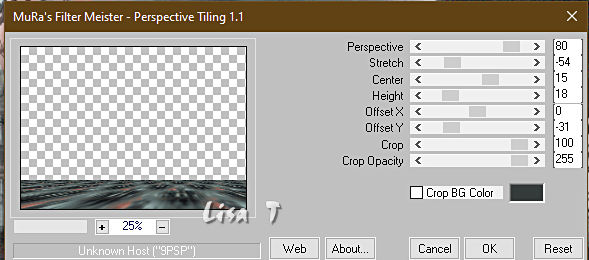
effects => plugins => Mura’s Meister => Perspective Tiling
9
enable the Magic Wand tool / feather : 60%
click into the transparent part => hit 4 times the DELETE key of your keyboard
selections => select none
don’t forget to reset Feather of the magic wand tool to 100%
10
Copy of Raster 1 is highlighted
effects => plugins => Flaming Pear => Flood
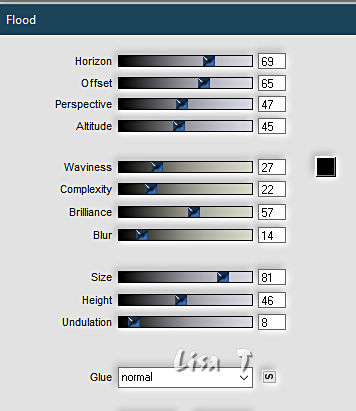
11
highlight top layer
copy / paste as new layers the elements ==> .....
« Mains crochues »
enable the Pick tool with the following settings, to move the layer acurately => position X : 47 / position Y : 16
effects => 3D effects => drop shadow => 2 / 2 / 80 / 15 / black
« Chauve-souris »
enable the Pick tool with the following settings, to move the layer acurately => position X : 517 / position Y : 4
effects => 3D effects => drop shadow => 2 / 2 / 100 / 2 / black
« Verres-bougie/livre »
enable the Pick tool with the following settings, to move the layer acurately => position X : 648 / position Y : 325
blend mode of the layer => Luminance
« Toile d’araignées »
image => resize => untick « resize all layers » => 58%
enable the Pick tool with the following settings, to move the layer acurately => position X : -28 / position Y : -26
effects => 3D effects => drop shadow => 1 / 1 / 70 / 1 / WHITE
« Rube Gothiqus Delf01 »
image => resize => untick « resize all layers » => 85%
enable the Pick tool with the following settings, to move the layer acurately => position X : 56 / position Y : 100
effects => 3D effects => drop shadow => 0 / 0 / 75 / 50 / WHITE => TWICE
text « Happy Halloween »
enable the Pick tool with the following settings, to move the layer acurately => position X : 559 / position Y : 198
optional => drop shadow (there is already one) => 5 / 5 / 100 / 5 / black
12
layers => merge => merge all (flatten)
edit => COPY
13
open the frame
(if you want to create it yourself, explanations are given at the end of the tutorial)
enable the Magic Wand tool and click in the middle
edit => paste into selection the image created in step 12
selections => select none
14
adjust => sharpness => unsharp mask / Soft
15
apply Shawnee’s watermark (thank you)
apply your watermark or signature
image => add borders => tick « symmetric » => 1 px black
resize if you wish and save as ... type .jepg
save as ... type .jpeg
The Frame
1 px color 2
10 px color 1
effects => texture effect => Blinds => 5 / 100 / black / tick all boxes
1 px white
5 px color
1 px white
45 (or 50) ps color 2
effetcts => texture effects => choose your texture
28% / 1 / 2 / 1 / 15 / color 1 ..... 146 / 50 / 30
effects => 3D effects => Inner Bevel / bevel shape to your likings
L 5 / 23 / 7 / -30 / 25 white 197 / 44 / 66
1 px white
5 px color 2
1 px white
1 px color 2
10 px color 1
effects => texture effect => Blinds / 5 / 100 / white / Tick « light »
effects => texture effect => Blinds / 5 / 100 / black / Tick all boxes

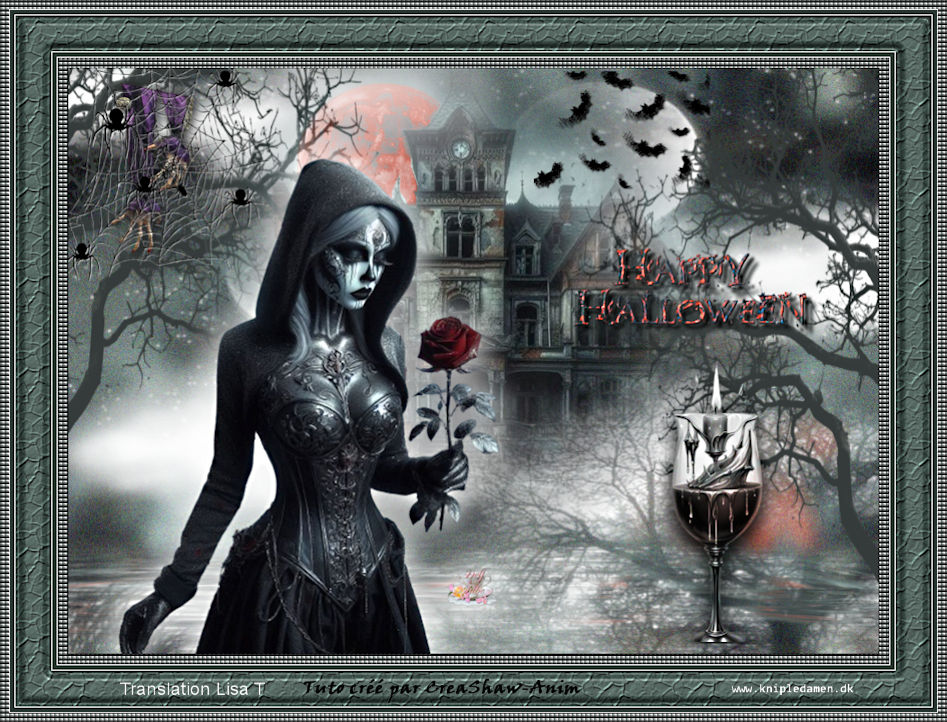
Another version with my tubes and misted image


Don't hesitate to write to me if you have any trouble with this tutorial
If you create a tag (using other tubes than those provided) with this tutorial
and wish it to be shown, send it to me !
It will be a real pleasure for me to add it to the gallery at the end of this translation



created by  Birte Birte

back to the boards of Shawnee’s tutorials
20 tutorials on each board
board 4 => 
at the bottom of each board you will find the arrows allowing you to navigate from one board to another


|