

The original tutorial can be found HERE
Conditions of use of the material provided
It is forbidden to modifiy, change the name, take off the
watermarks or alter the tubes.
It is forbidden to share them in groups or offer them on
your site, blog or forum without permission
If you want to use them to create a tutorial, you must ask
the permission to the authors.
This is a personal work.
any resemblance with another tutorial would be pure coincidence
it is forbidden to share it or distribute it on the Web,
to present it in a group or forum without the author’s
permission
Rose de Sables is happy to share her work with you
she hopes it will help you dream and get away from your eveyday
life

Material
decoration tubes - color palette

thank you to the tubers for their great work
open tubes, duplicate them and work with the copies
to prevent the theft of tubes, they are no longer provided
in the material ZIP
the only material provided is : decorations, masks
and selections
you will have to use your personal collection
following this tutorial, you will need a character tube (boy
or girl) (not provided)
and a landsccape tube (winter scenery)
Filters Used
Alien Skin Impact/Glass - Graphics Plus/Cross Shadow
AAA Frame Works -Xero /Clarity

translator’s note
Rose des Sables works with PSP X, I use PSPX9 to create my
tag and write my translation
but this tutorial can be realized with another version
according to the version of PSP you use, the results might
be slightly differents
don’t hesitate to change the blend modes of the layers
to match your tubes and colors
Colors

color 1 --> foreground color --> FG --> left click
--> #c7c7c7
color 2 --> background color --> BG --> right click
--> #ffffff
color 3 --> #4b3739
translator’s note : I chose other colors matching
my character’s tube
Use this pencil to follow the steps
hold down left click to grab it and move it

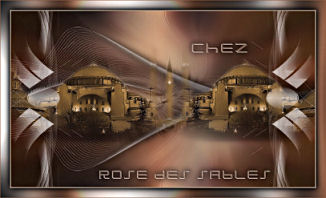
Realization
1
open a new transparent image 952 * 550 pixels
2
selections -> select all
3
selections -> select all
4
copy / paste into selection « AD Gentle
Twilight »
selections -> select none
5
layers -> new raster layer
selections -> select all
6
copy / paste into selection « AH Vorlage 1108 »
selections -> select none
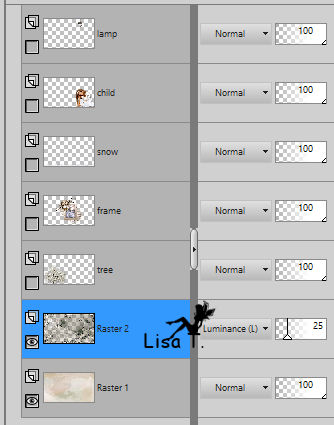
7
blend mode of layer : Luminance (Legacy) - opacity :
25%
8
effects -> edge effects -> enhance
9
open « ScrapHH-Fallen »
image -> resize -> 80% -> uncheck « resize
all layers »
10
copy / paste as new layer
11
image -> sharpness -> sharpen
don’t move it
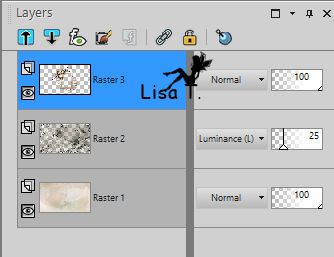
12
your layers palette and your tag look like this

13
highlight Raster 3 (frame) and close the eye of all other
layers
select inside this frame with magic wand tool
translator’s note : I prefered to make this selection
with Freehand tool / point to point
14
layers -> new raster layer
15
copy / paste into selection your landscape tube
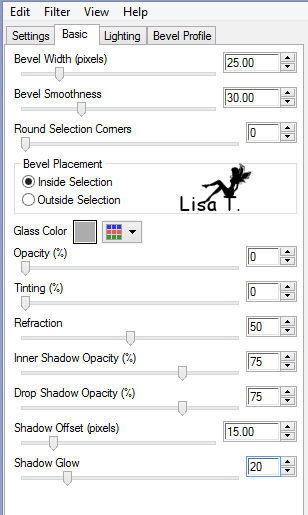
16
effects -> plugins -> Alien Skin Eye Candy 5 - Impact
/ Glass

17
selections -> select none
layers -> arrange -> move down
highlight top layer
18
layers -> merge -> merge down
open all layers
19
copy / paste as new layer « Winter Tree 2 »
resize to 120%
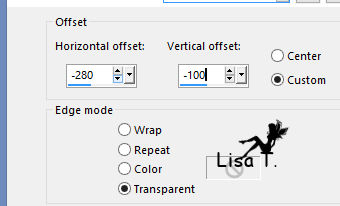
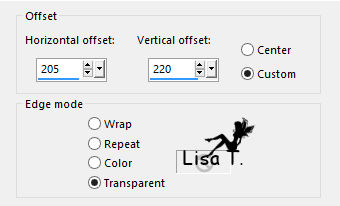
20
effects -> image effects -> offset
21
copy / paste a character tube of your choice
resize if necessary
move it to the right
layers -> arrange -> bring to top
22
copy / paste as new layer snow tube
move it bottom left
layers -> duplicate and move it to the right (use arrows
keys of your keyboard)
redo 2 or 3 times to fill bottom of your tag (see final
result)

layers -> merge -> merge all snow layers together
23
in layers palette, move your character tube above this « snow
tube »
24
character tube is highlighted
effects -> 3D effects -> drop shadow

drop the same shadow under frame and tree
highlight top layer
25
open « Silent Winter »
resize to 50% TWICE
26
copy / paste as new layer
27
effects -> image effects -> offset
28
close all layers except Raster 1 and Raster 2
highlight raster 2
29
edit -> copy special -> copy merged
edit -> paste as new image
minimize to tray for a later use
30
open all layers
copy / paste as new layer Text tube - move it as shown
on final result
colorize if necessary
layers -> merge -> merge all -> (flatten)
31
image -> add borders -> check « symmetric » -> ...
2 pixels color 1
2 pixels color 2
2 pixels color 1
25 pixels color 3
32
select this border with magic wand tool
33
selections -> promote selection to layer
highlight this new layer
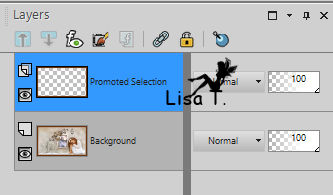
34
copy / paste into selection the image you set aside in
step 29
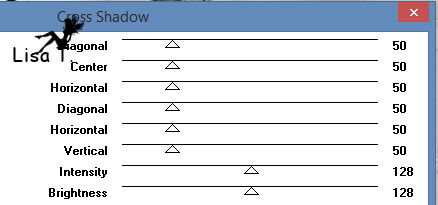
35
effects -> plugins -> Unlimited 2 -> Graphic
Plus / Cross Shadow / default settings
36
effects -> edge effects -> enhance
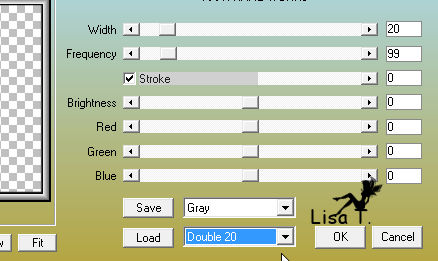
37
effects -> plugins -> AAA Frames -> Frame Works
38
effects -> plugins -> Unlimited 2 -> Graphic
Plus / Cross Shadow / default settings
39
selections -> select none
layers -> merge -> merge visible
40
apply your watermark
41
effects -> plugins -> Xero -> Clarity

file -> save as... type .jpeg
Your tag is finished.
Thank you for following this tutorial
Don’t hesitate to send your creations
to Rose des Sables

It will be a real pleasure for her to show them in the
gallery at the bottom of the tutorial page
Don’t forget to indicate her your name and the adress
of your blog or site if you have one
Back to the board of Rose des Sables’ tutorials
Board 1 

|