

click on french flag to find the original tutorial

Conditions of use of the material provided
It is forbidden to modify, change the name, take off the
watermarks or alter the tubes.
It is forbidden to share them in groups or offer them on
your site, blog or forum.
If you want to use them to create a tutorial, you must ask
the permission of the authors.

Odette has the permission of the creators to use their tubes,
masks and decorations
Thank you to all of them.
Without their beautiful creations, no tutorials could be
written.
Odette uses PSPX8 and I use PSPX9 to create the tags of her
tutorials
but you can follow this tutorials with any other version
of PSP
according to the version you use, the result might be slightly
different
Matérial
tubes - decoration tube - text tube

open all tubes
window/duplicate. Close the originals and work with the copies
to preserve the originals
don’t forget to erase tubes’ watermarks before
using them
install all plugins needed
Plugins
FM Tile Tools - Graphic Plus
Colors palette
foreground color -> color 1 -> #beddf3
background color -> color 2 -> #2b3165
in the materials palette, prepare a sunburst gradient

use the pencil to follow the steps
hold down Left click to grab it and move it

Realization
1
open a new transparent image 900 * 600 pixels
flood fill with the gradient
effects -> image effects -> semaless tiling -> default
settings
effects -> texture effects -> mosaic-glass
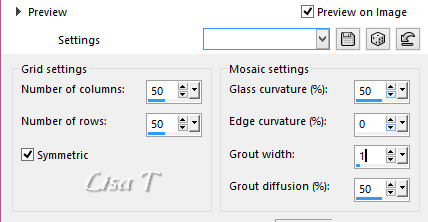
2
effects -> texture effects -> mosaic-antique
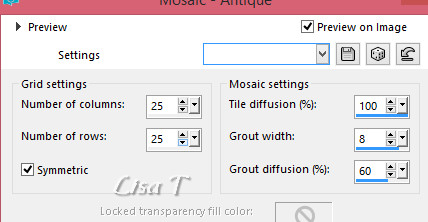
3
image -> add borders -> tick « symmetric » .....
2 pixels color 1
10 pixels color 2
2 pixels color 1
4
layers -> duplicate
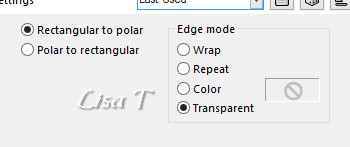
effects -> distortion effects -> polar coordinates
5
image -> mirror -> mirror vertical
copy / paste as new layer the landscape image
layers -> merge -> merge all (flatten)
6
layers -> duplicate
effects -> distortion effects -> polar coordinates
as before
image -> mirror -> mirror vertical
7
copy / paste as new layer the landscape image
adjust -> sharpness -> sharpen
8
effects -> plugins -> FM Tile Tools / default settings
9
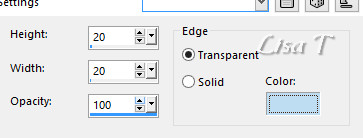
image -> add borders -> tick « symmetric » -> 20
pixels white
select this border with the magic wand tool
effects -> plulgins -> Graphic Plus -> Quick Tile
II

10
effects (> 3D effects -> buttonize
selections -> select none
image -> add borders -> tick « symmetric » -> 1
pixels color 2
11
copy / paste the children tube as new layer
image -> resize -> untick « resize all
layers » -> 80%
move it to the right
effects -> 3D effects -> drop shadow -> 1 / 1
/ 50 / 30 / black
12
copy / paste as new layer the bird tube
reisze it if necessary
move it to the left
effects -> 3D effects -> drop shadow -> 1 / 1
/ 50 / 30 / black
13
copy / paste as new layer the decoration tube
move it in the top left corner
15
apply your woatermark
16
layers -> merge -> merge all (flatten)
save as... type .jpeg
your tag is finished
Thank you for following this tutorial
don’t forget to sign your work
save as... type .jpeg
if you have any problemwwith this translation
or to show her your creations,
Don’t hesitate to write to me

It will be a real pleasure for me to present them at the
end of this tutorial
My tag with other tubes
Back to the boards of Odette’ s tutorials
board 1 

|