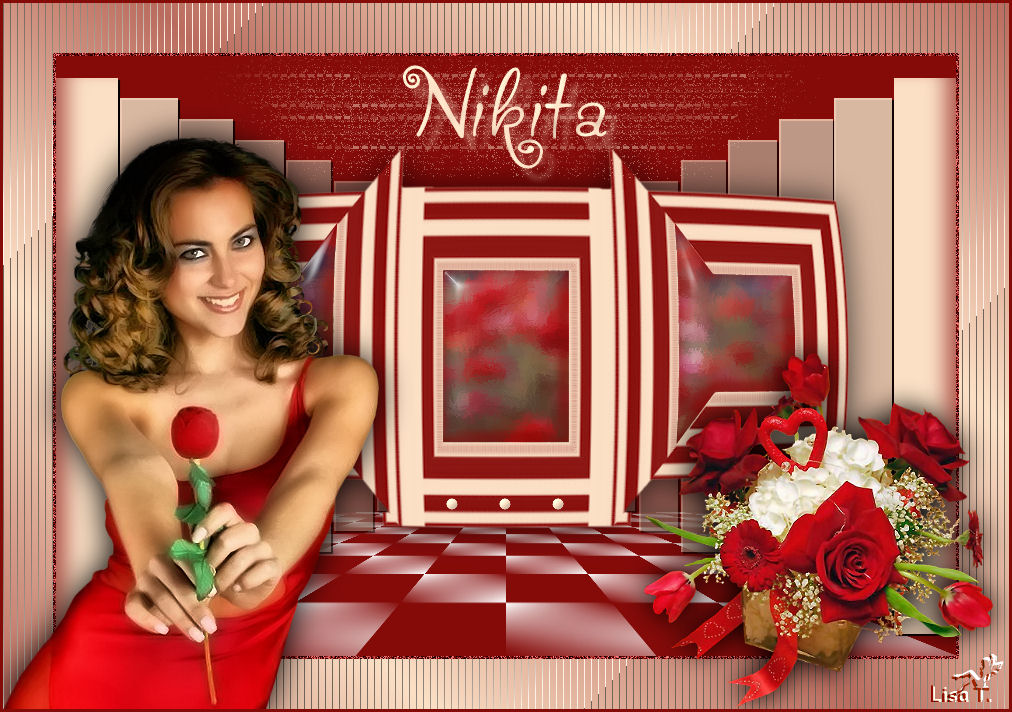
Nikita

You will find the original tutorial here :

Animabelle dédicated this tutorial to her friend Nikita

This tutorial is a personal creation.
Any resemblance with another one would be only pure coincidence.
It is stricly forbidden to modify images, to change their name or take off the watermarks,
To present them on your sites or blog,
To share them in groups,
to make a bank of images, or to use them on lucrative purposes.

Thank you to respect Animabelle’s work and the tubers work.
Don’t hesitate to warn her if you have any trouble with this tutorial.


Material
2 tubes (not provided) and 1 mask by Nikita
4 selections
1 preset

Animabelle does not provide the tubes to prevent the theft
for this tutorial she used a tube by Nicky and a mist by herself
she also used a decoration corner tube
Animabelle’s important note
Tubers have been warned that disrespectful and dishonest bloggers come steeling our tubes
they grab them into the folders of material we use to provide for our tutorials.
These people rename and convert the tubes to png type,
and then they offer them for download in their blogs, pretending they have done the work.

To protect my work, I am therefore forced to no longer provide my tubes with the material.
Honest people will understand my way of doing, I hope.
I thank them for their understanding.
Very important Tip:
never take your tubes on these blogs, because most of the time all of these tubes are stolen tubes.
Always make sure that the tubes you take have been signed by their authors.
Thank you.
|
Filters used
Mura’s Meister
Mura’s Seamless
Eye Candy5 Impact (preset provided)
Toadies
Tramage

“Renée Graphisme” filters, with her kind permission


translator’s note : I use PSP17, but this tutorial can be realized with another version.
I translate exactly the indications of Animabelle
I used my own tubes and colors to create my tag presented at the end of this translation

Colors used

Don't hesitate to change the colors and the blend mode of the layers, and the shadows,
according to your tubes and images.

Important
Open all images in PSP, duplicate them and close the originals.
work with the copies
Never work with original images.
Double click on the presets
and they will settle down automatically in the right plugin
copy/paste the selections into the special folder “selections” of “My PSP files”

use the pencil to follow the steps
left click to grab it


Execution
Step 1
Step 1
in the materials palette,
set color 1 as the foreground color, and color 2 as background color
open a new transparent background layer : 900 * 600 pixels
flood fill with color 1
layers/new raster layer
activate the selection tool/rectangle/custom selection
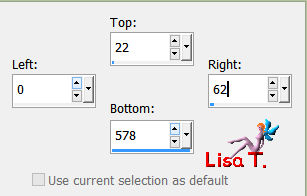
flood fill the selection with color 2
selections/select none
effects/plugins/Mura’s Meister/Copies

Step 2
with the magic wand (tolerance and feather set to 0, enable « inside »)
select the second rectangle on the left, (number 1 on the screenshot)
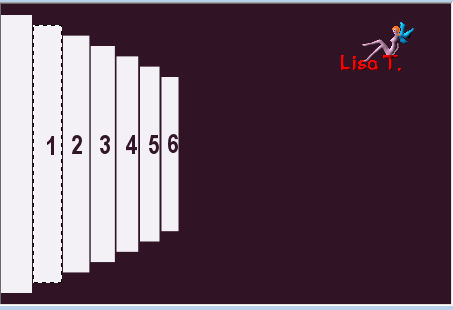
press the delete key of your keyboard
selections/promote selection to layer
flood fill with color 2, opacity of the layer : 90%
selections/select none
layers/merge/merge down
Step 3
with the magic wand, select the rectangle number 2
follow step 2 but set the opacity on 80%
do the same work for all the bars remaining
and lower the opacity of 10 each time
bar 3 : 70%
bar 4 : 60%
bar 5 : 50%
bar 6 : 40%
selections/select none
Step 4
layers/duplicate
image/mirror/mirror horizontal - layers/merge/merge down
effects/3D effects/drop shadow : 2 / 2 / 100 / 1 / black
Step 5
activate raster 1
layers/duplicate
effects/plugins/Mura’s Seamless/Checks with Gradation
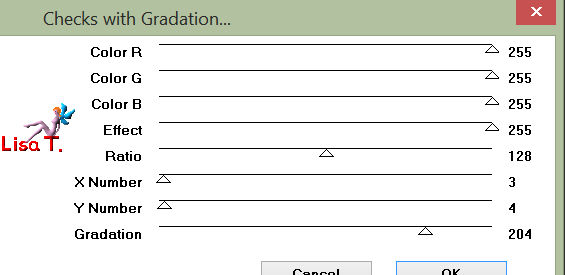
effects/plugins/Mura’s Meister/Perspective Tiling
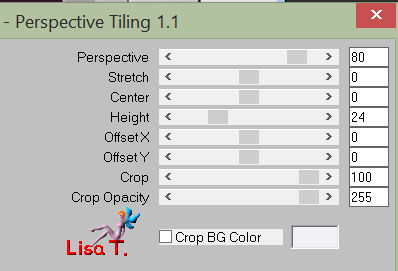
effects/3D effects/drop shadow : 2 / 2 / 50 / 20 / black
Step 6
activate the upper layer
layers/new raster layer
flood fill with color 2
layers/new raster layer
flood fill with color 1
layers/new mask layer/from image
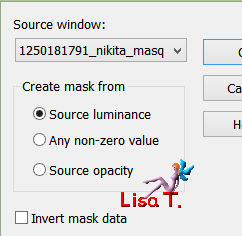
layers/merge/merge group
layers/merge/merge down
Step 7
selections/load-save selection/load selection from disk
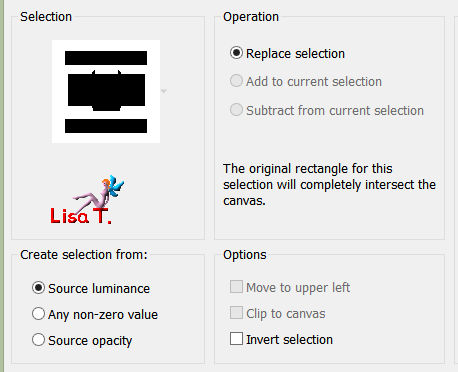
find selection « nikita2_animabelle »
press the delete key of your keyboard
selections/modify/feather/3
press 5 times the delete key of your keyboard
selections/select none
Step 8
image/resize : 75% (disable « resize all layers »)
effects/geometric effects/spherize/60/ellipse
effects/3D effects/drop shadow : 0 / 0 / 70 / 50 / black
Step 9
selections/load-save selection/load selection from disk
find the selection « nikita1_animabelle »
flood fill with color 1
copy/paste the landscape tube (1293040148_paysages_nikita) as new layer
place it in the selection with the Move Tool
selections/invert
press the delete key of your keyboard
selections/invert
effects/art media effects/brushs trokes
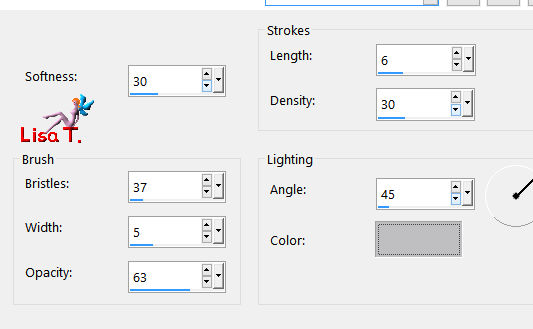
Step 10
effects/plugins/Alien Skin/Eye Candy 5 Impact/Bevel
select the preset « Nikita_bevel » provided in the material
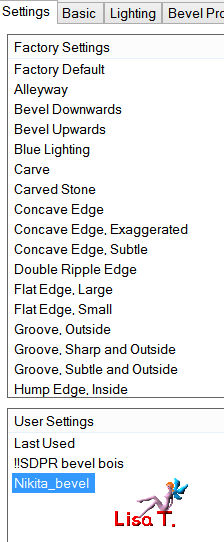
according to your colors, change this (dark color)
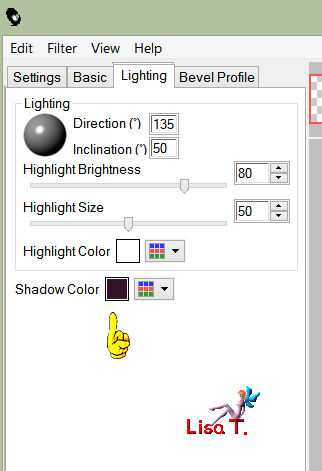
layers/merge/merge down
selections/select none
Step 11
layers/new raster layer
selections/load-save selection/load selection from disk
find the selection « nikita3_animabelle »
flood fill with color 2
effects/plugins/Toadies/Weaver

selections/select none
effects/texture effects/mosaic-antique
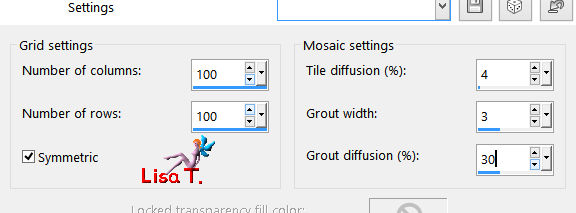
in the layers palette, set the opacity on 50%
Step 12
layers/new raster layer
selections/load-save selection/load selection from disk
find the selection « nikita4_animabelle »
flood fill with color 2
effects/3D effects/inner bevel
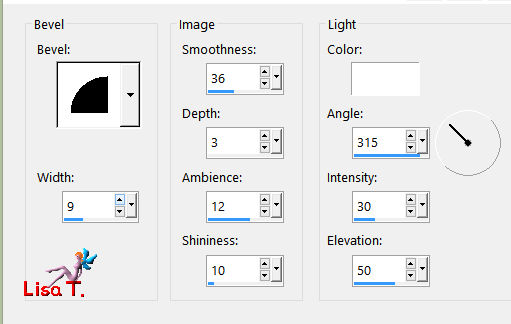
selections/select none
Step 13
image/add borders/3 pixels/contrasting color (red, or yellow...)
select this border with the magic wand (enable « inside »)
flood fill with color 1
adjust/add-remove noise/add noise/uniform/100/enable « monochrome »
selections/select none
Step 14
image/add borders/50 pixels color 2
select this border with the magic wand
selections/promote selection to layer
flood fill with a linear gradient /45 /3
effects/plugins/Tramage/Tow The Line

set the opacity of the layer on 55%
layers/merge/merge all (flatten)
Step 15
selections/select all
selections/modify/contract : 53 pixels
effects/3D effects/cutout
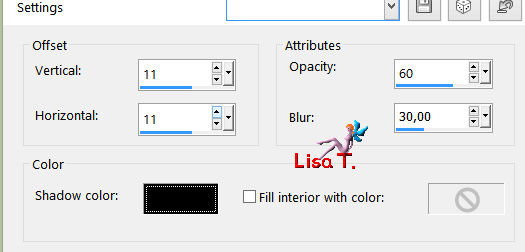
according to your colors, choose your dark color (or black) for the shadow color
apply the same effect again but with (-11) / (-11)
selections/select none
step 16
copy and paste the tube « 13458166638_femmes » as new layer
erase the watermark with the eraser tool
place it bottom left as on final result
effects/3D effects/drop shadow : 0 / 0 / 100 / 70 / black
step 17
copy and paste as new layer the tube of the flowers
image/resize to 90% (disable « resize all layers »)
with the move tool, place it bottom right as on final result
adjust/sharpness/sharpen
layers/duplicate
layers/merge/merge down
Step 18
With a police of your choice, write the word « Nikita » (or other)
Animabelle used the font « akafrivolity » (72 pixels, color 2)
drop a light shadow.
Animabelle chose : 11 / 11 / 35 / 8 / white
Step 19
image/add borders/3 pixels/color 1
select this border wit the magic wand
adjust/add-remove noise/add noise/uniform/100 (enable « monochrome »)
selections/select none
Sign and save as... type JPEG, resize if necessary

Don't hesitate to write to Animabelle if you have any trouble with her tutorial
To be informed about her new tutorials, join her NewsLetter

If you created a tag with her tutorial and wish it to be shown,
send it to Animabelle !
It will be her pleasure to add it to the gallery at the end of the tutorial


My version with my tubes
Back to the board of Animabelle's tutorials


|