
original tutorial in french. Click on MeryDesig’s
banner

Conditions of use of the material provided
It is forbidden to modifiy, change the name, take off the
watermarks or alter the tubes.
It is forbidden to share them in groups or offer them on
your site, blog or forum.
If you want to use them to create a tutorial, you must
ask the permission of the authors.
MaryDesig has the permission of the creators to use their
tubes, masks and decorations
Thank you to all of them for their work
Without their beautiful creations, no tutorials could be
written.

translator’s note : Merydesig
uses PSPX9 and I use PSP2019
but you can follow this tutorial with any other version
of PSP
according to the version you use, the results might be
slightly differents
Merydesig uses Animation Shop to create her animations
I use Ulead Gif Animator

Hints & Tips
TIP 1 -> if you don’t
want to install a font -->
open it in a software as « Nexus Font » (or
other font viewer software of you choice)
as long as both windows are opened (software and font),
your font will be available in your PSP
TIP 2 -> from PSPX4,
in the later versions of PSP the functions « Mirror » and « Flip » have
been replaced by -->
« Mirror » --> image => mirror => mirror horizontal
« Flip » --> image => mirror => mirror vertical

Material
selection - mask - tubes - preset

open all tubes and duplicate them (window
-> duplicate)
Close original tubes and work with the copies (to preserve
the originals)
don’t forget to erase tubes’ watermarks before
using them
open a gold tile (« dorado » or other)
and minimize to tray. You will use it as a pattern (without
installation)
open mask and minimize to tray
place the selection into the folder « selections » of
Corel PSP general folder
double click on the preset to install, or import

Plugins
Alien Skin Eye Candy 5-Impact / Glass
Simple
ScreenWorks
Animation Shop for the animation

  
Use the pencil to follow the steps
hold down left click to grab and move it
 |
  
Realization
1
oepn a new transparent image 950 * 700 px
selections => select all
copy / paste into selection « image fond »
selections => select none
2
adjust => blur => gaussian blur

3
effects => Simple => Blintz

4
effects => ScreeWorks => Point Array

5
layers => new raster layer
flood fill with color #2f2012
6
selections => load-save selection => from disk => selection « MD_nuevo » => tick « invert
selection »

DELETE on your keyboard
7
selections => select none
8
effects => Alien Skin Eye Candy 5 Impact / Glass => use
the preset « nature » provided
9
layers => new layer
flood fill with a gold tile of your choice
10
selections => load-save selection => from disk => selection « MD_nuevo » => tick « invert
selection »
DELETE
11
selections => select none
12
selections => select all
selections => float - selections => defloat
selections => contact => 3 px
DELETE
13
selections => select none
layers => duplicate
rename the two layers « noise 1 » and « noise
2 » (from bottom to top)
highlight « noise 1 » => add-remove
noise => add noise

highlight « noise 2 » => add-remove noise
=> add noise => change 40 by 60
close the eye of « noise 2 »
14
enable the Free Hand selection / point to point / mode « replace »
select inside the first rectangle on the left
copy / paste nto selection « image 1 » on
both layers « noise 1 » and « noise «2 »
15
select inside the midlle rectangle
copy / paste nto selection « image 2 » on both
layers « noise 1 » and « noise «2 »
16
select inside the third rectangle on the right
copy / paste nto selection « image 3 » on both
layers « noise 1 » and « noise «2 »
highlight top layer
17
enalbe the Smart Selection tool with the following settings

select trickles of water in the 3 images
(see example)
selections => promote selection to layer
layers => duplicate
rename these two layers « water 1 » and « water
2 » (from bottom to top)
18
highlight « water 1 » => add-remove
noise => same settings as in step 13=> 40%
highlight « water 2 » => add-remove noise
=> same settings as in step 13=> 60%
close the eye of « water 2 » and
highlight this layer (it is the top layer)
19
copy / paste as new layer « décor_4 »
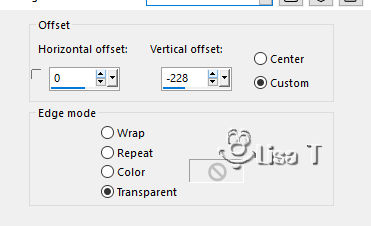
effects => image effects => offset

20
copy / paste as new layer « décor_5 »
effects => image effects => offset

21
copy / paste as new layer « décor_2 »
effects => image effects => offset

22
copy / paste as new layer « décor_3 »
effects => image effects => offset

23
copy / paste as new layer « décor_1 »
effects => image effects => offset

24
layers => new raster layer => apply your watermark
(or signature)
your layers palette looks like this

25 - Animation
edit => copy special => copy merged
open Animation Shop => paste as new animation
back into PSP => close the eyes of « noise
1 » and « water 1 »
open the eyes of « noise 2 » and « water
2 »
edit => copy special => copy merged
back into Animation Shop => paste after current frame
view your animation => image property : 10
file => save as... type .gif
  
your tag is finished
Thank you for following this tutorial
My tag with personal photos (This beautiful place is located
on the French side of the the Pyrenees)


created by Lena by Lena


if you have any problem with this translation,
or notice any error, mistake or oversight
Don’t hesitate to write to me, I’ll fix the
problem as quickly as I can


Back to the board of MeryDesig’s tutorials
board 1 board 2 board 2 board
3 board
3


|