

original tutorial in french. Click on MeryDesig’s banner

Conditions of use of the material provided
It is forbidden to modifiy, change the name, take off the watermarks or alter the tubes.
It is forbidden to share them in groups or offer them on your site, blog or forum.
If you want to use them to create a tutorial, you must ask the permission of the authors.
MaryDesig has the permission of the creators to use their tubes, masks and decorations
Thank you to all of them for their work
Without their beautiful creations, no tutorials could be written.

translator’s note : Merydesig uses PSPX9 and I use PSP2020 Ultimate
but you can follow this tutorial with any other version of PSP
according to the version you use, the results might be slightly differents
Merydesig uses Animation Shop to create her animations
I use Ulead Gif Animator
Hints & Tips
TIP 1 -> if you don’t want to install a font -->
open it in a software as « Nexus Font » (or other font viewer software of you choice)
as long as both windows are opened (software and font), your font will be available in your PSP
TIP 2 -> from PSPX4, in the later versions of PSP the functions « Mirror » and « Flip » have been replaced by -->
« Mirror » --> image => mirror => mirror horizontal
« Flip » --> image => mirror => mirror vertical
Supplies
tubes - gradient - preset

open all tubes and duplicate them (window -> duplicate)
Close original tubes and work with the copies (to preserve the originals)
don’t forget to erase tubes’ watermarks before using them
open the gold tile (« or » or other) and minimize to tray. You will use it as a pattern (without installation)
double click on the preset to install, or import
place the gradient into the folder « gradients » of Corel PSP general folder
Plugins
Unlimited 2
Toadies
AP01_complet
Animation Shop to create the animation

Use the pencil to mark your place
along the way
hold down left click to grab and move it
 |
Realization
1
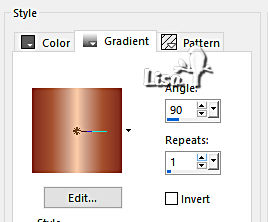
open a new image => transparent => 950 * 700 px
flood fill layer with the gradient provided (defautlt settings)
2
effects => plugins => AP Lines => Lines Silverlining
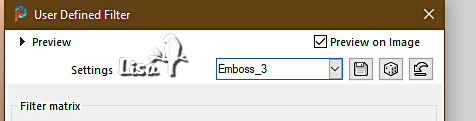
3
effects => plugins => User Defined Filter => Emboss 3
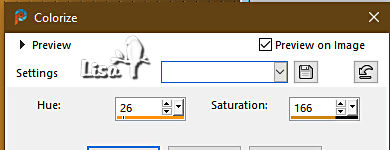
4
adjust => hue and saturation => colorize
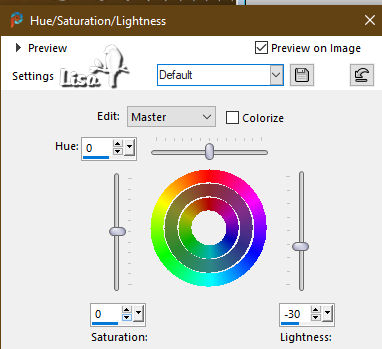
5
adjust => hue and saturation => hue/saturation/lightness
6
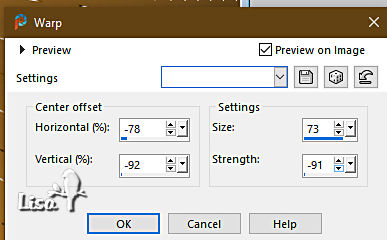
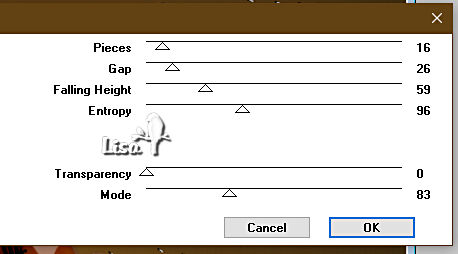
effects => distortion effects => warp
7
layers => new raster layer
copy / paste « Steam Memories Cluster 3 (2) » as new layer
image => resize => untick « resize all layers » => 70%
8
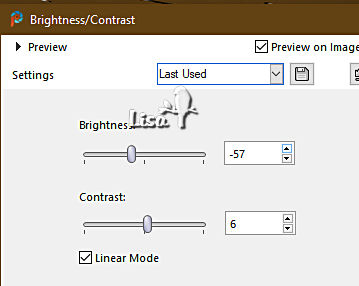
adjust => Brightness and Contrast => Brightness/Contrast
9
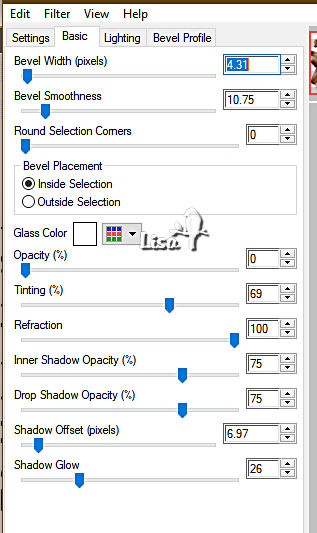
effects => plugins => Alien Skin Eye Candy 5 Impact / Glass => preset provided
TN => I changed the color to White, Merydesig set another color (orange)
11
layers => duplicate
effects => plugins => VM Distortion => Broken Mirror
layers => arrange => move down
12
work with this duplicated layer
selections => select all / selections => float / selections => defloat
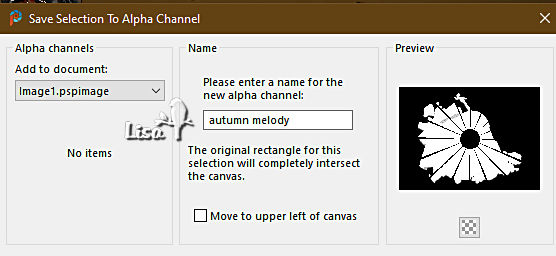
13
selections => save selection to Alpha Layer
name this selection
14
selections => select none
16
effects => plugins => Toadies => Blast’n Blur
17
selections => load-save selection => load selection => from alpha channel => choose selection created in step 13
18
selections => invert
hit the DELETE key of your keyboard
19
layers => new raster layer
flood fill selection with the « or » texture (angle 0 / scale 100)
selections => invert
20
selections => modify => expand => 2 px
Translator’s note => I asked for 3 px on my personal version

21
selections => invert
hit the DELETE key of your keyboard
selections => select none
22
blend mode of the layer : Luminance (Legacy)
adjust => sharpness => sharpen
23
layers => duplicate
rename layers « outlines 1 » and « outlines 2 » from bottom to top in the layers stack
highlight « outlines 1 »
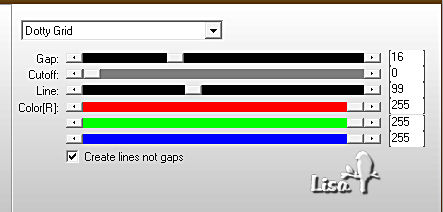
adjust => add-remove noise => add noise
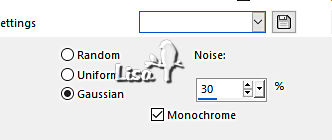
highlight « outlines 2 »
adjust => add-remove noise => add noise => 40
close the eye of the layer
24
copy / paste « TheMagicofAutumn » as new layer
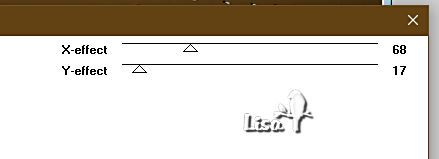
effects => image effects => offset => H : 0 / V : 237 / tick « custom » and « transparent»
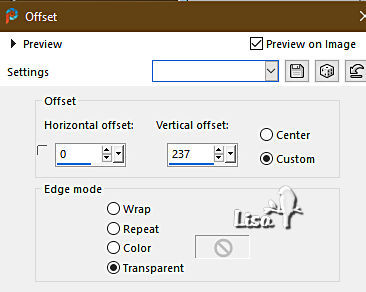
25
copy / paste « decor_notes » as new layer
effects => image effects => offset => H : 0 / V : -211 / tick « custom » and « transparent»

26
copy / paste «MD_cadre » as new layer
blend mode of the layer : Luminance (Legacy)
27
layers => duplicate
rename layers « frame 1 » and « frame 2 » from bottom to top
highlight « frame 1 »
adjust => add-remove noise => add noise => 30 (same settings as in step 23)
highlight « frame 2 »
adjust => add-remove noise => add noise => 40
close the eye of the layer
28
apply your watermark or signature
write your licence number if you used a licenced tube
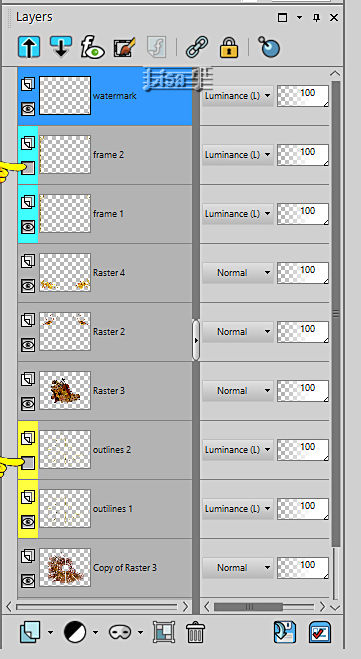
your layers palette looks like this
29
edit => copy special => copy merged
open Animation Shop => paste as new animation
back into PSP
close the eyes of « outlines 1 » and « frame 1 »
open the eyes of « outlines 2 » and « frame 2 »
edit => copy special => copy merged
back into Animation Shop => paste after current frame
save your work as... type .gif
your tag is finished
Thank you for following this tutorial
My tag with personal tube (couple n°29)

if you have any problem with this translation, or notice any error, mistake or oversight
Don’t hesitate to write to me, I’ll fix the problem as quickly as I can

Back to the board of MeryDesig’s * tutorials / 30 tutorials on each board
board 1 board 2 board 3 board 4 board 5 board 2 board 3 board 4 board 5


|