

original tutorial in french. Click on MeryDesig’s banner

Conditions of use of the material provided
It is forbidden to modifiy, change the name, take off the watermarks or alter the tubes.
It is forbidden to share them in groups or offer them on your site, blog or forum.
If you want to use them to create a tutorial, you must ask the permission of the authors.
MaryDesig has the permission of the creators to use their tubes, masks and decorations
Thank you to all of them for their work
Without their beautiful creations, no tutorials could be written.

translator’s note : Merydesig uses PSPX9 and I use PSP2020 Ultimate
but you can follow this tutorial with any other version of PSP
according to the version you use, the results might be slightly differents
Merydesig uses Animation Shop to create her animations
I use Ulead Gif Animator

Hints & Tips
TIP 1 -> if you don’t want to install a font -->
open it in a software as « Nexus Font » (or other font viewer software of you choice)
as long as both windows are opened (software and font), your font will be available in your PSP
TIP 2 -> from PSPX4, in the later versions of PSP the functions « Mirror » and « Flip » have been replaced by -->
« Mirror » --> image => mirror => mirror horizontal
« Flip » --> image => mirror => mirror vertical

Supplies
tubes and images

open all tubes and duplicate them (window -> duplicate)
Close original tubes and work with the copies (to preserve the originals)
don’t forget to erase tubes’ watermarks before using them

Plugins
Unlimited 2
Xenofex
Simple


Use the pencil to mark your place
along the way
hold down left click to grab and move it
 |

Realization
1
open a new image => transparent => 950 * 700 px
selections => select all
copy / paste « bee_autumncomes_p18 » into selection
selections => select none
2
effects => texture effects => blinds
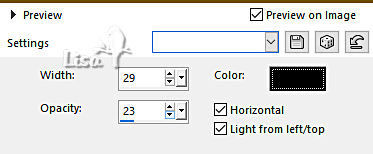
3
effects => geometric effects => Circle
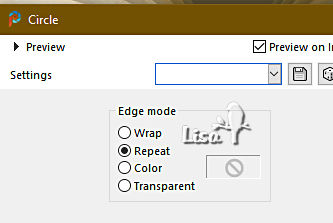
4
effects => image effects => seamless tiling
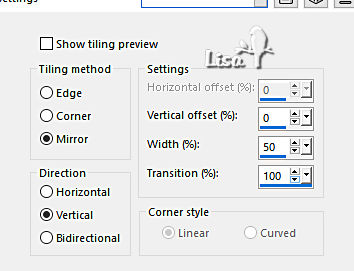
5
effects => plugins => Unlimited 2 => Buttons & Frames /3D Glass Frame 2
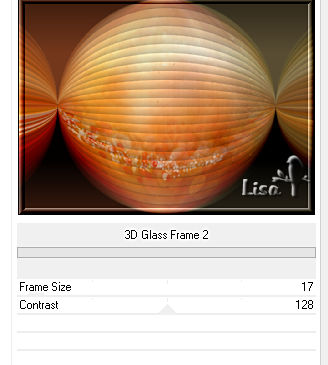
6
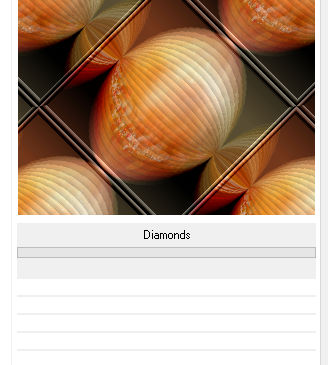
effects => plugins => Unlimited 2 => Simple => Diamonds
7
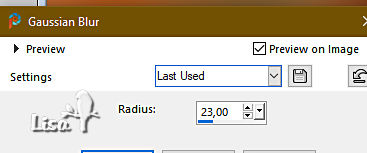
adjust => blur => gaussian blur => 23
8
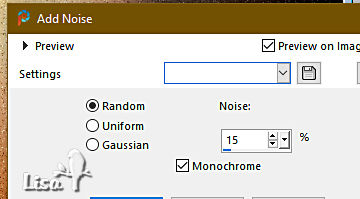
adjust => add-remove noise => add noise
9
effects => plugins => Unlimited 2 => Buttons & Frames /3D Glass Frame 2 / same settings as previously
10
layers => new raster layer
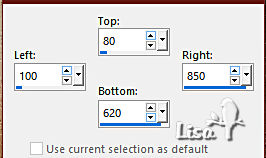
enable the Selection tool / custom selection
11
copy / paste « bee_autumncomes_p18 » into selection
effects => plugins => Unlimited 2 => Buttons & Frames /3D Glass Frame 2 / same settings as previously
12
selections => select none
13
effects => reflection effects => kaleidoscope
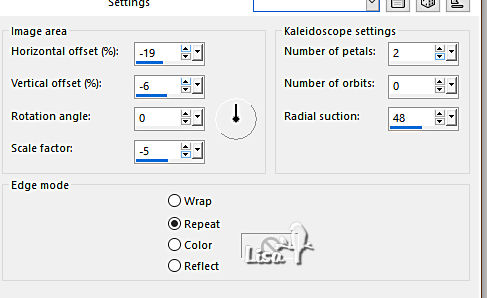
14
copy / paste the character misted tube as new layer
15
copy / paste « decoration 1 » as new layer
translator’s note => optional => drop a shadow 5 / 4 / 69 / 8
16
copy / paste « decoration 2 » as new layer
translator’s note => optional => drop a shadow 5 / 4 / 69 / 8
17
layers => duplicate
rename the layers « decoration 1 » and « decoration 2 » from bottom to top in the layers stack
highlight « decoration 1 »
adjust => add-remove noise => add noise
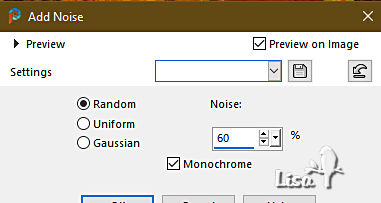
highlight « decoration 2 »
adjust => add-remove noise => add noise => change 60 by 40
close the eye of « decoration 2 »
make sure top layer is highlighted before going on
18
copy / paste « corners » as new layer
translator’s note => optional => drop a shadow 5 / 4 / 69 / 8
19
layers => duplicate
rename the layers « corners 1 » and « corners 2 » from bottom to top in the layers stack
highlight « corners 1 »
effects => plugins => Xenofex 2 / Constellation
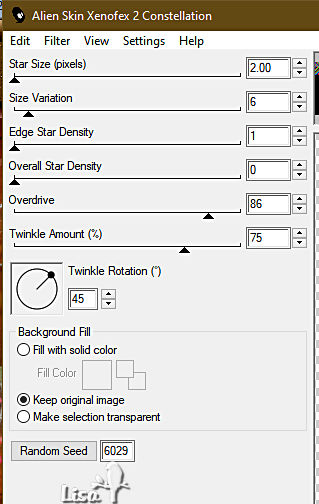
20
highlight « corners 2 »
effects => plugins => Xenofex 2 / Constellation => click on « random seed » at the bottom
21
close the eye of « corners 2 »
make sure top layer is highlighted before going on
22
apply your watermark or signature
write your licence number if you used a licenced tube
your layers palette looks like this (the screen capture below has been done with my personal version)

23
Animation
edit => copy special => copy merged
open Animation Shop => paste as new animation
back into PSP
close the eyes of « decoration 1 » and « corners 1 »
open the eyes of « decoration 2 » and « corners 2 »
edit => copy special => copy merged
back into Animation Shop => paste after current frame
animation => image properties => 10
save your work as... type .gif

your tag is finished
Thank you for following this tutorial
My tag with my misted image and corners by Pretty Ju


if you have any problem with this translation, or notice any error, mistake or oversight
Don’t hesitate to write to me, I’ll fix the problem as quickly as I can


Back to the board of MeryDesig’s tutorials
board 1 board 2 board 2 board 3 board 3 board 4 board 4 board 5 board 5


|