Maryne
I'm member of Tutorial Writers Inc

original can be found Here

Material
The selections must be recorded in the corresponding files of My Psp Files
Open the tubes and reduce them
if you change the tube of the lady, choose a multi colored tube, preferably in sitting position

Thank you to the tubers : Créaline - A.Ridzi
Filters used
Simple
BKG Kaleidoscope
Plugin Galaxy
Factory J
L&K
Toadies
Mura’s Meister
Foto Frame
Mehdi
VM Experimental
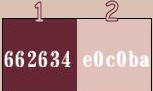
Colors palette
Use the paintbrush to follow the lines
Grab it with the left click of your mouse
 |
Realization
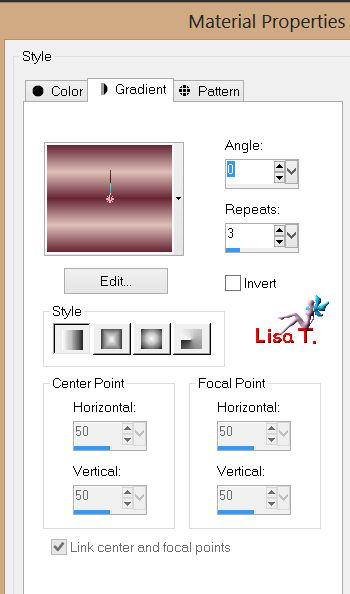
prepare a linear gradient with 2 colors chosen in the tube of the character
put the dark color as foreground and the light color as background
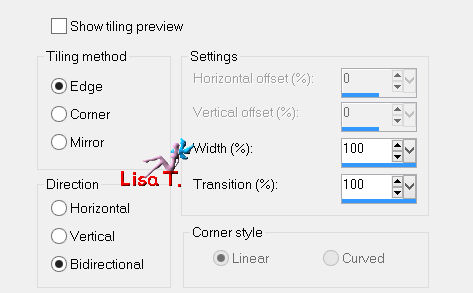
and configurate this way
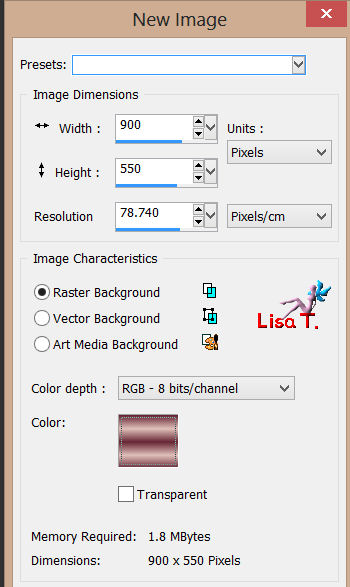
file/ new / 900 X 550 pixels
and click on the case “color” to find your gradient
selections/select all
copy the tube “woman_720_bycrealinejuillet2012”/paste into selection and select none
effects/image effects/semaless tiling (default settings)
adjuste/blur/gaussian blur : 40
effects/plugins/Mehdi/Sorting Tiles

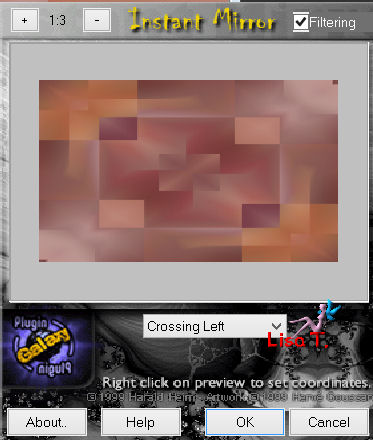
effects/plugins/Galaxy/Instant Mirror/Crossing Left
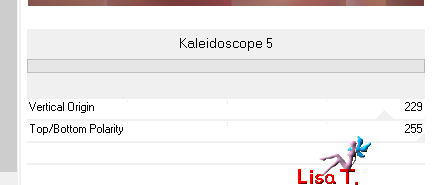
effects/plugins/BKG Kaleidoscope/Kaleidoscope 5
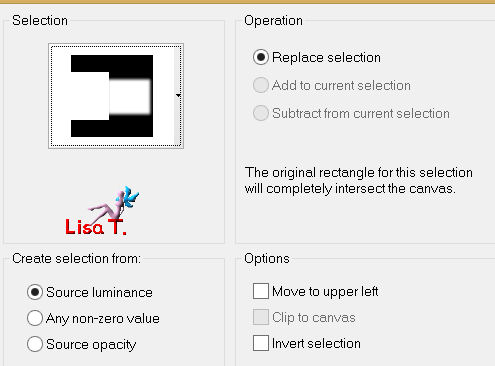
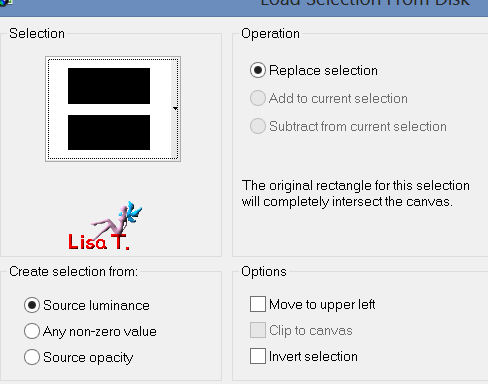
selections/load-save selection/load selection from disk : “Vivi 329”
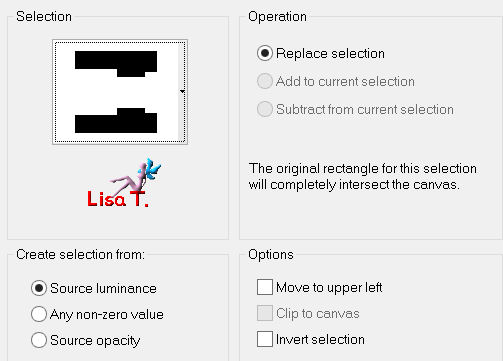
selections/promote selection to layer
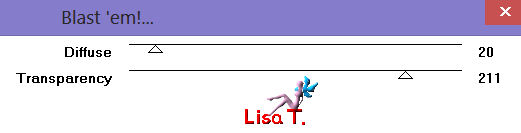
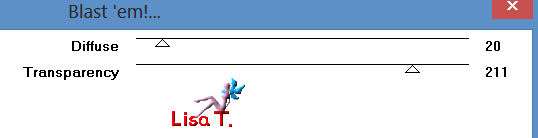
effects/plugins/Toadies/Blast’ Em!
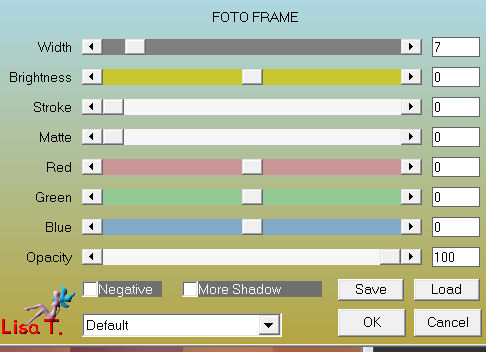
effects/plugins/AAA Frames/Foto Frame
selections/modify/contract : 15 pixels
effects/3D effects/buttonize (choose your dark color or white as you like)
selections/select none
layers/new raster layerselections/load-save selection/load selection from disk : “Vivi 330”
activate the tube “A.Ridzi 97”, copy and paste into selection
in the layers palette, blend mode : “Luminance” or “Luminance (Legacy)”
opacity : between 55 and 65%
layers/merge/merge down
effects/3D effects/drop shadow : 0 / 0 / 60 / 30 / black
selections/select none
effects/3D effects/drop shadow as before
activate the background layer (raster1)
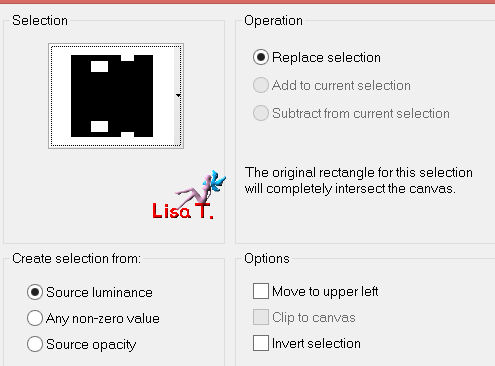
selections/load-save selection/load selection from disk : “Vivi 331”
selections/promote selection to layer and select none
layers/duplicate
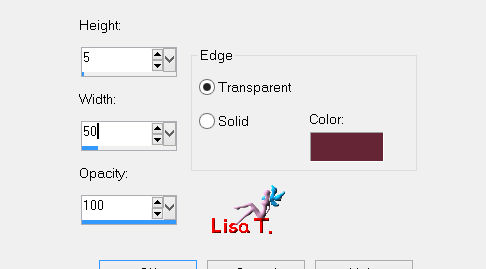
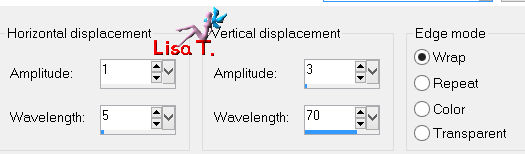
effects/distortion effects/wind/ : 100 from right
effects/distortion effects/wind/ : 100 from left
layers/merge/merge down
effects/plugins/filter Factory Gallery J/Drink to Me : 15
effects/distortion effects/ wave
in the layers palette, blend mode “lighten more “ (or other), opacity : 80%
effects/3D effects/drop shadow : 0 / 0 / 60 / 30 / white
activate the background layer (raster 1)
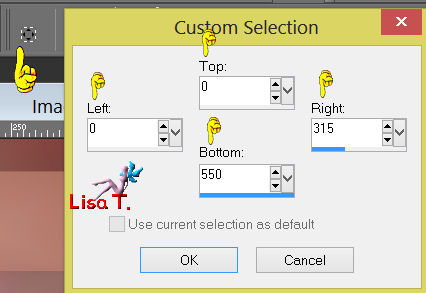
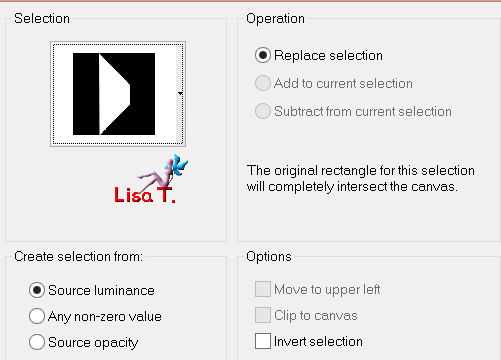
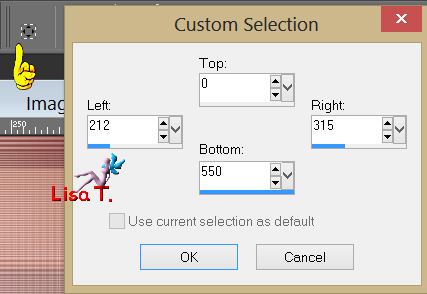
selection tool/rectangle/custom selection
selections/promote selection to layer
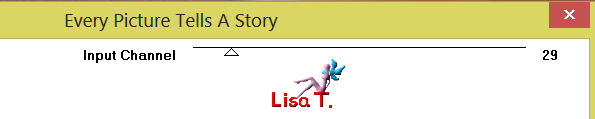
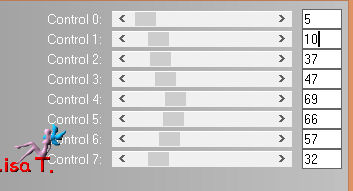
effects/plugins/VM Experimental/Every Picture Tells a Story
layers palette : blend mode : Screen, opacity : 100%
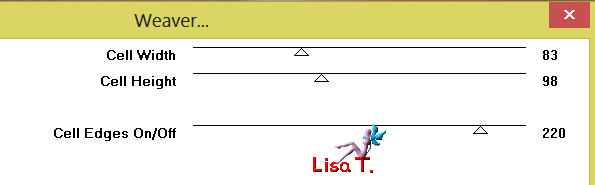
effects/plugins/Toadies/Weaver
effects/plugins/Simple/Pizza Slice Mirror, and select none
rename this layer “rectangle”
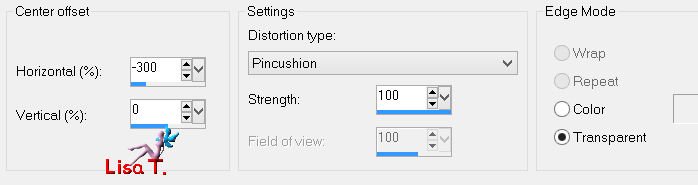
selections/load selection from disk : “Vivi 332”
effects/distortion effects/lens distortion
selections/promote selection to layer
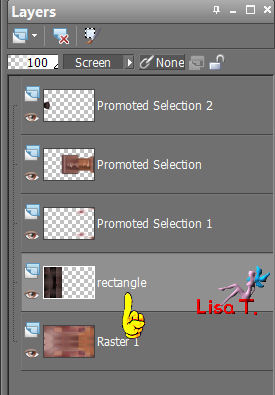
layers/arrange/bring to top
effects/geometric effects/circle (enable transparent)
image/mirror
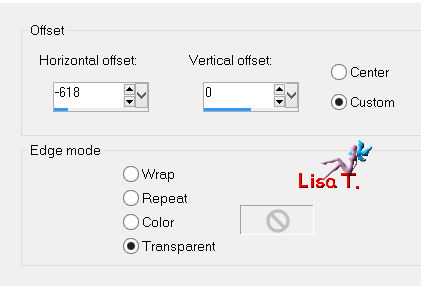
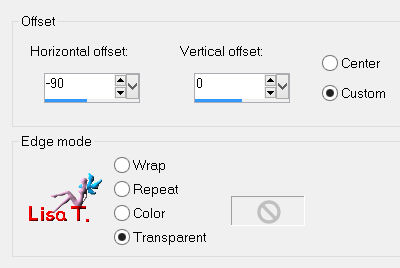
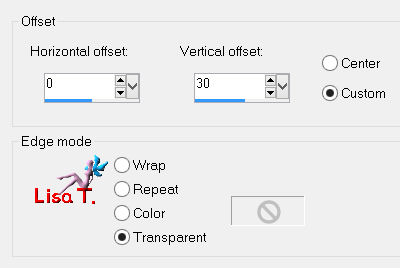
effects/image effects/offset
activate the layer “rectangle”
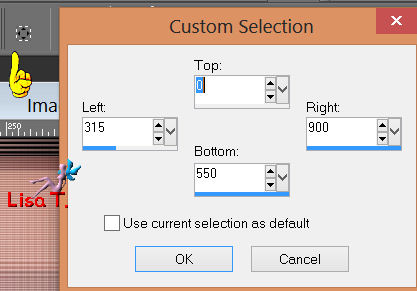
selection tool/rectangle/custom selection
selections/promote selection to layer
selections/modify/contract : 15 pixels, and press the delete key of your keyboard
selections/select none
effects/3D effects/drop shadow : 0 / 0 / 60 / 30 / black
activate the layer “Vivi 1”, copy and paste as a new layer
effects/image effects/offset

layers/arrange/move down
activate the background layer (raster 1)
selection tool/rectangle/custom selection
effects/plugins/L&K’s Zitah
effects/plugins/Simple/Blintz, and select none
layers/merge/merge visible
adjust/brightness and contrast/clarify : 3
activate the tube “Vivi 2”, copy and paste as a new layer
effects/image effects/offset
colorize with your colors, or set the blend mode of the layer to “Luminancy (Legacy)”
drop shadow as you like
layers/new raster layer
selections/select all
selections/modify/contract : 2 pixels
selections/invert
paint with the light color and select none
layers/merge/merge visible
layers/duplicate
image/resize to 85% (disable “resize all layers”)
effects/3D effects/drop shadow : 0 / 0 / 60 / 45 / black
effects/image effects/offset
activate the bottom layer
selections/load selection from disk : “Vivi 333”
selections/promote selection to layer
adjust/blur/gaussian blur : 13
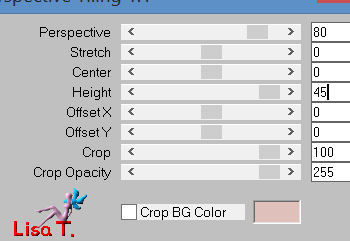
effects/plugins/Mura’s Meister/Perspective Tiling
selections/select none
effects/3D effects/drop shadow as before
activate the bottom layer (your background)
effects/plugins/Toadies/Blast’ Em!
effects/image effects/seamless tiling
layers/merge/merge all (flatten)
image/add borders/2 pixels/dark color
image/add borders/60 pixels/white
activate the tube of the woman “womanbycrealinejuillet2012” and resize to 80%
image/mirror
copy and paste as a new layer
move it as shown on the final result
adjust/shrapness/sharpen, and drop shadow as you like
activate the tube “logane fleur déco”, colorize it if necessary
image/mirror - resize it to 80%
copy and paste as a new layer and move it as shown
drop shadow as you like
image/add borders/2 pixels/dark color
don’t forget to sign
resize if necessary, save as... type JPEG

thank you to have realized this tutorial
If you want Vivi to expose your creation, don’t hesitate to send it to her
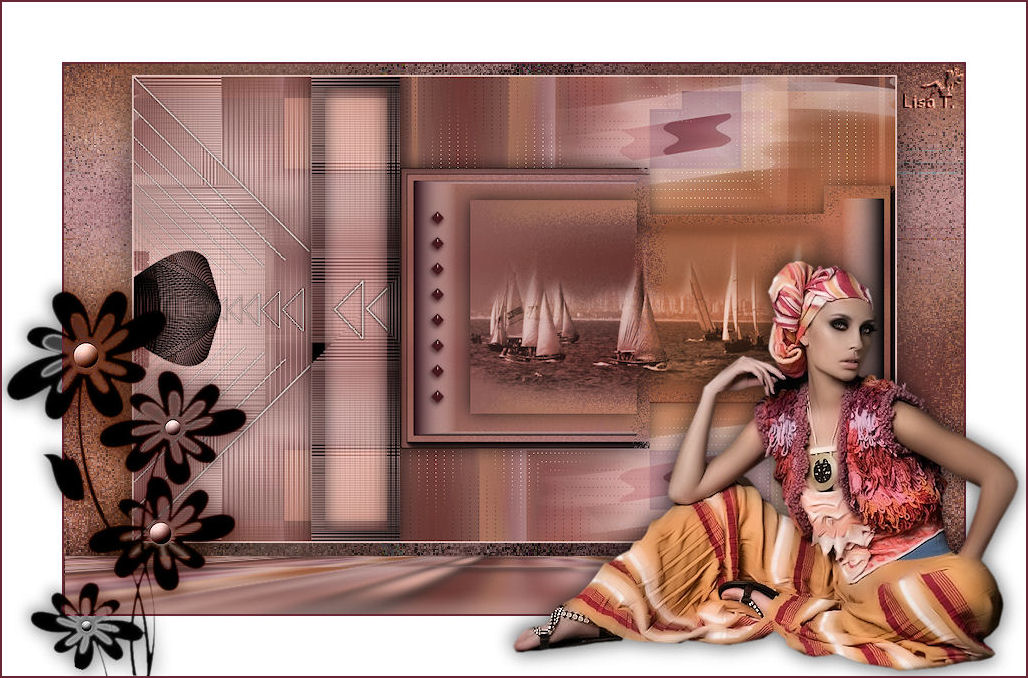
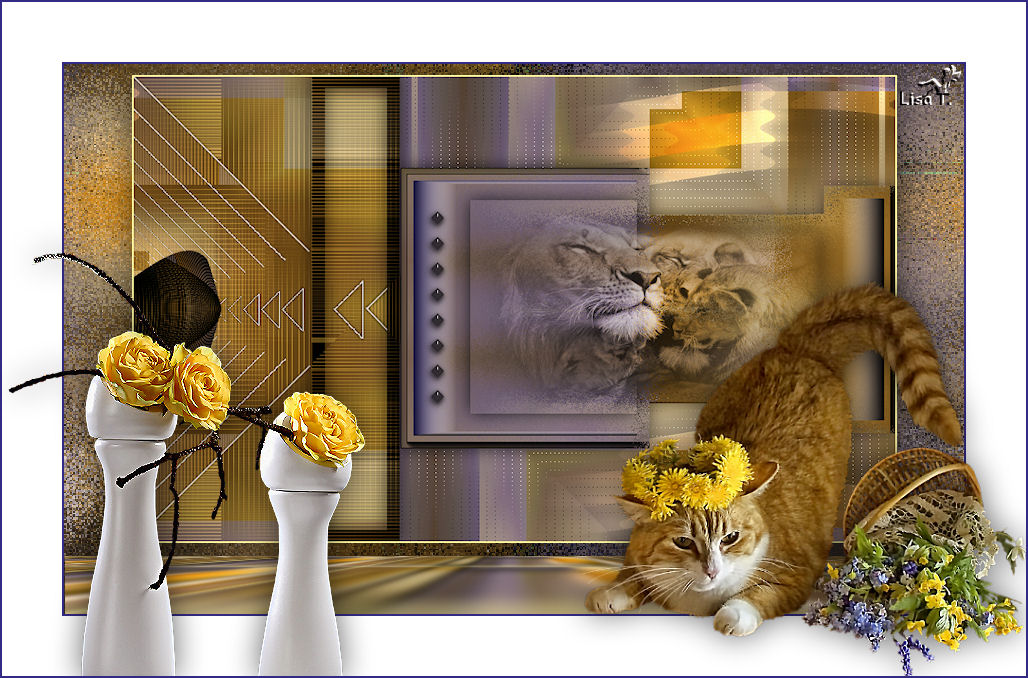
Here is my try with my tubes
Back to the boards of Vivi's tutorials
board 1 board 2 board 2

|