Marylou
original can be found Here

I am member of TWInc
My translations are protected against copy


Material
tubes
1 alpha layer “alpha_marylou”
open them in PSP, duplicate them, and minimize them
you will work with the copies
Thank you to the tubers : Verlaine - Talanat

Filters used
Background Designers IV
Mehdi
Mura’s Meister
VM Extravaganza
L&K
AP01 Innovations
Teph’s Tricks
Vanderlee:Unplugged X
Toadies
Simple
Graphic Plus
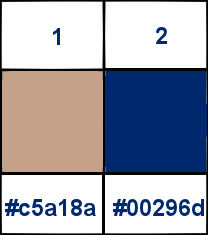
Colors palette
foreground color #c5a18a
background color #00296d
Use the paint brush to follow the steps
Left click to grab it

Realization
open the alpha layer “alpha_marylou”
window/duplicate, close the original, and work with the copy
prepare a sunburst gradient with 2 colors chosen in your main tube
foreground color -> light / background color -> dark
Vivi chose #c5a18a / color 1
and #00296d / color 2
use the settings below
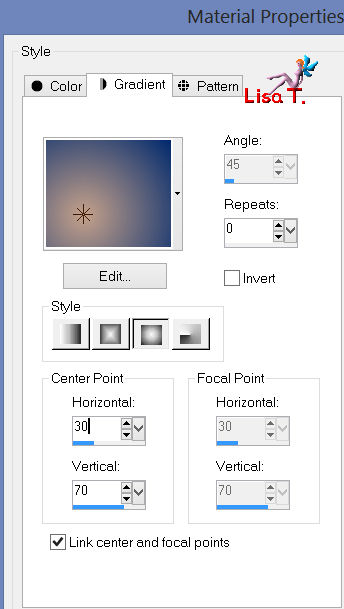
paint your layer with the gradient
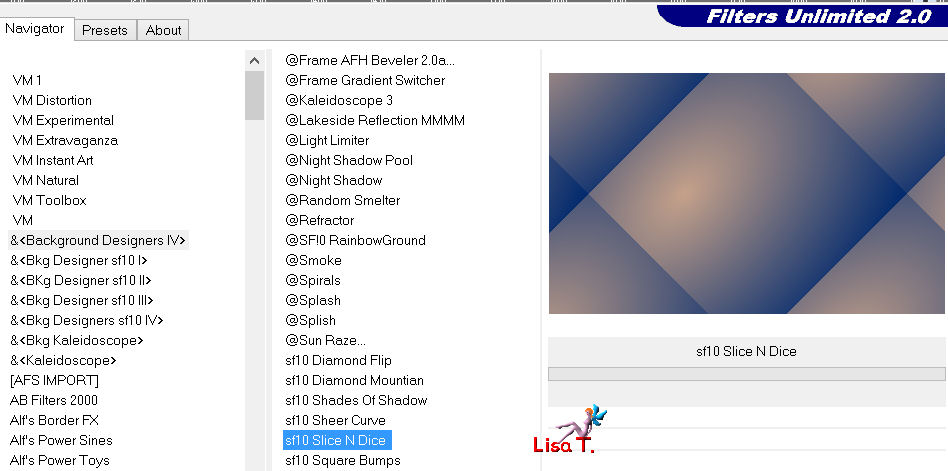
effects/plugins/Background Desingers IV/sf10 Slice N Dice
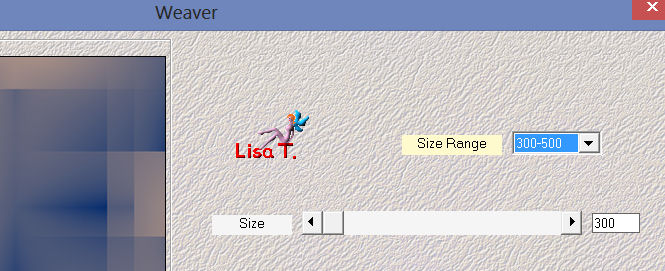
effects/plugins/Mehdi/Weaver
adjust/sharpness/sharpen more
activate the selection tool (S), custom selection

selections/promote selection to layer
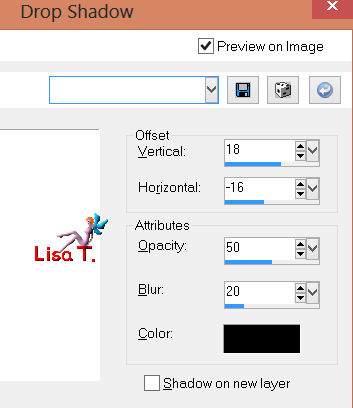
effects/3D effects/drop shadow/ 0 / 0 / 50 / 20 / black
selections/select none
effects/plugins/Teph’s Tricks/Slide Y 50%
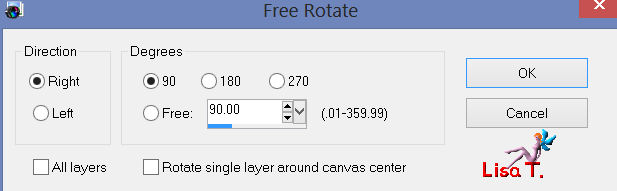
image/free rotate
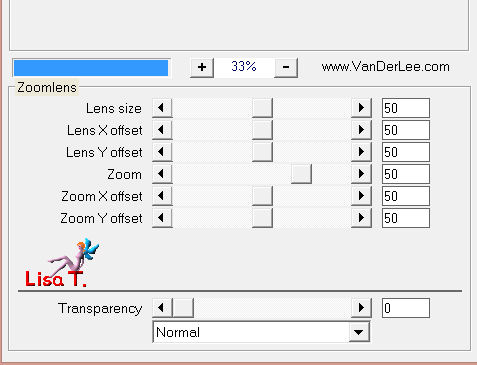
effects/plugins/VanderLee/Unplugged X/Zoomlens/default settings
effects/image effects/seamless tiling

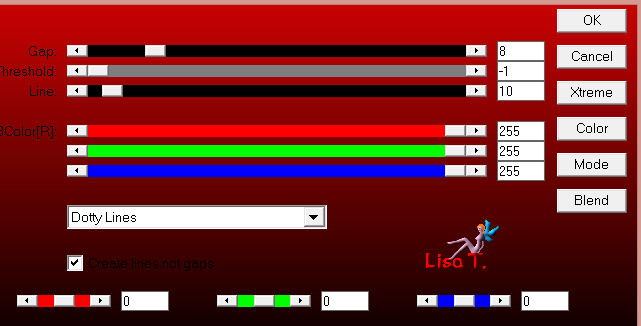
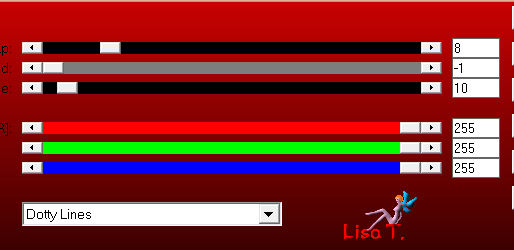
effects/plugins/AP01 Innovations/Lines SilverLining
in the layers palette, set the blend mode on “screen” or “hard light”
(or other according to your colors)
and the opacity on 50%
activate the bottom layer (raster 1)
selections/load-save selection/from alpha channel/selection #1
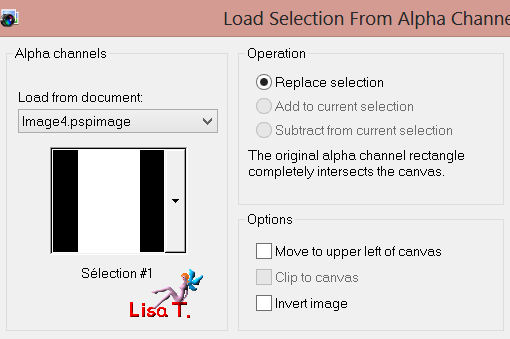
selections/promote selections to layer
selections/select none
effects/plugins/Toadies/Weaver/default settings

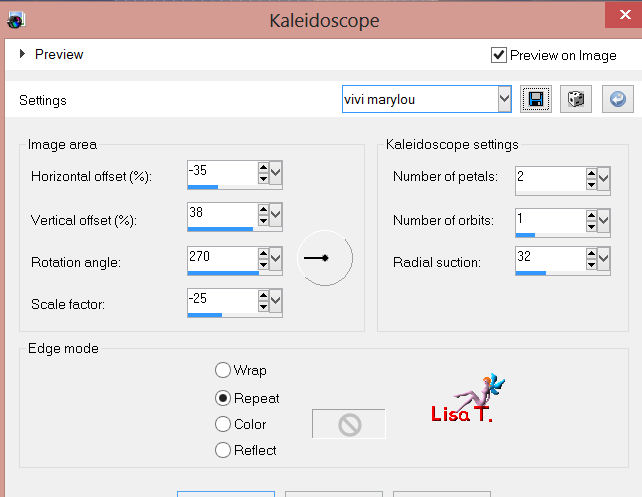
effects/reflections effects/kaleidoscope
effects/plugins/L&K/Adonis

in the layers palette, set the blend mode on “hard light” or “overlay” (or other)and the opacity on 80%
effects/3D effects/drop shadow/ 0 / 0 / 50 / 20 / black
selections/load-save selection/from alpha channel/selection #2
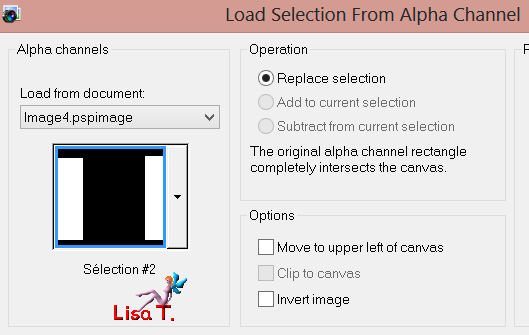
press the delete key of your keyboard (or do edit/cut) and select none
edit/copy special/copy merged
edit/paste as a new image
we wre going to work on this image
image/resize to 25% (check “resize all layers”)
selections/select all
layers/new raster layer/paint with color 2
selections/modify/contract/2 pixels
press the delete key of your keyboard and select none
layers/merge/merge down
edit/copy
back on your work, activate the upper layer of the stack – edit/paste as a new layer
image/resize to 85% (uncheck “resize all layers”)
effects/3D effects/drop shadow/ 0 / 0 / 50 / 20 / black
image/free rotate

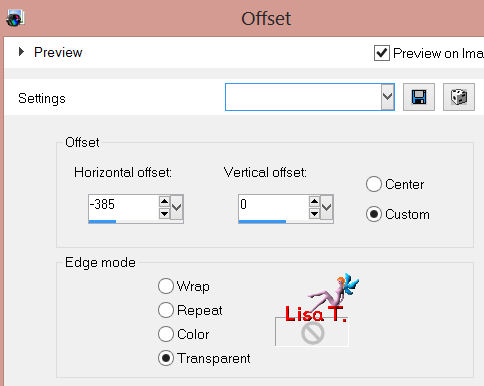
effects/image effects/offset
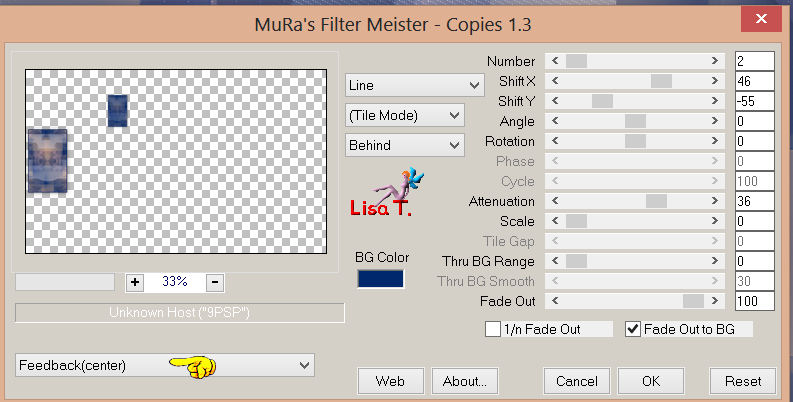
effects/plugins/Mura’s Meister/Copies
click on « reset » before applying the following preset
effects/plugins/Simple/Top Left Mirror
layers/duplicate
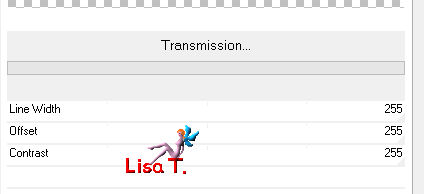
effects/plugins/VM Extravaganza/Transmission
don’t worry, this layer seems “empty” and almost “transparent”, it is normal
adjust/sharpness/sharpen more
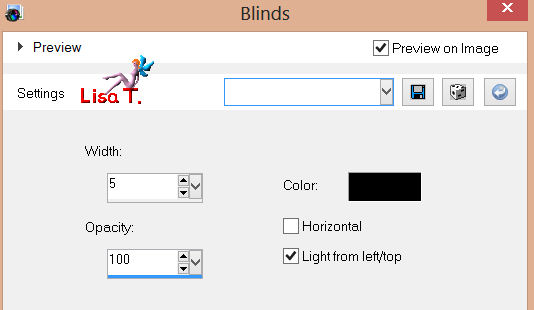
effects/texture effects/blinds (with black)
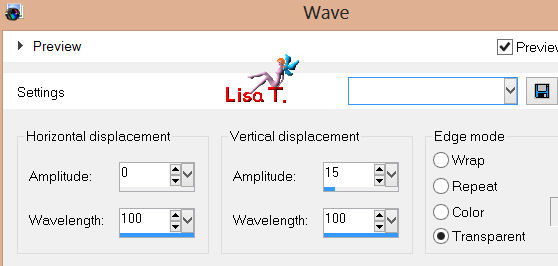
effects/distortion effects/wave
layers/arrange/move down
your layers palette should be like this

layers/merge/merge visible
activate the layer « déco marylou », copy and paste as a new layer
don’t move it
activate the layer “déco2 marylou”, copy and paste as a new layer
don’t move it
adjust/hue and saturation/colorize/according to your colors
layers/merge/merge all (flatten)
image/add borders/check “symmetric”
1 pixel color 2
4 pixels color 1
30 pixels color 2
select the last border with the magic wand tool (default settings)
paint the selection with the sunburst gradient prepared at the begining
effects/plugins/AP01 Innovations/Lines SilverLining/Dotty Grids
effects/plugins/Simple/4Way Average
selections/invert
effects/3D effects/drop shadow/ 0 / 0 / 80 / 35 / black, and select none
image/add borders/2 pixels/color 1
selections/select all
image/add borders/50 pixels/color 2
edit/copy
selections/invert, and paste into selection
adjust/blur/gaussian blur/25
effects/Graphic Plus/Quick Tile I/default settings
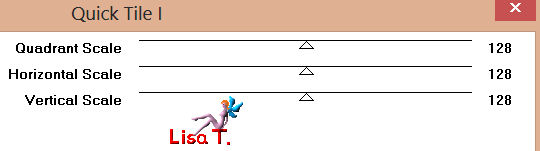
apply the same effect once more
selections/invert
effects/3D effects/drop shadow/ 0 / 0 / 80 / 35 / black and select none
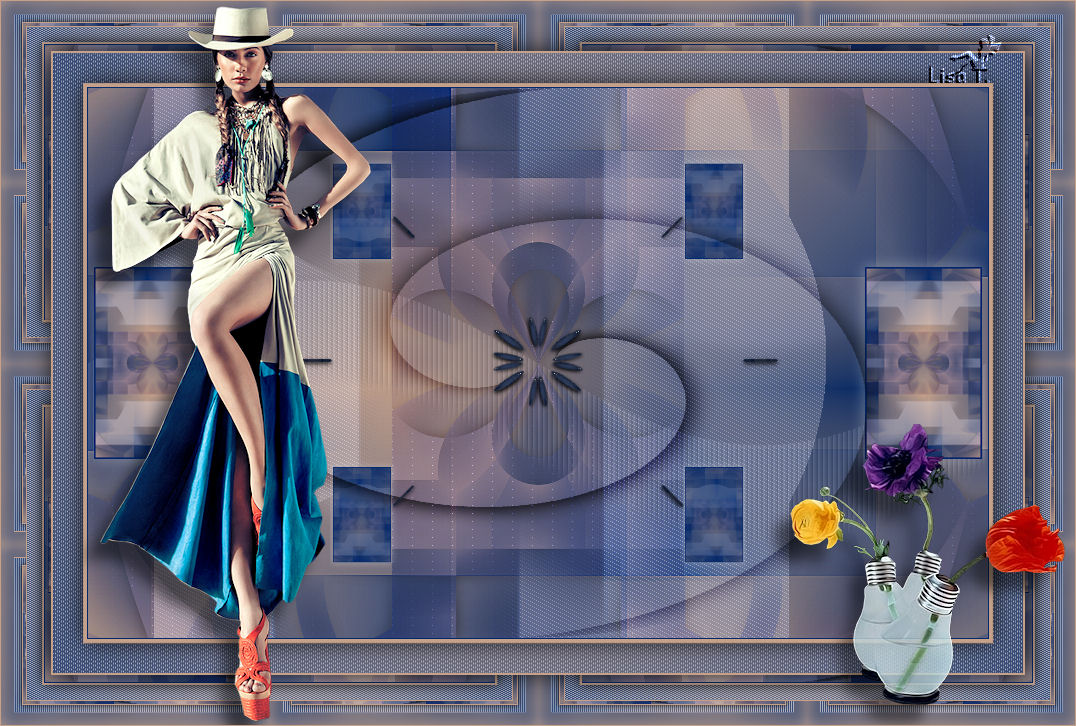
activate the tube “Verlaine A 151”
resize to 85%, copy and paste on your tag as a new layer
move it to the left (or right, as you like)
effects/3D effects/ 18 / -16 / 50 / 20 / black
adjust/sharpness/sharpen
activate the tube “Talanat Vae 1815042013”, resize to 50%
copy and paste on your tag as a new layer
move it opposite to the tube of the lady
drop the same shadow
adjust/sharpness/sharpen
new raster layer for your watermark, and merge all (flatten)
image/add border/1 pixel/color 1
resize if necessary, save as... type JPEG
thank you to have realized this tutorial
if you want Vivi to see your creation
she will be very glad to receive it and present it at the end of her tutorial

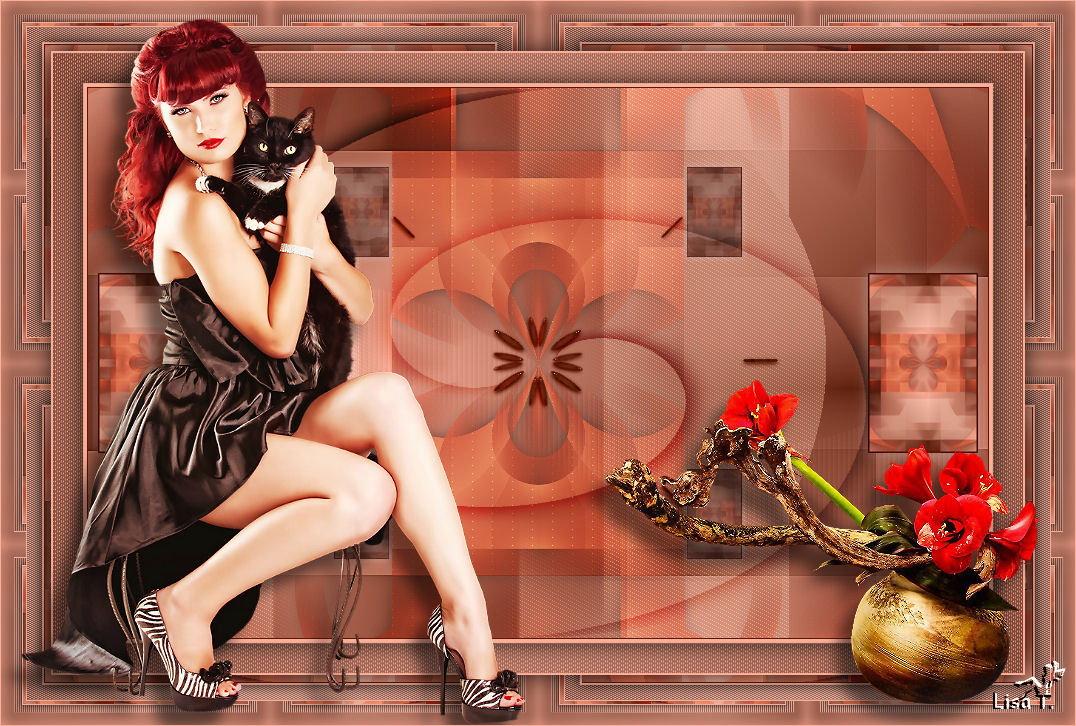
My try with my tubes
Back to the boards of Vivi's tutorials
board 1  board 2 board 2

|