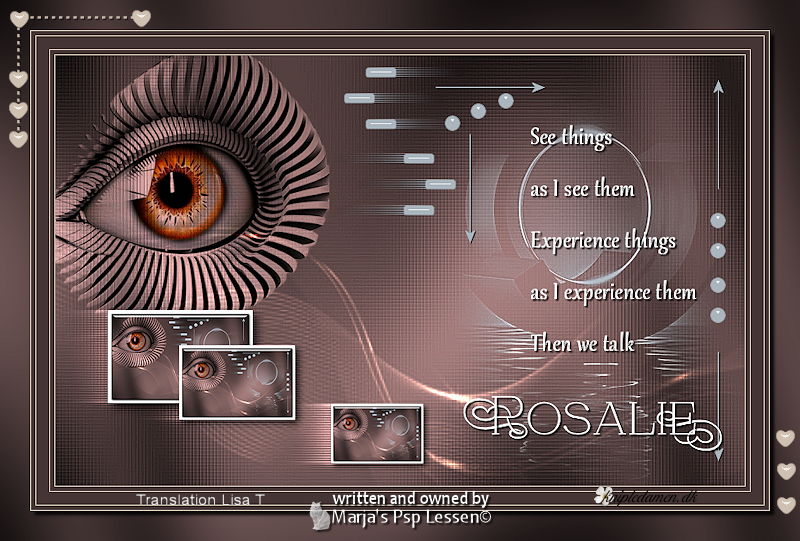

You will find the original tutorial here :

Thank you Marja for your permission to translate your work
This tutorial is a personal creation.
Any resemblance with another one would be only pure coincidence.
It is stricly forbidden to modify tubes, to change their name or take off the matermarks,
To present them on your sites or blog,
To share them in groups,
to make a bank of images, or to use them on lucrative purposes.

Thank you to respect Marja’s work and the tubers work.
Don’t hesitate to warn me if you have any trouble with this translation,
and I’ll try to fix the problem as quickly as I can

Marja worked with PSP X2 and I worked with PSP2020 Ultimate
you can follow this tutorial with another version of PSP, but the result might be slightly different
don’t hesitate to change blend modes and opacities of the layers to match your personal colors and tubes
place the tools and materials provided into the appropriate folders of My COREL PSP general folder
to import presets if any, double-click on them, or import
open the mask(s) and minimize to tray
duplicate all the tubes and decorations, and alpha layers, and work with the copies to preserve originals
install the plugins necessary
this tutorial is the property of Marja, and the translation is my property

Supplies
Marja does't provide the misted tube, you will have to use one of your personal choice
I used one of my misted tubes on the tag above
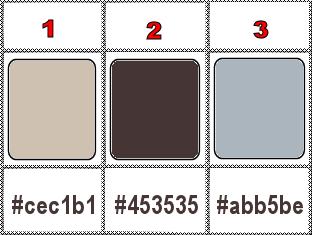
Palette
Decorations tubes
masks
Marja’s watermark


Hints and Tips
TIP 1 -> if you don’t want to install a font -->
open it in a software as « Nexus Font » (or other font viewer software of you choice)
as long as both windows are opened (software and font), your font will be available in your PSP
TIP 2 -> from PSPX4, in the later versions of PSP the functions « Mirror » and « Flip » have been replaced by -->
« Mirror »has become --> image => mirror => mirror horizontal
« Flip » has become --> image => mirror => mirror vertical

Plugins needed
Graphics Plus – Cross Shadow
Unlimited 2.0
Alien skin eye candy 5 impact – Glass

colors

set FG to color 1 and BG to color 2 in materials palette

Use the pencil to mark your place
along the way
hold down left click to grab and move it
 |

To preserve originals => ALWAYS duplicate tubes, close the originals and work with the copies
1
open a new image => black => 800 * 500 px
flood fill layer with color 2
2
effects => plugins => Graphics Plus => Cross Shadow / default settings
effects => plugins => Unlimited 2 => &<Bkg Designer sf10 II> => DIS Refracto1
3
effects => edge effects => enhance more
layers => new raster layer
flood fill layer with color 1
4
layers => new mask layer => from image
choose « Masker298mpd©designs»
5
layers => merge => merge group
blend mode of the layer : Dodge
effects => 3D effects => drop shadow => 2 / 2 / 85 / 2 / black
6
layers => merge => merge visible
set color 3 as FG color
layers => new raster layer
flood fill layer with color 3
7
layers => new mask layer => from image
choose « Masker294mpd©designs »
8
layers => merge => merge group
adjust => sharpness => sharpen more
layers => merge => merge visible
9
copy / paste your misted tube as new layer
resize if necessary
place properly (see final result)
10
blend mode of the layer : Overlay (or other of your choice)
11
copy / paste « L633 deco by mpd© » as new layer
12
effects => image effects => offset => H : 0 / V : 150 / tick « custom » and « transparent »
13
copy / paste « L633 deco 1 by mpd© » as new layer » as new layer
14
effects => image effects => offset => H : 210 / V : 0 / tick « custom » and « transparent »
15
Duplicate this image => Shift + D => set this original work aside for a later use
(minimize to tray is a good way to set aside)
work on the copy
layers => merge => merge visible
16
selections => select all
image => add borders => tick « symmetric » => 20 px white
17
effects => plugins => Alien Skin Eye Candy 5 Impact / Glass
settings tab => Clear
Basic tab => Width (pixels) => 30.00
18
effects => 3D effects => drop shadow => 5 / 5 / 85 / 15 / black
selections => select none
19
Copy / paste this image as new layer on your main work that you set aside in step 15
image => resize => untick « resize all layers » => 20%
20
effects => image effects => offset => H : -255 / V : -100 / tick « custom » and « transparent »
21
adjust => sharpness => sharpen
effects => 3D effects => drop shadow => 5 / 5 / 85 / 15 / black
22
layers => duplicate
image => resize => untick « resize all layers » => 80%
23
effects => image effects => offset => H : 15 / V : -50 / tick « custom » and « transparent »
24
layers => duplicate
image => resize => untick « resize all layers » => 80%
25
effects => image effects => offset => H : 125 / V : -85 / tick « custom » and « transparent »
26
layers => merge => merge down TWICE => the three small frames are now on the same layer
27
layers => duplicate
effects => distortion effects => Wind => from right => 80%
28
effects => texture effect => Blinds => Tick « Horizontal »
width => 2 / opacity => 100 / White
29
layers => arrange => move down
blend mode of the layer : Overlay (or other of your choice)
highlight top layer
30
copy / paste « texte L633 text 1 by mpd© » as new layer » as new layer
31
effects => image effects => offset => H : 250 / V : 35 / tick « custom » and « transparent »
32
copy / paste « L633 text 2 by mpd© » as new layer » as new layer
33
effects => image effects => offset => H : 225 / V : -180 / tick « custom » and « transparent »
34
in the materials palette, set color 1 as FG color, and color 2 as BG color
layers => merge => merge visible
35
image => add borders => tick « symmetric » => ...
1 px color 1
5 px color 2
1 px color 1
15 px color 2
1 px color 1
5 px color 2
1 px color 1
36
selections => select all
image => add borders => tick « symmetric » => 35 px color 2
selections => invert
37
effects => plugins => Graphics Plus => Cross Shadow / default settings
selections => invert
38
effects => 3D effects => drop shadow => 5 / 5 / 85 / 5 / black
selections => select none
39
image => resize => tick « resize all layers » => 800 px width
adjust => sharpness => sharpen
40
Copy / paste « L633 corner by mpd© » as new layer
41
effects => image effects => offset => H : 3 / V : 8 / tick « custom » and « transparent »
42
Add Marja’s Watermark
apply your watermark
write your licence number if you used a licenced tube
file => save your work as... type .jpeg

My tag with my misted tube

Don't hesitate to write to me if you have any trouble with this translation
If you create a tag (using other tubes than those provided) with this tutorial
and wish it to be shown, send it to me !
It will be a real pleasure for me to add it to the gallery below


created by ▼ Birte


back to the boards of Marja ’s tutorials
20 tutorials on each board
 1 1
at the bottom of each board you will find the arrows allowing you to navigate from one board to another


|