

You will find the original tutorial here :
Thank you Marja for your permission to translate your work
This tutorial is a personal creation.
Any resemblance with another one would be only pure coincidence.
It is stricly forbidden to modify tubes, to change their name or take off the matermarks,
To present them on your sites or blog,
To share them in groups,
to make a bank of images, or to use them on lucrative purposes.

Thank you to respect Marja’s work and the tubers work.
Don’t hesitate to warn me if you have any trouble with this translation,
and I’ll try to fix the problem as quickly as I can

Marja worked with PSP X2 and I worked with PSP2020 Ultimate
you can follow this tutorial with another version of PSP, but the result might be slightly different
don’t hesitate to change blend modes and opacities of the layers to match your personal colors and tubes
place the tools and materials provided into the appropriate folders of My COREL PSP general folder
to import presets if any, double-click on them, or import
open the mask(s) and minimize to tray
duplicate all the tubes and decorations, and alpha layers, and work with the copies to preserve originals
install the plugins necessary
this tutorial is the property of Marja, and the translation is my property
This lesson contains 52 steps

Supplies
Main tube is from Marja
Masks are from Narah
Other supplies are made by Marja, there is « mpd© » at the end of the title
selections
Tube(s)
MPL Watermark
AI Generated by mpd©
L643 Deco by mpd©
L643 Deco 2 and 3 by mpd©
L643 text by mpd©


Hints and Tips
TIP 1 -> if you don’t want to install a font -->
open it in a software as « Nexus Font » (or other font viewer software of you choice)
as long as both windows are opened (software and font), your font will be available in your PSP
TIP 2 -> from PSPX4, in the later versions of PSP the functions « Mirror » and « Flip » have been replaced by -->
« Mirror »has become --> image => mirror => mirror horizontal
« Flip » has become --> image => mirror => mirror vertical

Plugins needed
Unlimited 2.0
FunHouse - Vibes & Tremors*
Filter Factory Gallery A - Weave*
MuRa's Meister - Pole Transform
Graphics Plus - Emboss
Xero - Porcelain
Alien skin eye candy 5 impact – Glass
Plugins marked with a * => Import this filter into Unlimited 2.0

Use the pencil to mark your place
along the way
hold down left click to grab and move it
 |

To preserve originals => ALWAYS duplicate the tubes, close the originals and work with the copies
place the selections into the dedicated folder of My Corel PSP general folder
1.
Create a transparent image of 800x500 pixels
Selections / select all
2.
copy / paste « AI generated by mpd© » into selection
Select nothing
3.
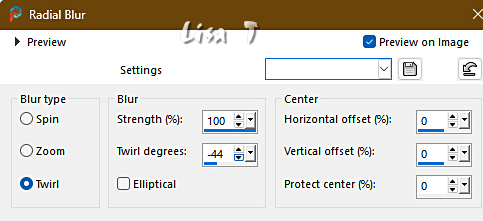
Adjust / blur / radial blur
4.
Layers / duplicate
Effects / plugins / Unlimited 2.0 / FunHouse - Vibes, default settings
Effects / plug-ins / Unlimited 2.0 / FunHouse - Tremors, default settings
5.
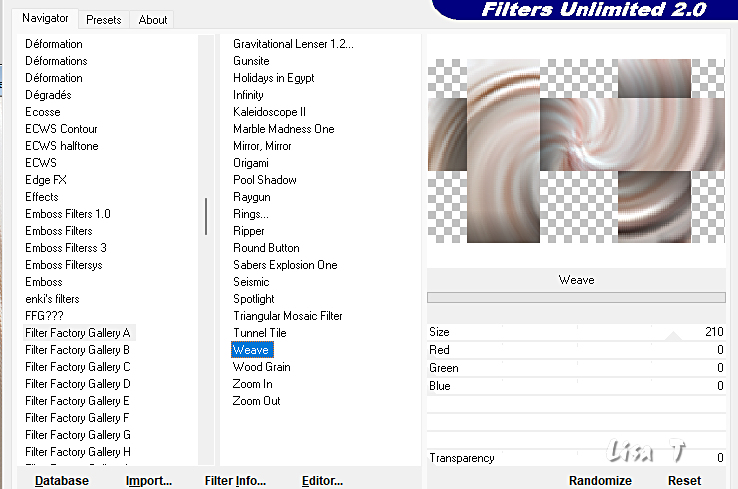
Effects / plug-ins / Unlimited 2.0 / Filter Factory Gallery A - Weave
Set Size to 210
the rest on 0
6.
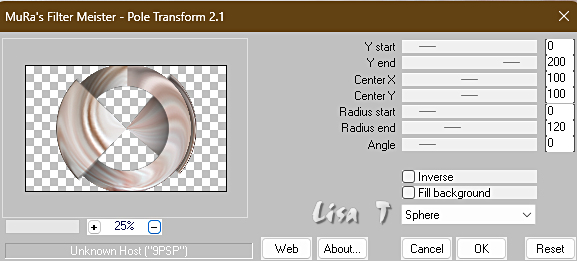
Effects / plug-ins / MuRa's Meister / Pole Transform
Set the blend mode of this layer to Luminance
and reduce the layer opacity to 50%
7.
effects => 3D effects => drop shadow => 0 / 0 / 65 / 35 / black
Layers / merge / merge visible layers
8.
copy / paste « L643 deco by mpd© » as new layer
9.
effects => image effects => offset => H : -370 / V : 0 / tick « custom » and « transparent »
10.
Effects / plugins / Graphics plus - emboss
all sliders on 0
11.
effects => 3D effects => drop shadow => 0 / 0 / 65 / 35 / black
12.
copy / paste « L643 deco 1 by mpd© » as new layer
13.
effects => image effects => offset => H : 25 / V : 0 / tick « custom » and « transparent »
14.
Layers / arrange / move down
effects => 3D effects => drop shadow => 0 / 0 / 65 / 35 / black
15.
Set the blend mode of this layer to Overlay
Keep this layer active
16.
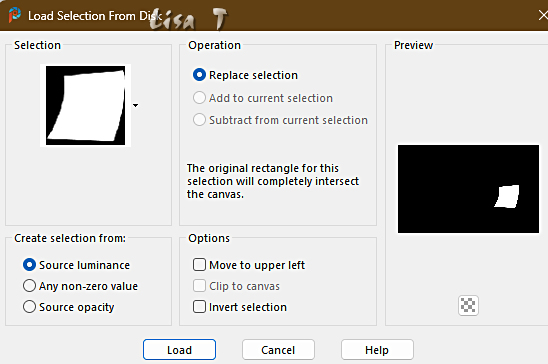
Selections / load-save selection / load selection from disk and in the drop-down menu look for
« L643 Sel 1 mpd©designs»
17.
Now press once on your delete key
Select nothing
Highlight top layer in your layer palette
set FG to whiteand BG to black in the materials palette
18.
Selections / load-save selection / load selection from disk and search in the dropdown menu for
« L643 Sel 2 mpd©designs »
Don’t change the settings
19.
Layers / new raster layer
flood fill selection with white
20.
Effects / plugins / xero - porcelain, default xettings
Selections / modify / contract by 15 px
Layers / new raster layer
21.
copy / paste « AI Generated by mpd© » into selection
22
Adjust / sharpness / sharpen
Select nothing
23
effects => 3D effects => drop shadow => 2 / 2 / 65 / 2 / black
effects => 3D effects => drop shadow => -2 / 0/ 65 / 2 / black
24
Layers / merge / merge down
effects => image effects => offset => H : -325 / V : -85 / tick « custom » and « transparent »
25
Layers / duplicate
image => resize => untick « resize all layers » => 70%
26
effects => image effects => offset => H : 465 / V : 265 / tick « custom » and « transparent »
27
effects => 3D effects => drop shadow => 0 / 0 / 65 / 25 / black
28
Selections / load-save selection / load selection from disk and in the drop-down menu look for
« L643 Sel 3 mpd©designs »
Don’t change the settings
29
highlight bottom layer
(merged layer)
30
selections => promote selection to layer
layers => arrange => bring to top
31
Effects / plugin / Unlimited 2.0 / FunHouse - Vibes, default settings
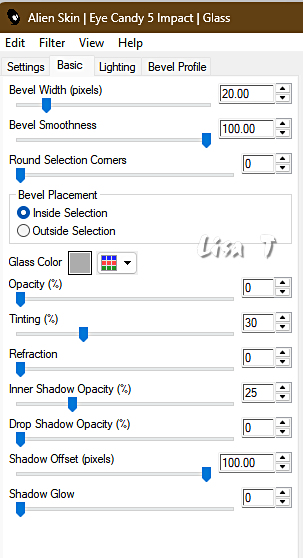
Effects / plugin / alien skin eye candy 5 impact – glass
On the settings tab => Choose « clear »
In the Basic tab
keep selection active
32
selections => modify = > select selection borders
tick « outside » and « anti-alias »
Border width at 2px
33
Layers / new raster layer
flood fill selection white
Select nothing
Layers / merge / merge down
34
effects => image effects => offset => H : -85 / V : -85 / tick « custom » and « transparent »
35
Layers / duplicate
image => resize => untick « resize all layers » => 80%
36
effects => image effects => offset => H : -200 / V : 150 / tick « custom » and « transparent »
37
Layers / duplicate
image => resize => untick « resize all layers » => 70%
38
Marja’s note => Presumably you guessed it.... yes, sorry.
I can move it myself, but then you don't know
how far and possibly up or down.
So I'm sorry.... but here are the values.....
effects => image effects => offset => H : -125 / V : -215 / tick « custom » and « transparent »
39
Layers / merge / merge down Twice
40
effects => 3D effects => drop shadow => 0 / 0 / 65 / 25 / black
41
copy / paste « L643 deco 2 by mpd© » as new layer
Place the deco on the left
42
copy / paste « AI Generated misted by mpd© » as new layer
43
effects => image effects => offset => H : -35 / V : -10 / tick « custom » and « transparent »
44
Reduce the layer opacity of this layer to 35%
Layers / arrange / move down
Repeat this twice more
highlight top layer in your layers palette
45
copy / paste « L643 Deco 3 by mpd© » as new layer
Marja’s note => oops... here we go again
But this is really the last time
effects => image effects => offset => H : 200 / V : -30 / tick « custom » and « transparent »
46
effects => 3D effects => drop shadow => 0 / 0 / 65 / 5 / black
47
Layers / merge / merge all layers (flatten)
Image / add borders…
1 pixel black
35 pixels white
1 pixel black
48
image => resize => tick « resize all layers » => 800 px width
49
copy / paste « L643 text by mpd© » as new layer
Place the text right at the bottom (see final result)
50
effects => 3D effects => drop shadow => 0 / 0 / 65 / 5 / black
51
Add Marja’s Watermark
apply your watermark
write your licence number if you used a licenced tube
Save your work as a jpeg file

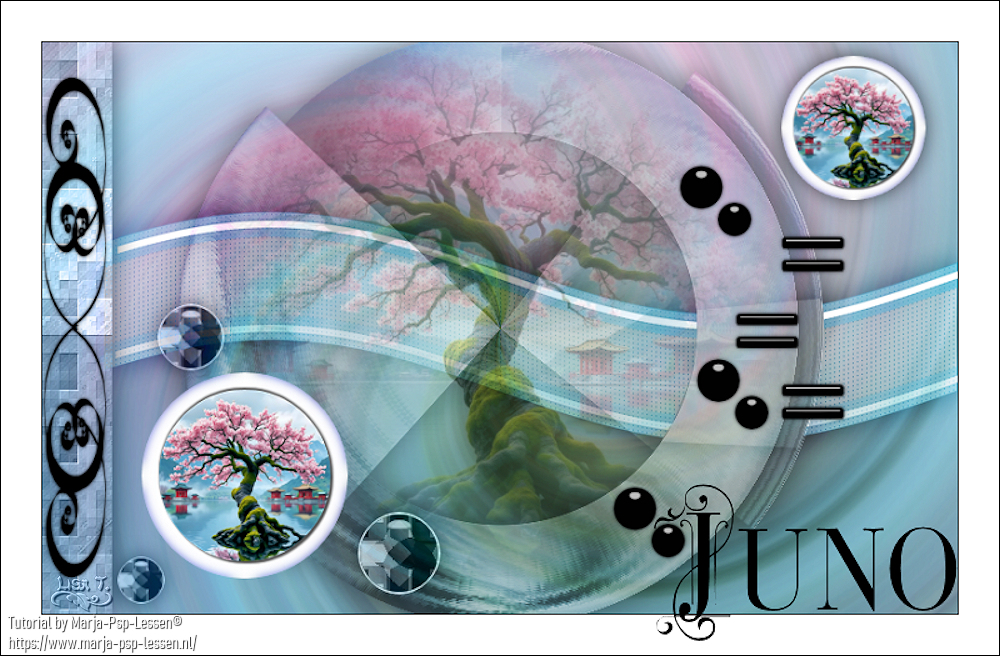
My tag with another AI image
Don't hesitate to write to me if you have any trouble with this translation
If you create a tag (using other tubes than those provided) with this tutorial
and wish it to be shown, send it to me !
It will be a real pleasure for me to add it to the gallery below


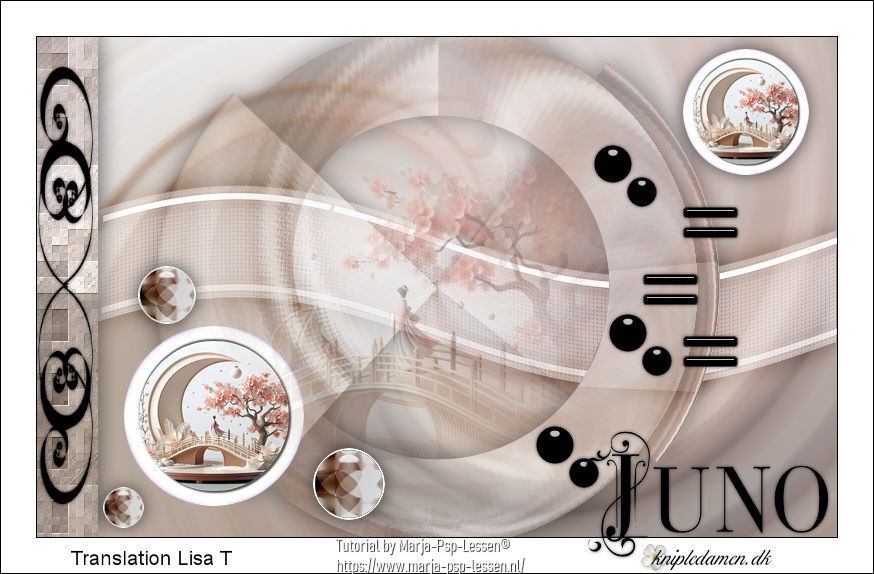
created by ▼ Birte

back to the boards of Marja’s tutorials
20 tutorials on each board
board 1 => 
at the bottom of each board you will find the arrows allowing you to navigate from one board to another


|