
You will find the original tutorial here :

Thank you Marja for your permission to translate your work
This tutorial is a personal creation.
Any resemblance with another one would be only pure coincidence.
It is stricly forbidden to modify tubes, to change their name or take off the matermarks,
To present them on your sites or blog,
To share them in groups,
to make a bank of images, or to use them on lucrative purposes.

Thank you to respect Marja’s work and the tubers work.
Don’t hesitate to warn me if you have any trouble with this translation,
and I’ll try to fix the problem as quickly as I can

Marja worked with PSP X2 and I worked with PSP2020 Ultimate
you can follow this tutorial with another version of PSP, but the result might be slightly different
don’t hesitate to change blend modes and opacities of the layers to match your personal colors and tubes
place the tools and materials provided into the appropriate folders of My COREL PSP general folder
to import presets if any, double-click on them, or import
open the mask(s) and minimize to tray
duplicate all the tubes and decorations, and alpha layers, and work with the copies to preserve originals
install the plugins necessary
this tutorial is the property of Marja, and the translation is my property

Supplies
MPL Watermark
color L635
Renee-TUBES-Pasques-2024-107
Spring Scenery
L635 text made by mpd©
L635 deco made by mpd©
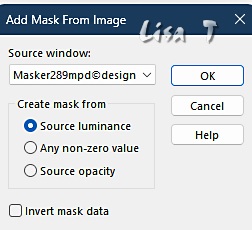
Masker289mpd©designs
1 selection L635 Sel 1 mpd©designs

the main tube used for this creation was made by RenéeGraphisme

Hints and Tips
TIP 1 -> if you don’t want to install a font -->
open it in a software as « Nexus Font » (or other font viewer software of you choice)
as long as both windows are opened (software and font), your font will be available in your PSP
TIP 2 -> from PSPX4, in the later versions of PSP the functions « Mirror » and « Flip » have been replaced by -->
« Mirror »has become --> image => mirror => mirror horizontal
« Flip » has become --> image => mirror => mirror vertical

Plugins needed
Penta.com – Color Dot
Xero – Porcelain

colors

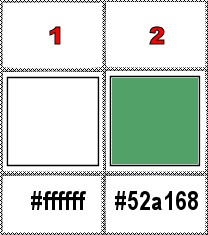
set FG to color 1 and BG to color 2 in materials palette

Use the pencil to mark your place
along the way
hold down left click to grab and move it
 |

To preserve originals => ALWAYS duplicate the tubes, close the originals and work with the copies
place the selections into the dedicated folder of My Corel PSP general folder
1
open a new image => black => 800 * 500 px
2
layers => new raster layer
selections => select all
3
open the main tube
highlight middle layer
edit => copy / paste into selection on your main work
4
selections => select none
effects => image effects => seamless tiling => default settings
adjust => blur => gaussian blur => 50
5
effects => plugins => Penta.com => Color Dot
distance => 5
6
layers => merge => merge all (flatten)
layers => new raster layer
flood fill white
7
layers => new mask layer => from image

8
layers => merge => merge group
effects => image effects => offset => H : 0 / V : -100 / tick « custom » and « transparent »
9
effects => 3D effects => drop shadow => 0 / 0 / 50 / 20 / color 2
10
effects => plugins => Xero => Porcelain
blue channel => 50
other settings => 50 / 128 / 128 / 0 / 0 / 50
11
close the eye of bottom layer
enable the magic wand tool => tolerance : 0
select the top part, above the arabesque
12
selections => modify => expand => 20 px
layers => new raster layer
13
copy / paste « Spring Scenery » into selection
selections => select none
14
open the eye of bottom layer
highlight top layer
15
effects => plugins => Xero => Porcelain => same settings as in step 10
opacity of the layer => 65%
16
layers => arrange => move down
keep this layer highlighted
17
selections => load-save selection => from disk => selection # 1
18
selections => promote selection to layer
selections => modify = > select selection borders => tick « outside » and « anti-alias » / 10
19
layers => new raster layer
flood fill selection white
selections => select none
20
effects => 3D effects => drop shadow => 0 / 0 / 50 / 5 / color 2
21
effects => plugins => Xero => Porcelain => same settings as in step 10
22
layers => merge => merge down
layers => arrange => move up
23
copy / paste the text tube as new layer
24
effects => image effects => offset => H : 143 / V : -132 / tick « custom » and « transparent »
25
copy / paste « L635 deco made by mpd© » as new layer
26
effects => image effects => offset => H : -18 / V : 30 / tick « custom » and « transparent »
27
layers => merge => merge visible
image => add borders => tick « symmetric » => ...
1 px color 2
5 px white
1 px color 2
28
image => add borders => tick « symmetric » => ...
35 px white
1 px color 2
29
image => resize => tick « resize all layers » => 800 px width
30
copy / paste « Renee-TUBES-Pasques-2024-107 » as new layer
31
image => mirror => mirror horizontal
image => resize => untick « resize all layers » => 50%
32
effects => image effects => offset => H : -155 / V : -25 / tick « custom » and « transparent »
33
adjust => sharpness => sharpen
effects => plugins => Xero => Porcelain => same settings as in step 10
Add Marja’s Watermark
apply your watermark
write your licence number if you used a licenced tube
file => save your work as... type .jpeg

My tag with one of my tubes

Don't hesitate to write to me if you have any trouble with this translation
If you create a tag (using other tubes than those provided) with this tutorial
and wish it to be shown, send it to me !
It will be a real pleasure for me to add it to the gallery below


coming ▼ soon

back to the boards of Marja ’s tutorials
20 tutorials on each board
board 1 => 
at the bottom of each board you will find the arrows allowing you to navigate from one board to another


|