Precious moment

Original tutorial can be found here

I am member of TWInc
this tutorial is protected


This tutorial was created using PSPX2
but it can be realized with other versions

General conditions
This tutorial is an original and personal design of Libellule.
any resemblance with another one would be pure coincidence.
You can share your creations, create signatures for your friends or for groups
but you are not allowed to use this tutorial in your site, or claim it as yours
You must indicate the copyrights of the artists.
Thank you to respect the rules.

If you are interested by translating this tutorial in another language
thank you to ask Libellule.
a link towards her site will be asked

It is strictly forbidden to use the material provided for your tutorials
and to share it in groups or forums

Libellule has received the authorizations to use the tubes she provides
see here


Material
1 mask created by Linda
the tube of the woman was created by Animabelle
the tube of the flower was created by Guismo
different images, decorations and tubes
1 alpha layer

Plugin
AP 01 [innovations] / Lines Silverlining

Implementation
install the plugin if necessary
copy the mask in the folder “mask” of “My PSP Files” or open with PSP and minimize it (best method)
activate the brush/file/import the brush tip

Colors
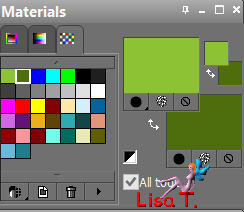
color 1/foreground color/#ffffff
color 2/background color/#8dc234
color 3 / #4e6d0f
you may change colors 2 and 3, according to your tubes, but keep white as foreground color


Use the paint brush to follow the steps
left click to grab it
 |

Realization
The tag
Step 1
open the alpha layer, duplicate it, close the original and work with the copy
Step 2
in the material palette, set color 2 as foreground and color 3 as background
prepare a linear gradient, angle 135, repeat 1, check “invert”
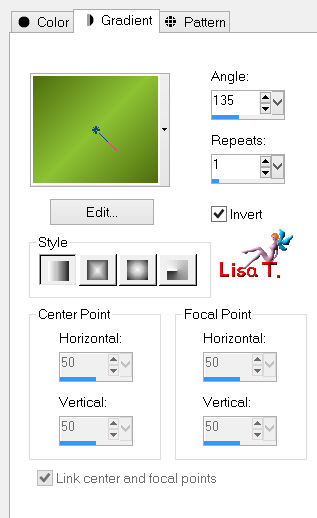
paint the layer with the gradient
Step 3
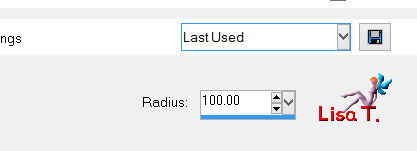
adjust/blur/gaussian blur/100
Step 4
effects/texture effects/fur
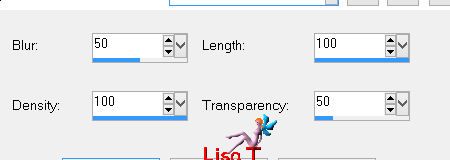
effects/edge effects/enhance more
Step 5
layers/new raster layer/fill with black
layers/new mask layer/from image/uncheck “invert mask data”/choose mask “01maskkelswwazj4”
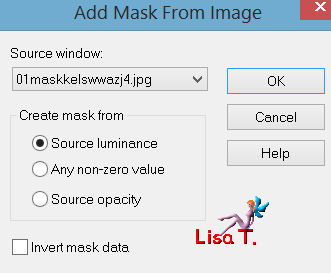
layers/merge/merge group
layers/duplicate - image/mirror
Step 6
effects/texture effects/weave
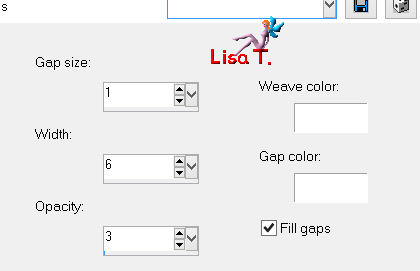
selections/select all
selections/modify/contract/11 pixels
selections/invert
press the delete key of your keyboard
selections/select none
layers/merge/merge visible
Step 7
selections/load-save selection/from alpha channel/selection #1
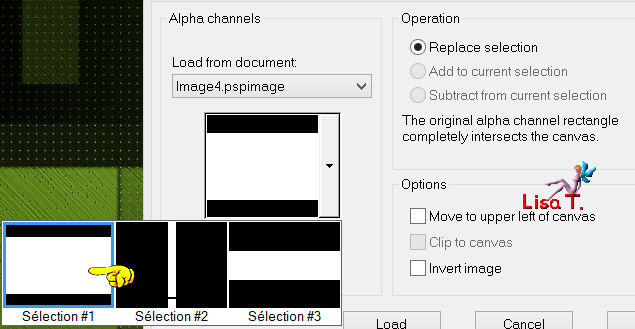
selections/promote selection to layer
Step 8
effects/plugins/AP 01[Innovations]/Lines Silverlining
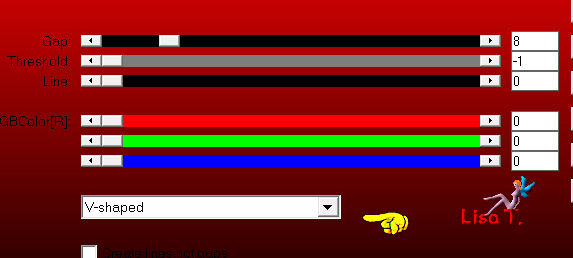
keep the selection active
Step 9
layers/new raster layer
in the materials palette, set white as foreground color
activate the paint brush tool, and choose the tip “libellule_moment_precieux”, size 400
apply the brush tip twice into selection
keep the selection active
Step 10
layers/new raster layer/fill the selection with black
selections/modify/contract/2 pixels
press the delete key of your keyboard
layers/merge/merge down/2 times
selections/select none
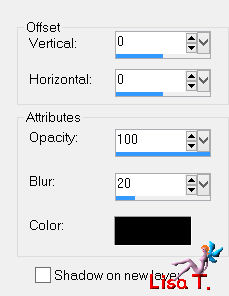
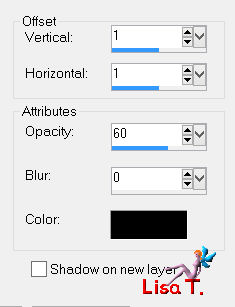
effects/3D effects/drop shadow
Step 11
in the layers palette, activate the background layer
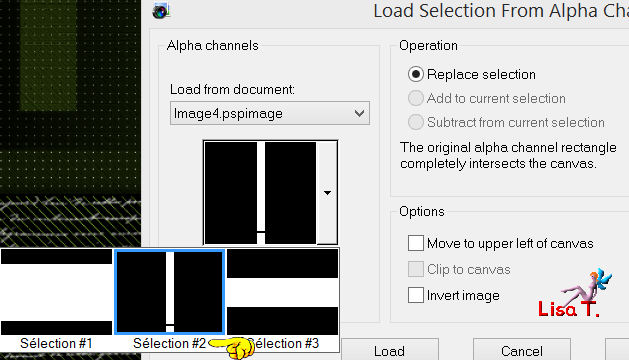
selections/load-save selection/from alpha channel/selection #2
Step 12
activate the image “feuille”
(or another tube of your choice, but resize it to 575 pixels height)
edit/copy - back to your work - edit/paste as new layer
don’t move it
selections/invert/press the delete key of your keyboard
selections/invert
keep the selection active
don’t close the image, you will need it later
Step 13
layers/new raster layer/fill with black
selections/modify/contract/2 pixels/press the delete key of your keyboard
layers/merge/merge down
selections/select none
effects/3D effects/drop shadow

Step 14
in the layers palette, activate the background layer
selections/load-save selection/from alpha channel/selection #3
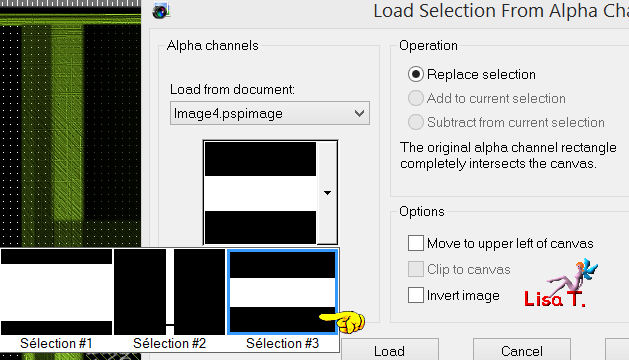
selections/promote selection to layer
layers/new raster layer
acitvate the image “feuille” again
edit/copy - back to your work - edit/paste into selection
Step 15
layers/new raster layer/fill with black
selections/modify/contract/2 pixels/press the delete key of your keyboard
layers/merge/merge down
selections/select none
effects/3D effects/drop shadow

Step 16
in the layers palette, activate the layer on top of the stack
activate the flood fill tool, and set the opacity on 30%

layers/new raster layer/fill with white
(don’t forget to reset the opacity of the flood fill tool on 100%)
Step 17
layers/new mask layer/from image/choose “LF-Mask-92”
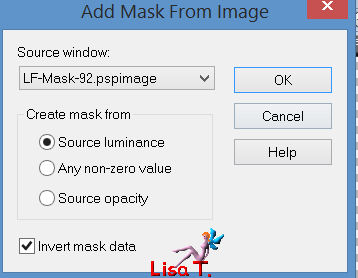
layers/merge/merge group
Step 18
activate the main tube
edit/copy - back to your work - edit/paste as new layer
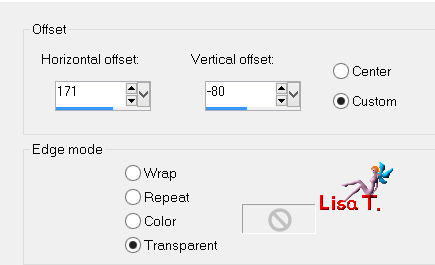
effects/image effects/offset (if you choose another tube, move it to the right of the tag)
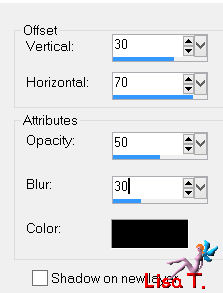
effects/3D effects/drop shadow
Step 19
in the layers palette, activate the layer on top of the stack
activate the tube “calguisbambou09042012”
edit/copy - back to your work - edit/paste as new layer
image/mirror
image/resize/uncheck “resize all layers”/ 60%
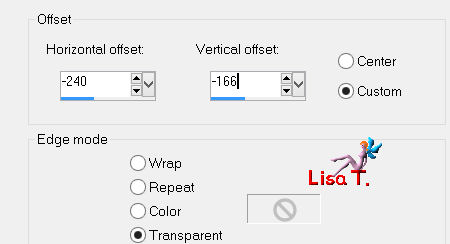
effects/image effects/offset (if you choose another tube, move it to the left)
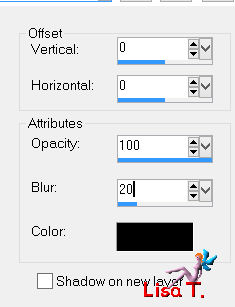
effects/3D effects/drop shadow
Step 20
activate the tube “moment_precieux_mot_art”
edit/copy - back to your work - edit/paste as new layer
move it where you want
effects/3D effects/drop shadow
The Frame
Step 21
image/add borders/check “symmetric” :
1 pixel white
2 pixels black
30 pixels white
1 pixel black
Step 22
activate the tube “moment_precieux_decor”
edit/copy - back to your work - edit/paste as new layer
don’t move it, it is in the right place
Step 23
apply your signature
layers/merge/merge all (flatten)
Step 24
resize your tag to 800 pixels wide (or other)

your tag is finished
hope you enjoyed it !!

to write to Libellule


If you create a tag with this tutorial, don’t hesitate to send it toLibellule
She will be very glad to see it and present it in her galery
at the end of the tutorial on her site

If you want to be informed about Libellule’s new tutorials ans work
join her newsletter


Back to the board of Libellule’s tutorials


|