Moon Witch

Original tutorial can be found here


This tutorial was created using PSPX2
I use PSPX8
but it can be realized with other versions

General conditions
This tutorial is an original and personal design of Libellule.
any resemblance with another one would be pure coincidence.
You can share your creations, create signatures for your friends or for groups
but you are not allowed to use this tutorial in your site, or claim it as yours
You must indicate the copyrights of the artists.
Thank you to respect the rules.

If you are interested by translating this tutorial in another language
thank you to ask Libellule.
a link towards her site will be asked

It is strictly forbidden to use the material provided for your tutorials
and to share it in groups or forums

Libellule has received the authorizations to use the tubes she provides
see here


Implementation
install the plugins
copy the masks into the folder “masks” of “My PSP Files” or open with PSP and minimize them (best method)
open the tubes and duplicate them. Work with the copies, close the originals
install the Picture Tube into the corresponding folder of My PSP Files

Filters
Graphic Plus - Xero


Material


Use the Pencil to follow the steps
left click to grab it


Realization
Step 1
in the materials palette, set Black #000000 as Foreground color (FG)
Step 2
open the Alpha layer, duplicate it and close the original. Work with the copy
Step 3
flood fill the layer with Black
Step 4
layers > new mask layer > from image > choose the mask « halloween_masque5 »
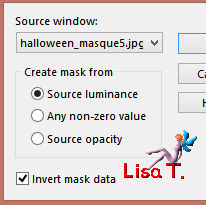
layers > merge > merge group
Step 5
image > reszie > uncheck « resize all layers » > 80%
Step 6
effects > image effects > offset
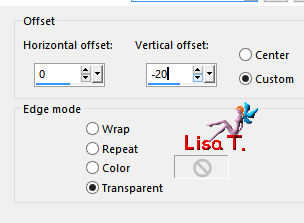
Step 7
layers > new raster layer
selections > select all
copy/paste into selection the paper « libellulegraphisme_papier_halloween5.jpg »
selections > select none (Ctrl + D)
Step 8
layers > arrange > move down
Step 9
layesr > new mask layer > from image > choose « leemonca8.jpg »
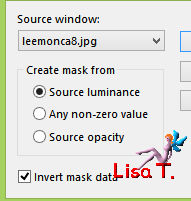
layers > merge > merge group
Step 10
image > resize > uncheck « resize all layers » > 110%
adjust > sharpness > sharpen
Step 11
activate the top layer
Step 12
activate the tube «libellulegraphisme_cinderella.png »
window > duplicate (we are going to work on the tube before using it)
close the original
image > mirror > mirror horizontal – image > resize > uncheck «resize all layers » > 60%
Step 13
edit > copy – back to your work - edit > paste as new layer
Step 14
effects > image effects > offset
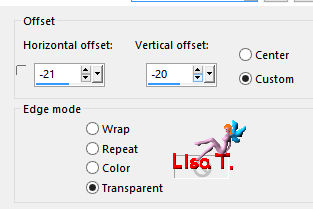
Step 15
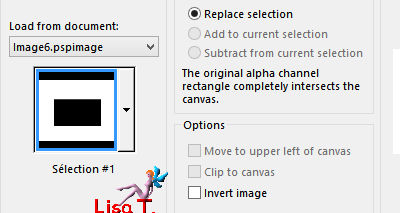
selections > load-save selection > from alpha channel > selection #1
Step 16
DELETE (hit the Delete key of your keyboard)
Step 17
selections > select none
Step 18
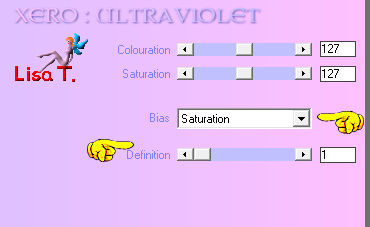
effects > plugins > Xero > Ultraviolet > Colouration and Saturation
Step 19
layers > merge > merge down
Step 20
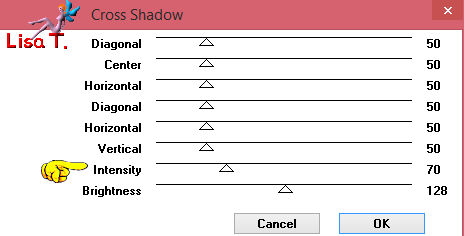
effects > plugins > Graphic Plus > Cross Shadow
Step 21
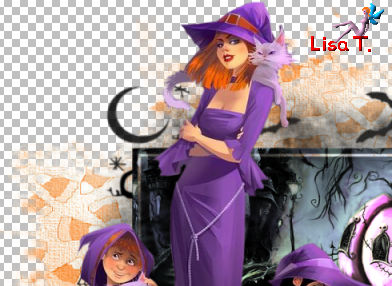
copy/paste as new layer the tube «772967069194a0.png »
(don’t forget to erase the watermark)
Step 22
image > mirror > mirror horizontal
move it to the left (don’t hide the moon)
Step 23
effects > 3D effects > drop shadow
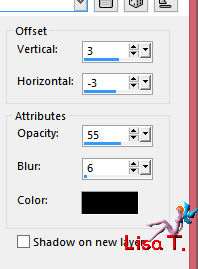
Step 24
layers > duplicate >
adjust > blur > gaussian blur > 5
Step 25
layers > arrange > move down
blend mode of the layer : exclusion
(a green shadow will appear, but it might be of a different color according to the tube you chose)
Step 26
activate the top layer
copy/paste as new layer the tube «libellulegaphisme_chauvesouris.png »
Step 27
image > resize > 40% - move it to the right
Step 28
copy/paste as new layer the tube « EL3.png »
Step 29
efects > image effects > offset
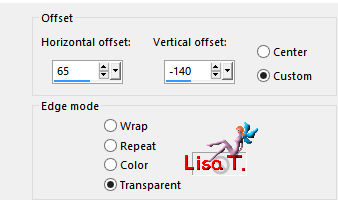
Step 30
your layers palette looks like this
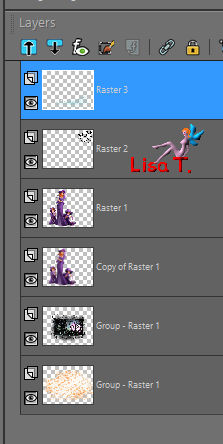
activate the layer « Group-Raster 1 »
Step 31
copy/paste as new layer the tube « HighFour_BOO_Element53.png »
move to the left
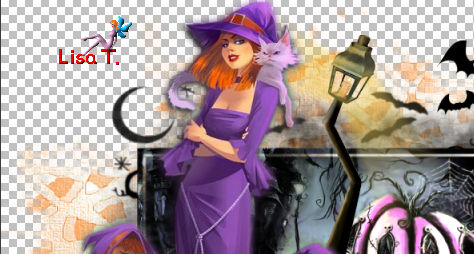
Step 32
activate the top layer
copy/paste as new layer the tube « Achtergrond.png »
Step 33
image > resize > 80% - move it bottom right
Step 34
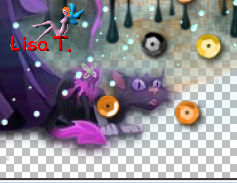
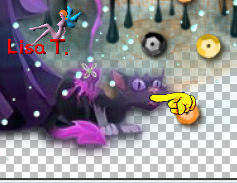
using the eraser tool, or the freehand selection tool, erase the « sequin » placed on the cat
Step 35
activate the Picture Tube Tool, and find the the tube « psptubez_insct_019 », scale 10

zoom in to have a better view
layers > new raster layer , apply the spider on the right of your work
Step 36
apply your watermark
layers > merge > merge visible
file > save as... type .png (to keep the transparency of the image)
if you wish to have a white background > merge > merge all (flatten)

to write to Libellule


If you create a tag with this tutorial, don’t hesitate to send it toLibellule
She will be very glad to see it and present it in her galery
at the end of the tutorial on her site
Your gallery

If you want to be informed about Libellule’s new tutorials and work
join her newsletter


My tag with an animation (UGA)

Back to the boards of Libellule’s tutorials
board 1  board 2 board 2 

|