Mastiff with a heart of Gold !

Original tutorial can be found here


This tutorial was created by Libellule with PSPX7
I use PSPX8
but it can be realized with other versions
General conditions
This tutorial is an original and personal design of Libellule.
any resemblance with another one would be pure coincidence.
You can share your creations, create signatures for your friends or for groups
but you are not allowed to use this tutorial in your site, or claim it as yours
You must indicate the copyrights of the artists.
Thank you to respect the rules.

If you are interested by translating this tutorial in another language
thank you to ask Libellule.
a link towards her site will be asked
It is strictly forbidden to use the material provided for your tutorials
and to share it in groups or forums
Libellule has received the authorizations to use the tubes she provides
see here

reparation
install the plugins if necessary
copy the masks in the folder “mask” of “My PSP Files” or open with PSP and minimize it (best method)
open the tubes and duplicate them. Work with the copies, close the originals
double click on the preset to install it automatically
Colors
color 1/foreground color #c0b3df
color 2/background color #4b265c
color 3 -> #3d3b40

you may change the colors, according to your tubes
Filters
FM Tile Tools, Tronds Patterns, Eye Candy 5 Textures
Graphic plus, Medhi, AFS Import, Penta.com

Material

Use the Pencil to follow the steps
hold down left click to grab it and move it

Realization
1
prepare the colors into the materials palette
colors 1 and 2 as FG and BG
open a new transparent raster layer 900 * 600 pixels
2
flood fill the layer with color 1
3
copen « libellulegraphisme_chien_aux_fleurs9 »
erase the watermark
edit -> copy
4
back to your work
selections -> select all
5
edit -> paste into selection
6
selections -> select none
7
effects -> image effects -> seamless tiling / default settings
8
adjust -> blur -> radial blur
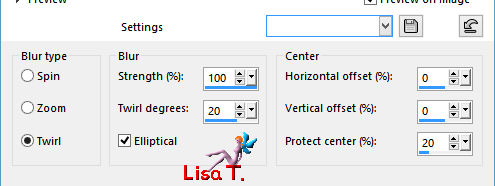
9
effects -> plugins -> FM Tile Tools / Blend Emboss

apply the effects once more
10
layers -> duplicate
11
effects -> image effects -> seamless tiling / default settings
12
blend mode of the layer : Hard Light - opacity : 50%
13
layers -> new raster layer
14
flood fill with color 1
15
effects -> plugins -> Tronds Patterns / CrazyOne / default settings (32)
(note : don’t use this filter withUnlimited 2, it won’t work)
16
adjust -> blur -> blur
17
adjust -> blur -> blur more
18
blend mode of the layer : Luminance (Legacy) - opacity : 42%
19
layers -> new raster layer
20
flood fill with color 1
21
effects -> plugins -> Alien Skin Eye Candy 5 Textures / Diamond Plate
apply effect 1 provided - here are the settings if you have troubles with the preset
 
22
open the mask « Narah_Mask_0902 »
back to you work
23
layers -> new mask layer -> from image

24
layers -> merge -> merge group
25
effects -> User Defined Filter / Emboss 3
26
blend mode of the layer : Luminance - opacity : 90%
27
layers -> merge -> merge visible
28
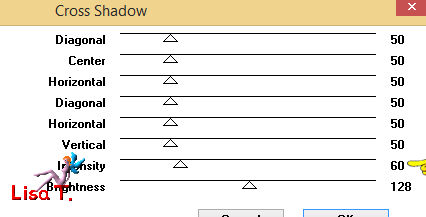
effects -> plugins -> Graphic Plus / Cross Shadow
29
open « priss_haiku_el10 »
edit -> copy
30
back to your work
layers -> new raster layer
selections -> select all
edit -> paste into selection
31
selections -> select none
32
effects -> image effects -> seamless tiling

33
effects -> plugins -> Texture / Texturizer

34
opacity of the layer : 40%
35
adjust -> sharpness -> sharpen
36
layers -> new raster layer
37
effects -> plugins -> Mehdi / Wavy Lab

38
adjust -> blur -> gaussian blur / 50
39
open the mask « LF-Mask-215 »
back on your work
layers -> new mas layer -> from image

40
layers -> merge -> merge group
41
effects -> edge effects -> enhance
42
adjust -> add-remove noise -> add noise

43
effects -> distortion effects -> wave

44
effects -> image effects -> offset

45
opacity of the layer : 70%
46
selections -> select all
47
image -> add borders -> check « symmetric » -> 10 pixels color 3
48
selections -> invert
49
effects -> plugins -> Graphic Plus -> Cross Shadow as before
50
effects -> Penta.Com / Jeans / default settings
51
selections -> invert
52
effects -> 3D effects -> drop shadow -> 0 / 0 / 100 / 10 / black
53
selections -> select none
54
layers -> duplicate
image -> resize -> 90% -> uncheck « resize all layers »
55
open « LF-Brush-54 » and erase the watermark
copy / paste as new layer
56
effects -> image effects -> offset

57
blend mode of the layer : Soft Light - opacity : 80%
58
effects -> plugins -> [AFS IMPORT] / sqborder2

59
layers -> merge -> merge down
60
effects -> 3D effects -> drop shadow -> 0 / 0 / 100 / 10 / black
61
layers -> duplicate
62
image -> free rotate

63
layers -> duplicate
64
image -> mirror -> mirror horizontal
65
lyers -> arrange -> move down TWICE
your work looks like this

66
layers -> merge -> merge visible
67
selections -> select all
68
edit -> copy
69
image -> add borders -> 50 pixels white
70
selections -> invert
71
layers -> new raster layer
72
edit -> paste into selection
73
effects -> plugins -> Tile & Mirror / Mirrored & Scaled / default settings
74
selections -> select none
75
activate Magic Wand Tool

76
select the four solid colored borders
77
flood fill selection with color 1
78
effects -> plugins -> Penta.Com / Jeans / defautl settings
79
selections -> select all
80
selections -> modify -> contract : 50 pixels
81
effects -> 3D effects -> drop shadow -> 0 / 0 / 100 / 40 / black
selections -> select none
82
copy / paste as new layer « molosse_decor »
don’t move it
83
copy / paste a new layer « molosse_decor2 »
84
move it top left

85
layers -> arrange -> move down
86
activate top layer
87
copy / paste as new layer « libellulegraphisme_chien_aux_fleurs9 »
88
image -> resize / 85%
89
adjust -> sharpness -> sharpen
90
move it to the right
91
layers-> duplicate
92
adjust -> blur -> gaussian blur / 15
93
layers -> arrange -> move down
94
blend mode : Dodge
95
layers -> arrange -> bring to top
96
copy / paste as new layer « molosse_texte »
97
move it where you like
98
layers -> duplicate
99
adjust -> blur -> gaussian blur / 5
100
layers -> arrange -> Move down
101
blend mode : Dodge
102
apply your watermark
103
image -> add borders -> 2 pixels color 1
104
image -> add borders -> 2 pixels color 3
105
file -> save as... type .jpeg
to write to Libellule

If you create a tag with this tutorial, don’t hesitate to send it toLibellule
She will be very glad to see it and present it in her galery
at the end of the tutorial on her site
If you want to be informed about Libellule’s new tutorials and work
join her newsletter

My tag with my tube

Back to the boards of Libellule’s tutorials
board 2  board 3 board 3

|