
Original tutorial can be found here

This tutorial was created by Libellule with PSPX7
I used PSPX9
but it can be realized with other versions

General conditions
This tutorial is an original and personal design of Libellule.
any resemblance with another one would be pure coincidence.
You can share your creations, create signatures for your
friends or for groups
but you are not allowed to use this tutorial in your site,
or claim it as yours
You must indicate the copyrights of the artists .
Thank you to respect the rules.

If you are interested by translating this tutorial in another
language
thank you to ask Libellule.
a link towards her site will be asked

It is strictly forbidden to use the material provided for
your tutorials
and to share it in groups or forums
Libellule has received the authorizations to use the tubes
she provides
see here


Preparation
install the plugins (double click on them)
copy the masks in the folder “mask” of “My
PSP Files” or open with PSP and minimize it (best method)
open the tubes and duplicate them. Work with the copies,
close the originals
copy the texture into the folder « textures » of
Corel PSP Folder

Colors
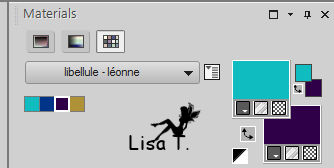
color 1 --> foreground color --> FG --> #10bcc0
color 2 --> background color --> BG --> #013589
color 3 -> #2f0048
color 4 -> #af9139

don’t hesitate to change the colors, the blend modes,
to match with your tubes

Filters


Material


use the Pencil to follow the steps
hold down left click to grab it and move it


Realization
1
in the materials palette, set colors 1 & 3 as
FG and BG colors
open the Alpha layer
2
window -> duplicate
close the original
3
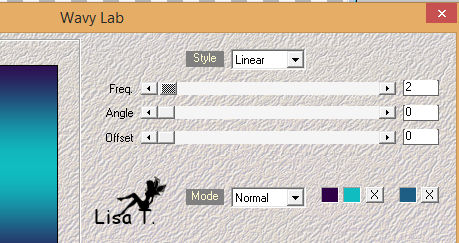
effects -> plugins -> Mehdi / Wavy Lab (colors 1,
2 & 3)
4
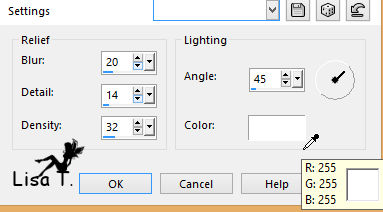
effects -> texture effects -> soft plastic -> default
settings
5
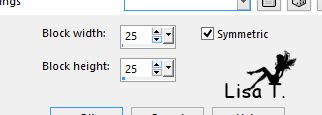
effects -> distortion effects -> pixelate
6
effects -> edge effects -> enhance
7
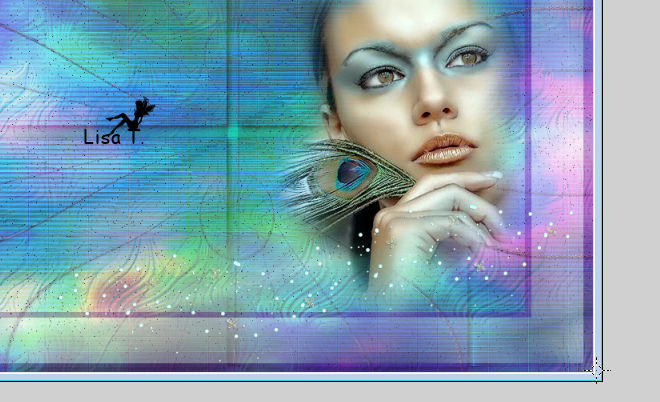
layers -> duplicate
8
image -> free rotate / left - 90°
9
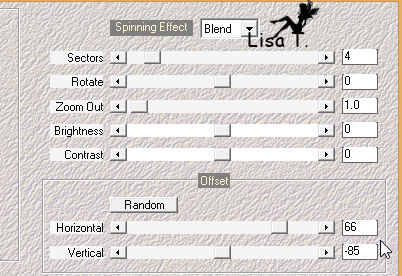
effects -> plugins -> Mehdi Kaleidoscope 2.1
10
effects -> plugins -> FM Tile Tools / Emboss / default
settings (but set intensity to : 1.000)
11
layers -> merge -> merge visible
12
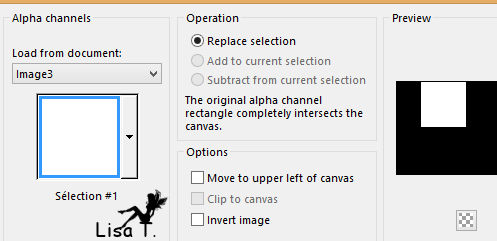
selections -> load-save selection -> from alpha
channel -> selection #1
13
selections -> promote selection to layer
14
selections -> select none
15
effects -> plugins -> Simple -> Top Left Mirror
/ default settings
16
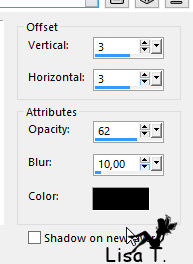
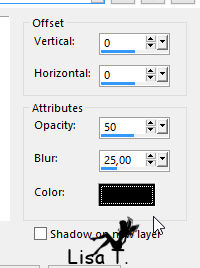
effects -> 3D effects -> drop shadow
17
layers -> duplicate
18
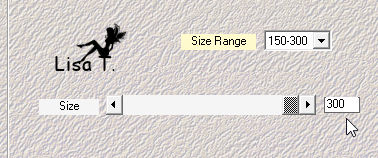
effects -> plugins -> Mehdi / Weaver
19
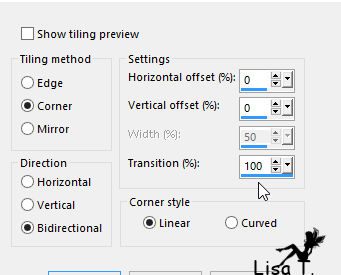
effects -> image effects -> seamless tiling
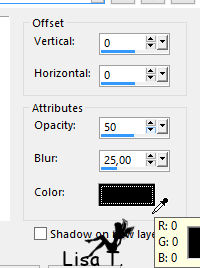
20
effects -> edge effects -> enhance
21
layers -> arrange -> move down
22
highlight top layer
23
layers -> duplicate
24
effects -> distortion effects -> wave

25
blend mode of the layer : dodge - opacity : 70%
26
layers -> new raster layer
27
flood fill white
28
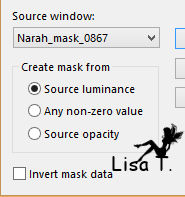
layers -> new mask layer -> from image
29
layers -> merge -> merge group
30
layers -> duplicate
31
effects -> plugins -> Unlimited 2 -> Render /
Color Clouds / 87
32
layers -> arrange -> move down
33
layers -> properties -> blend mode : hard light
- opacity : 80%
34
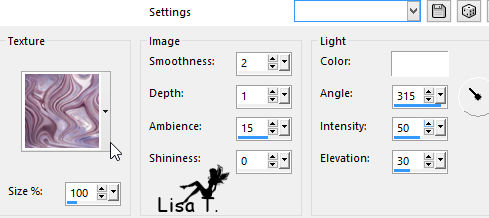
effects -> texture effects -> find « BRpuep »
35
highlight top layer
36
layers -> new raster layer
37
flood fill with color 4
38
adjust -> add-remove noise -> add noise -> gaussian
/ check « mochrome » / 100%
39
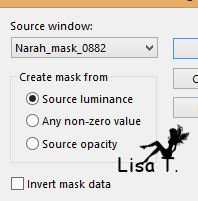
layers -> new mask layer -> from image
40
layer s-> merge -> merge group
41
adjust -> sharpness -> sharpen
42
effects -> plugins -> Simple / 4 Way Average/ default
settings
43
effects -> edge effects -> enhance
44
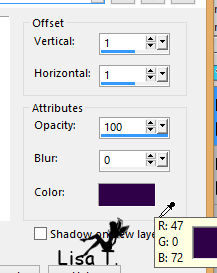
effects -> 3D effects -> drop shadow -> color
3
45
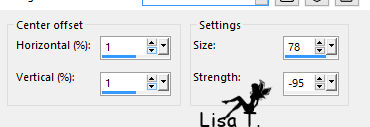
effects -> distortion effects -> warp
46
layers -> duplicate
47
blend mode of the layer : dissolve - opacity :
10%
48
layers -> arrange -> move down
49
highlight top layer
50
layers -> new raster layer
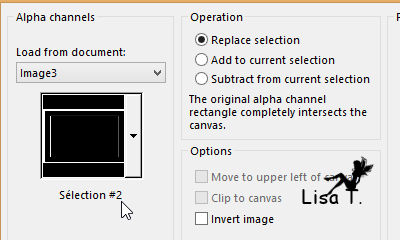
51
selections -> load-save selection -> from alpha
channel -> selection #2
52
flood fill selection with color 3
53
effects -> plugins -> Unlimited 2 -> VM Stylize
/ Raygun / default settings
54
effects -> texture effects

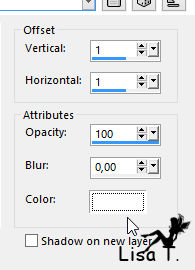
55
effects -> 3D efefcts -> drop shadow
56
selections -> select none
57
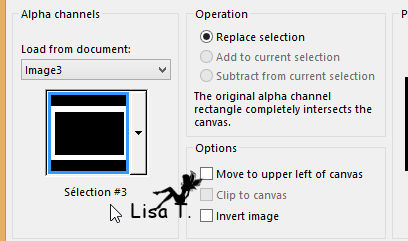
selections -> load-save selection -> from alpha
channel -> selection #3
58
flood fill selection white - opacity : 30%
59
effects -> plugins -> Graphic Plus / Cross Shadow
(default settings)
60
selections -> select none
61
copy / paste as new layer the misted image « libellulegraphisme_femme_plume_paon.png »
62
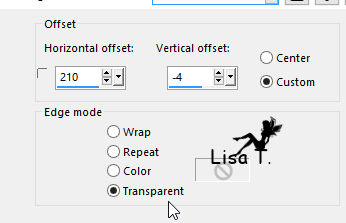
effects -> image effects -> offset
63
copy /paste as new layer « EL3.png »
64
move it bottom right on the woman’s hand
65
selections -> load-save selection -> from alpha
channel -> selection #4
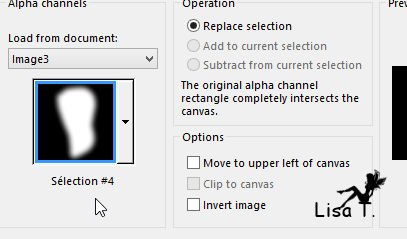
if you don’t use the same tube, select all, then :
selections -> float - selections -> defloat
66
highlight « promoted selection » and
DELETE
67
selections -> select none
68
highlight top layer
69
highlight the character tube, erase the watermark
back to your work : copy / paste as new layer
70
image -> resize -> uncheck « resize all
layers » -> 90%
71
adjust -> sharpness -> sharpen
72
move the layer to the left (see final result)
73
layers -> duplicate
74
adjust -> blur -> gaussion blur / 5
75
layers -> arrange -> move down
76
blend mode of the layer : dodge
77
copy / paste as new layer the text tube
78
move it to the right (or elsewhere, as you like)
79
layers -> merge -> merge visible
80
selections -> select all
81
image -> add borders -> 30 pixels white
82
effects -> 3D effects -> drop shadow
83
selections -> select all (previous selection is automatically
replaced)
84
image -> add borders -> 15 pixels colpr 3
85
selections -> invert
86
selections -> promote selection to layer
87
effects -> plugins -> Unllimited 2 -> Render
/ Color Clouds (default settings)
88
effects -> texture effects

89
effects -> 3D effects -> drop shadow
90
selections -> select none
91
image -> add borders -> 1 pixel black
92
apply your watermark
file -> save as... -> type .jpeg
your tag is finished

to write to Libellule


If you create a tag with this tutorial, don’t hesitate
to send it to Libellule
She will be very glad to see it and present it in her galery
at the end of the tutorial on her site
Your gallery

If you want to be informed about Libellule’s new
tutorials and work
subscribe to her newsletter


Back to the boards of Libellule’s tutorials
board 1  board
2 board
2  board
3 board
3 

|