Larissa

Original tutorial can be found here

I am member of TWInc
this tutorial is protected


This tutorial was created using PSPX2
but it can be realized with other versions

General conditions
This tutorial is an original and personal design of Libellule.
any resemblance with another one would be pure coincidence.
You can share your creations, create signatures for your friends or for groups
but you are not allowed to use this tutorial in your site, or claim it as yours
You must indicate the copyrights of the artists.
Thank you to respect the rules.

If you are interested by translating this tutorial in another language
thank you to ask Libellule.
a link towards her site will be aske

It is strictly forbidden to use the material provided for your tutorials
and to share it in groups or forums
Libellule has received the authorizations to use the tubes she provides
see  here here


Implementation
install the plugins
copy the selections into the folder “selection” of “My PSP Files”
copy the masks in the folder “mask” of “My PSP Files” or open with PSP and minimize it (best method)
open the tubes and duplicate them. Work with the copies, close the originals

Colors
color 1/foreground color/#54473c
color 2/background color/#fcecdf
color 3 -> #ffffff -> white

prepare the colors in the materials palette
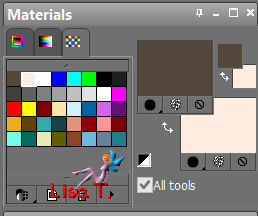
you may change the main colors, according to your tubes, but keep white
in your tube, choose a dark color as color 1 and a light color as color 2

Filters
Two Moon - Graphic Plus - Unlimited 2 (special effects) - user defined filter : Emboss 3 - Penta.com


Material
1 color palette - 1 tube by Syl - 2 masks (without name or signature) - 1 selection
2 decoration tubes - 2 doodles

Use the paint brush to follow the steps
left click to grab it
 |

Realization
The TAG
Step 1
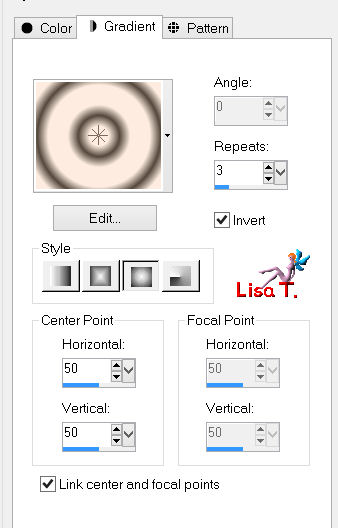
in the materials palette, prepare a sunburst gradient
Step 2
open a new transparent raster layer 800 * 600 pixels
fill with the gradient
Step 3
adjust/blur/radial blur

Step 4
effects/plugins/Two Moon/Grinder/80

effects/edge effects/enhance more
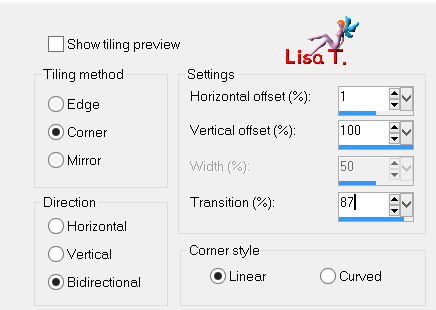
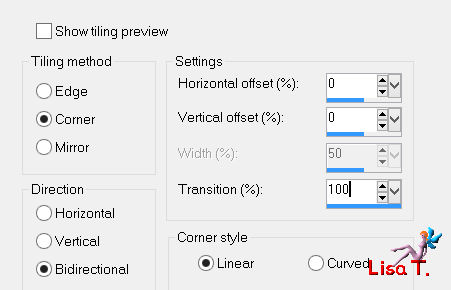
effects/image effects/seamless tiling
Step 5
layers/new raster layer
fill with color 1
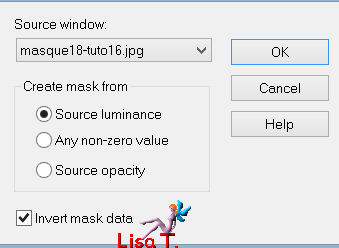
layers/new mask layer/from image/”masque18-tuto16”
layers/merge/merge group
Step 6
effectsuser defined filter/Emboss
in the layers palette, set the blend mode on “Luminance (legacy)” (or other)
layers/merge/merge visible (IMPORTANT)
Step 7
effects/image effects/seamless tiling (new settings)
Step 8
layers/duplicate - image/resize/uncheck “resize al layers”/80%
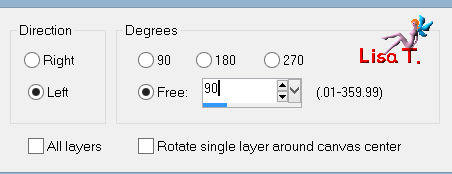
image/free rotate/left/90°
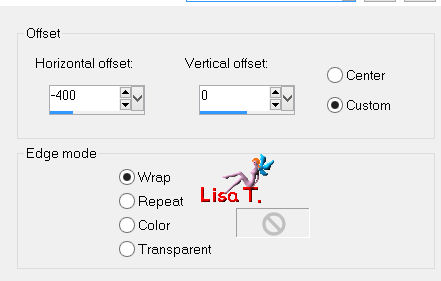
effects/image effects/offset
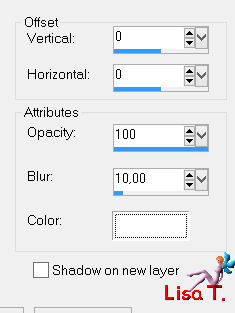
effects/3D effects/drop shadow (V : 0 H : 0 opacity : 100 blur : 10 color : white)
Step 9
layers/new raster layer
paint white
layers/new mask layer/from image/find mask “dream”
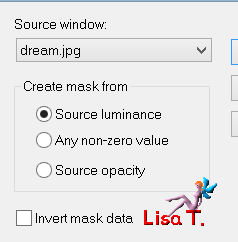
layers/merge/merge group
Step 10
layers/duplicate
effects/distortion effects/wave

layers/arrange/move down
Step 11
in the layers palette, activate the top layer
layers/new raster layer
selections/select all
activate the “cluster”
edit/copy - back to your work - edit/paste into selection
in the layers palette, set the blend mode on “Saturation” (or other)
selections/select none (or Ctrl+D)
Step 12
layers/new raster layer
selections/select all
activate the tube “luces_2.7.6.10_S”
edit/copy - back to your work - edit/paste into selection
selections/select none (or Ctrl+D)
Step 13
effects/plugins/Penta.com/Color Dot/default settings
effects/edge effects/enhance more
Step 14
activate the tube “larissa_decor”
edit/copy - back to your work - edit/paste as new layer
don’t move it
Step 15
selections/load-save selection/from disk/find selection “libellule-larissa”
layers/new raster layer
fill the selection with color 3/opacity of the flood fill tool on 80%

Step 16
effects/plugins/Two Moon/ShapeHolstien
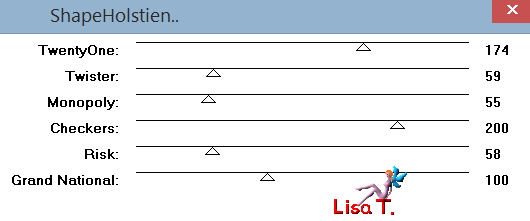
Step 17
effects/plugins/Unlimited 2/Special Effects 2/Puzzle [scaled]/255
selections/select none (or Ctrl+D)
effects/edge effects/enahnce more
layers/arrange/move down
in the layers palette, set the opacity on 60%
activate the top layer
layers/merge/merge down
Step 18
activate the tube “SvB(274)Beauty”
edit/copy - back to your work - edit/paste as new layer
move it properly
layers/duplicate
adjust/blur/gaussian blur/20
layers/arrange/move down
The Frame
Step 19
image/add borders/check “symmetric” ->
2 pixels color 1
1 pixel color 2
50 pixels with a contrasting color (red for instance)
Step 20
activate the magic wand tool (tolerance 0 feather 0 inside) and select the large border
Step 21
in the materials palette, prepare a linear gradient
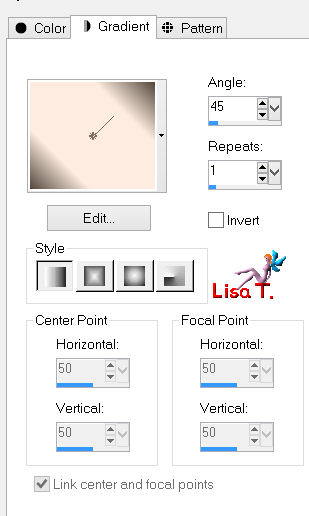
reset the opacity of the flood fill tool on 100%
fill the selection with the gradient
Step 22
selections/promote selection to layer
effects/plugins/Penta.com/Color Dot/default settings
effects/edge effects/enhance more
Step 23
effects/plugins/Graphic Plus/Cross Shadow/default settings
Step 24
selections/invert
effects/3D effects/drop shadow ( v 2 / h 2 / oapcity 60 / blur 5 / color black)
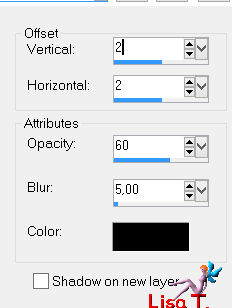
and again, drop shadow : ( -2 / -2 / 60 / 5 / black)
selections/select none (or Ctrl+D)
Step 25
image/add borders/check “symmetric” ->
1 pixel color 2
1 pixel black
Step 26
activate the tube “larissa_cecor2”
edit/copy - back to your work - edit/paste as new layer
don’t move it
Step 27
apply your signature
layers/merge/merge all (flatten)
Step 28
image/resize/width 800 pixels (or other)

your tag is finished. We hope you enjoyed doing it

to write to Libellule


If you create a tag with this tutorial, don’t hesitate to send it toLibellule
She will be very glad to see it and present it in her galery
at the end of the tutorial on her site


If you want to be informed about Libellule’s new tutorials ans work
join her newsletter


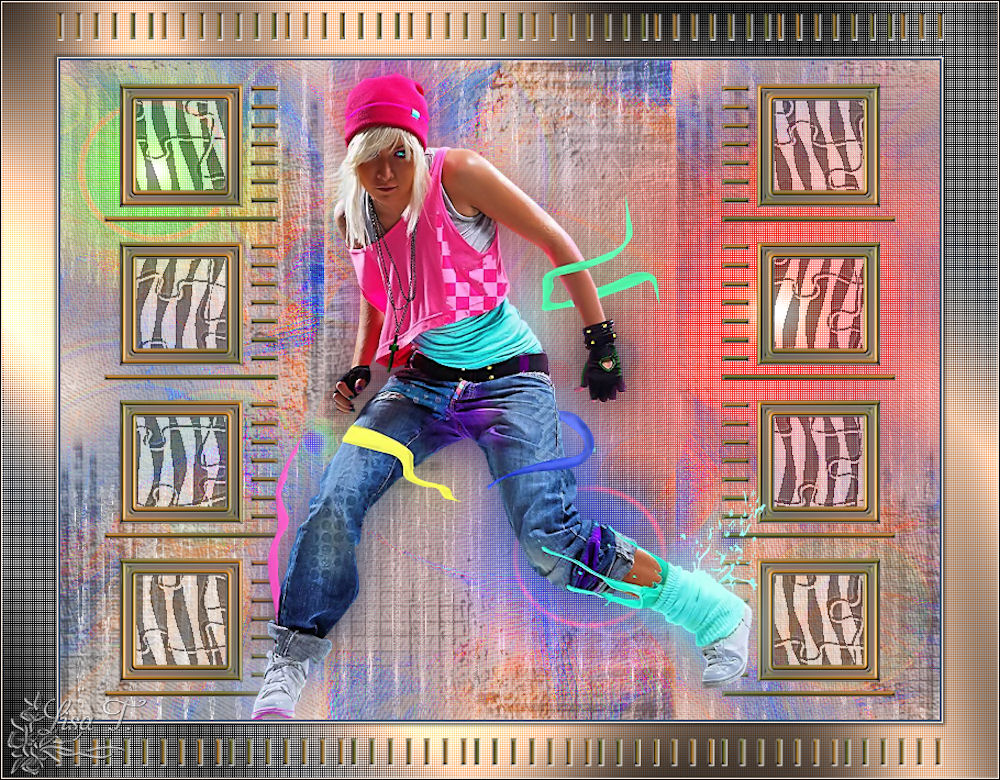
My tag with my tubes
Back to the board of Libellule’s tutorials


|