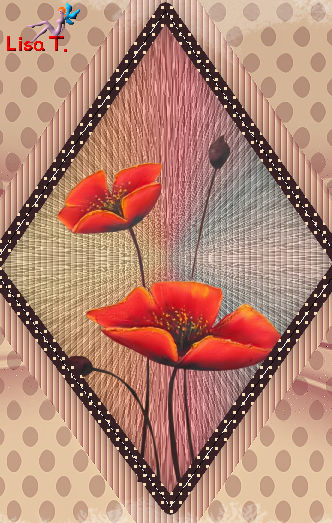
Kenzo

Original tutorial can be found here


This tutorial was created by Libellule with PSPX7
I use PSPX8
but it can be realized with other versions
General conditions
This tutorial is an original and personal design of Libellule.
any resemblance with another one would be pure coincidence.
You can share your creations, create signatures for your friends or for groups
but you are not allowed to use this tutorial in your site, or claim it as yours
You must indicate the copyrights of the artists.
Thank you to respect the rules.

If you are interested by translating this tutorial in another language
thank you to ask Libellule.
a link towards her site will be asked
It is strictly forbidden to use the material provided for your tutorials
and to share it in groups or forums
Libellule has received the authorizations to use the tubes she provides
see here

Preparation
install the plugins
copy the selections into the folder “selection” of “My PSP Files”
copy the masks in the folder “mask” of “My PSP Files” or open with PSP and minimize it (best method)
open the tubes and duplicate them. Work with the copies, close the originals
Colors
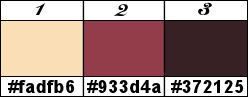
color 1/foreground color #fadfb6
color 2/background color #933d4a
color 3 -> #372125
you may change the colors, according to your tubes
Filters
AP Gradient, Topaz Labs, Andrew's Filter Collection 56, Alien Skin Candy5, Impact, &Neu!

Material

Use the Pencil to follow the steps
left click to grab it

Realization
Step 1
prepare the colors in the materials palette
color 1 as FG color and color 3 as BG color

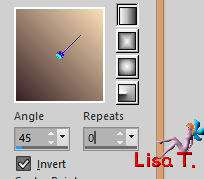
Step 2
in the materials palette, prepare a linear gradient
Step 3
open the alpha layer
window > duplicate
close the original and work with the copy
Step 4
flood fill the layer with the gradient
Step 5
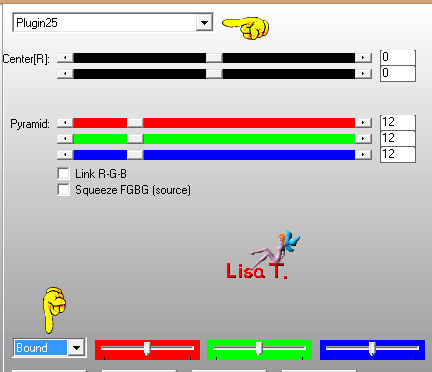
effects > plugins > AP Gradients > Gradient Pyramid > plugin 25 and Bound
Step 6
image > duplicate – image > mirror > mirror horizontal
Step 7
lower the opacity to 50%
Step 8
layers > merge > merge down
Step 9
adjust > blur > blur more
Step 10
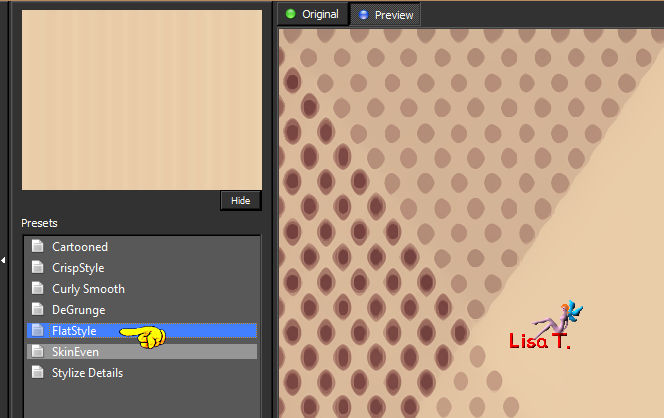
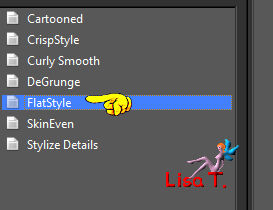
effects > plugins > Topaz Labs > Clean 3 > Flatstyle > default settings
Step 11
layers > new raster layer
flood fill with color 2
Step 12
adjust > add/remove noise > add noise

Step 13
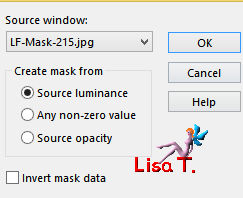
open the mask and minimize it to tray
layers > new mask layer > from image
Step 14
layers > merge > merge group
Step 15
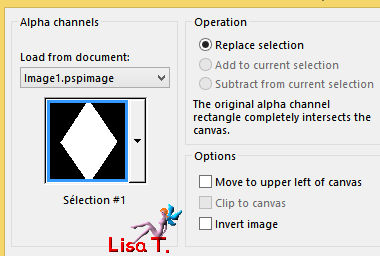
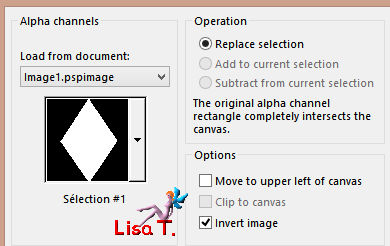
selections > load/save selection > from alpha channel > selection #1
Step 16
DELETE (hit the Delete key of your keyboard)
keep the selection active
Step 17
activate the background layer (raster 1)
effects > texture effects > Blinds > color 2
selections > select none
Step 18
layers > merge > merge visible
Step 19
adjust > shrpness > sharpen
Step 20
copy / paste as new layer the tube « kenzo_contour »
don’t move it
Step 21
opacity of the layer : 66%
Step 22
layers > new raster layer
Step 23
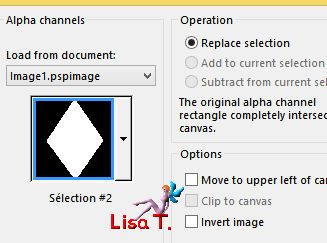
selections > load/save selection > from alpha channel > selection #2
Step 24
selections > modify > select selection borders
Step 25
flood fill the selection with color 3
Step 26
effects > texture effects > Weave > weave color #b4bfc1 > gap color : color 1

Step 27
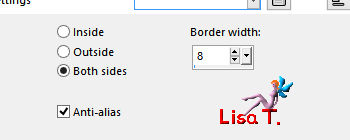
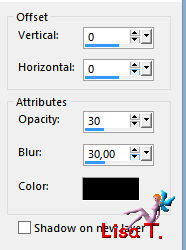
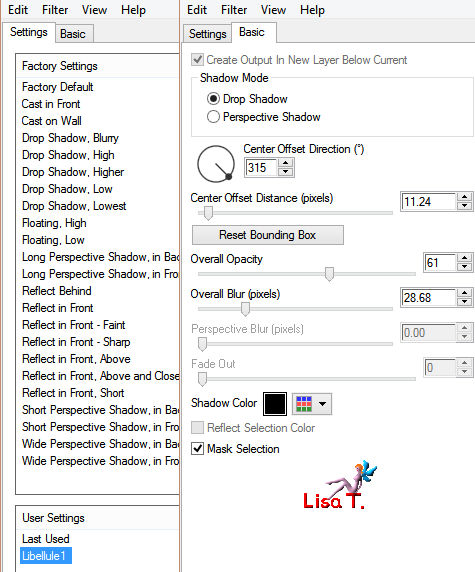
effects > 3D effects > drop shadow
Step 28
selections > sleect none
Step 29
layers > duplicate
Step 30
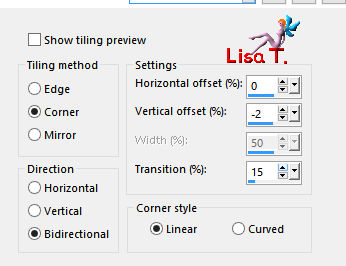
effects > image effects > seamless tiling
Step 31
layers > arrange > move down
Step 32
blend mode of the layer : Screen
Step 33
activate the top layer
layers > new raster layer
Step 34
selections > load/save selection > from alpha channel > selection #2
Step 35
in the materials palette, set White as FG color
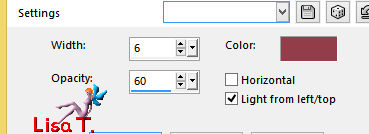
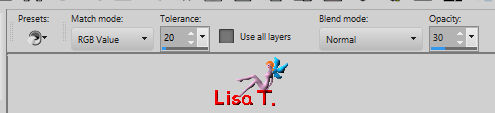
flood fill tool with the following settings and fill the selection (left click)
keep the selection active
Step 36
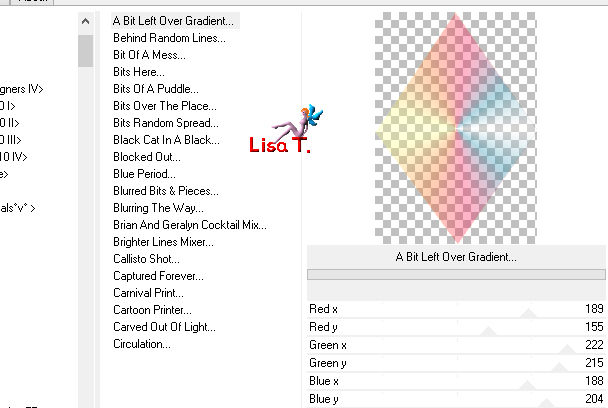
effects > plugins > Andrew’s Filter Collection 56 > A Bit Left Over Gradient > default settings
(this pluginsg should be found in Unlimited 2)
Step 37
layers > arrange > move down
Step 38
adjust > blur > gaussian blur > 6
Step 39
layers > dulicate
keep the selection active (otherwise the effect will be propagated to all the layer)
Step 40
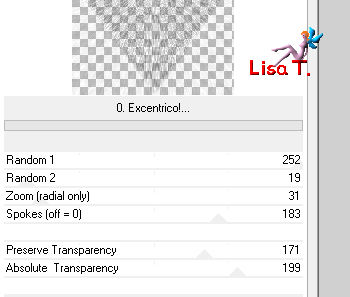
effects > plugins > Unlimited 2 > &Neu ! > &0.Excentricol
Step 41
adjust > sharpness > sharpen more
Step 42
keep the selection active
layers > new raster layer
Step 43
open the tube « calguisdcoquelicot2889 »
image > resize > uncheck « all layers » > 60% (don’t save the changing when closing the tube)
Step 44
copy / paste as new layer
move it like this
Step 45
selections > invert
DELETE
selections > select none
Step 46
effects > 3D effects > drop shadow
step 47
activate the background layer
open the tube « splatter6colorel »
edit > cut
Step 48
selections > load/save selection > from alpha channel > selection #1
don’t forget to check « invert »
Step 49
layers > new raster layer
edit > paste into selection
selections > select none
Step 50
effects > plugins > Topaz Labs > Clean 3 > Flatstyle > default settings
Step 51
blend mode of the layer : Luminance (Legacy) – opacity : 60%
Step 52
copy / paste as new layer the tube « libellule_kenzo_decor2 »
don’t move it
Step 53
blend mode of the layer : Screen
Step 54
activate the top layer
copy / paste as new layer the tube « MR_Ming Xi-Flower by Kenzo »
(don’t forget the erase the watermark)
move it to the right (see final result)
Step 55
effects > plugins > Alien Skin Eye Candy 5 – Impact > Perspective Shadow
find the preset provided
Step 56
copy / paste as new lyaer the tube « MR_Elixir by Kenzo » (the perfume bottles)
Step 57
image > resize > 50%
Step 58
image > mirror > mirror horizontal
Step 59
adjust > sharpness > sharpen
Step 60
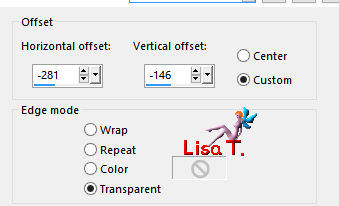
effects > image effects > offset
Step 61
effects > plugins > Alien Skin Eye Candy 5 – Impact > Perspective Shadow > preset 1 Libellule
Step 62
copy / paste as new layer the word Art tube
move it top left

Step 63
apply your watermark
Step 64
layers > merge > merge all
Step 65
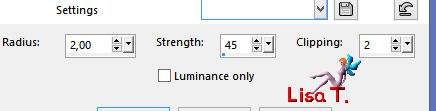
adjust > sharpness > unsharp mask
Step 66
image > add borders > check « symmetric » >
2 pixels black
5 pixels white
1 pixel black
30 pixels white
1 pixel color 2
1 pixel black
Step 67
file > save as... type .jpeg
to write to Libellule

If you create a tag with this tutorial, don’t hesitate to send it toLibellule
She will be very glad to see it and present it in her galery
at the end of the tutorial on her site
Your gallery

If you want to be informed about Libellule’s new tutorials and work
join her newsletter

Back to the boards of Libellule’s tutorials
board 2  board 3 board 3

|