Garden's Fragrances

Original tutorial can be found here

I am member of TWInc
this tutorial is protected

This tutorial was created using PSPX2
but it can be realized with other versions

General conditions
This tutorial is an original and personal design of Libellule.
any resemblance with another one would be pure coincidence.
You can share your creations, create signatures for your friends or for groups
but you are not allowed to use this tutorial in your site, or claim it as yours
You must indicate the copyrights of the artists.
Thank you to respect the rules.

If you are interested by translating this tutorial in another language
thank you to ask Libellule.
a link towards her site will be asked

It is strictly forbidden to use the material provided for your tutorials
and to share it in groups or forum

Libellule has received the authorizations to use the tubes she provides
see here


Implementation
copy the selection in the folder “selection” of “My PSP Files”
copy the mask in the folder “mask” of “My PSP Files” or open with PSP and minimize it
the second method is better, because it does not slow down your computer
Material
2 masks - 1 frame - 2 flowers tubes - 1 nail tube - 1 woman tube - 3 images - 1 background
I made the woman’s tube , Libellule has my permission to use it
the tubes of the chain and the branches were made by Choubinette Designs
the background is signed by Spring Art

Plugins
no plugin needed

Use the paint brush to follow the steps
left click to grab it
 |

Realization
Step 1
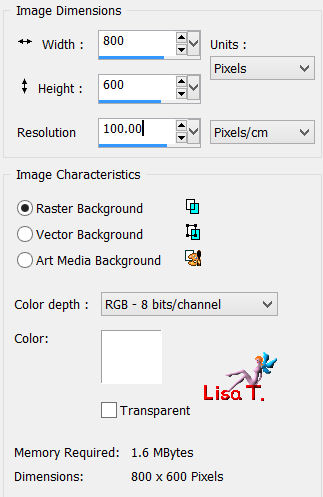
open a new transparent raster background 800 * 600 pixels
fill with white
Step 2
layers/new raster layer
fill with color #ffc2e5
layers/new mask layer/from image/find mask “WSL_Mask254”
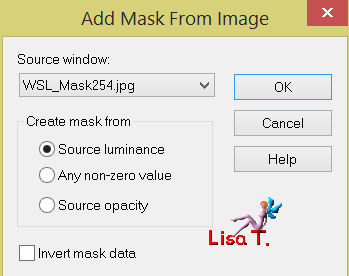
layers/merge/merge group
Step 3
activate the tube “feistuffohlove”
edit/copy - back to your work - edit/paste as new layer
image/mirror
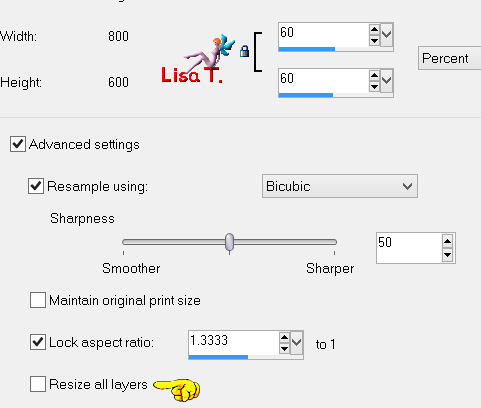
image/resize/uncheck “resize all layers”/60%
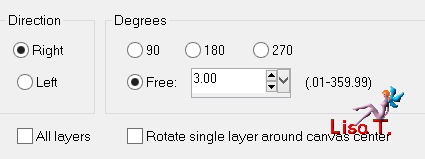
image/free rotate/right/3
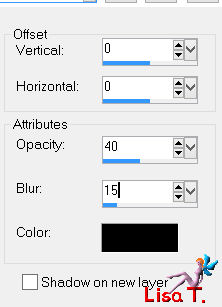
effects/3D effects/drop shadow
Step 4
layers/new raster layer
selections/select all
activate the tube “spring_art”
edit/copy - back to your work - edit/paste into selection
selections/select none
Step 5
layers/new mask layer/from image/finc mask “2proud”
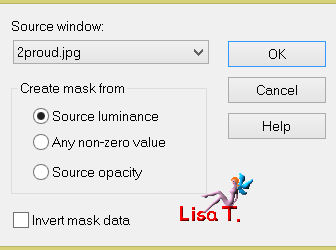
effects/edge effects/enhance more
layers/merge/merge group
layers/arrange/move down
adjust/sharpness/sharpen
Step 6
activate the image “HFD_beautiful_earth_Element7”
edit/copy - back to your work - edit/paste as new layer
image/resize/uncheck “resize all layers”/30%
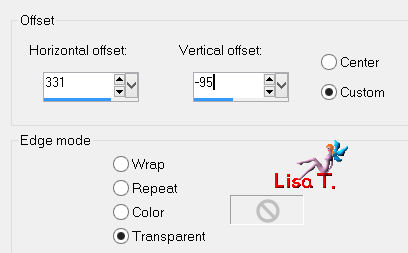
effects/image effects/offset
selections/load selection from disk/selection “libellule_effluve_jardin”
press the delete key of your keyboard
selections/select none
Step 7
in the layers palette, activate the upper layer
activate the tube “femmes_0243_lisat” (or one of your choice)
erase the signature
edit/copy - back to your work - edit/paste as new layer
if you use the tube of Lisa T., resize it to 55% - image/mirror
activate the freehand selection tool

draw a rectangle at the bottom of the tube, to soften the line
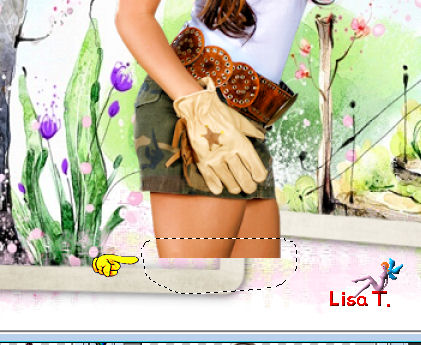
press the delete key of your keyboard (1 or 2 times)
Step 8
activate the tube “ChoubinetteDesigns_AuPaysDeLily_El(7)”
edit/copy - back to your work - edit/paste as new layer
image/resize/uncheck “resize all layers”/90%
move it to the left (see final result)
effects/3D effects/drop shadow
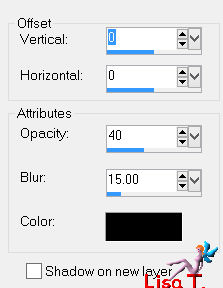
layers/arrange/move down
Step 9
acitvate the tube “ChoubinetteDesigns_AuPayDeLily_El(22)”
image/resize/60%
edit/copy - back to your work - edit/paste as new layer
move it to the left, next to the frame
effects/3D effects/drop shadow as before
Step 10
activate the tube of the nail
edit/copy - back to your work - edit/paste as new layer
image/resize/uncheck “resize all layers”/80%
move it to the left, on the first ring of the chain (previous tube)
adjust/sharpness/sharpen
Step 11
activate the tube “kimia_be_flowers1”
edit/copy - back to your work - edit/paste as new layer
image/resize/uncheck “resize all layers”/50%
adjust/sharpness/sharpen
effects/3D effects/drop shadow as before
move it at the bottom right
Step 12
activate the tube “fleurs”
edit/copy - back to your work - edit/paste as new layer
adjust/sharpness/sharpen
move it to the right, be careful not to hide the barrier
apply your signature
layers/merge/merge all (flatten)
file/save as… type jpeg

to write to Libellule


If you create a tag with this tutorial, don’t hesitate to send it to Libellule
She will be very glad to see it and present it in her galery
at the end of the tutorial on her site

If you want to be informed about Libellule’s new tutorials and work
join her newsletter


Back to the board of Libellule’s tutorials


|