

You will find the original tutorial here :

Thank you Laurette for your permission to translate your work
This tutorial is a personal creation.
Any resemblance with another one would be only pure coincidence.
It is stricly forbidden to modify tubes, to change their name or take off the matermarks,
To present them on your sites or blog,
To share them in groups,
to make a bank of images, or to use them on lucrative purposes.

Thank you to respect Laurette’s work and the tubers work.
Don’t hesitate to warn me if you have any trouble with this translation,
and I’ll try to fix the problem as quickly as I can

Laurette and I work with PSP2020 Ultimate
you can follow this tutorial with another version of PSP, but the result might be slightly different
don’t hesitate to change blend modes and opacities of the layers to match your personal colors and tubes
place the tools and materials provided into the appropriate folders of My COREL PSP general folder
to import presets, double-click on them, or import
open the mask(s) and minimize to tray
duplicate all the tubes and decorations, and alpha layers, and work with the copies to preserve originals
install the plugins necessary
this tutorial is the property of Laurette, and the translation is my property

Supplies
1 alpha layer
1 Tube Woman by Mentali
1 Tube landscape
4 Tubes decoration
1 Texture
1 Palette


Hints and Tips
TIP 1 -> if you don’t want to install a font -->
open it in a software as « Nexus Font » (or other font viewer software of you choice)
as long as both windows are opened (software and font), your font will be available in your PSP
TIP 2 -> from PSPX4, in the later versions of PSP the functions « Mirror » and « Flip » have been replaced by -->
« Mirror »has become --> image => mirror => mirror horizontal
« Flip » has become --> image => mirror => mirror vertical

Plugins needed
Medhi Wavy Lab 1.1
Filters Unlimited 2.0 / &<Background Designers IV / @Kaleidoscope 3
Filters Unlimited 2.0 / BKG Kaleidoscope / 4 QFlip Upperl
Flaming Pear / Flexify 2
MuRa's Seamless / Emboss at Alpha
AAA Frames / Foto Frame Works
Simple / Top Left Mirror

colors


Use the pencil to mark your place
along the way
hold down left click to grab and move it
 |

1
set FG to color 1 and BG to color 2 in materials palette
open the alpha layer, duplicate, close the original and work with the copy - rename « Raster1 »
effects => plugins => Mehdi => Wavy Lab 1.1 => colors 2 / 1 / 3 / 4

effects => texture effects => blinds / color 1
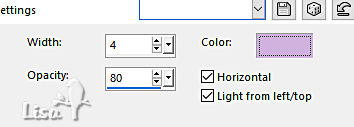
2
effects => plugins => Unlimited 2 => &<Background Designers IV> => @Kaleidoscope 3 / default settings

3
effects => plugins => Unlimited 2 => &<Bkg Kaleidoscope> / 4 QFlip UpperL / default settings
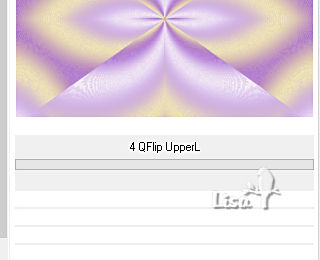
4
layers => duplicate
highlight bottom layer
effects => Effet de textures => use the texture provided « @nne textuur-M »

You don't see anything changed, that's normal
highlight top layer
*** don’t follow the explanations following if you use the tube « flexify2 » provided => go directly to step 6 ***
effects => geometric effects => Geometric => Circle

image => resize => untick « resize all layers » => 75%

edit => repeat => « resize all layers » => 75%
5
effects => plugins => Flaming Pear => Flexify 2
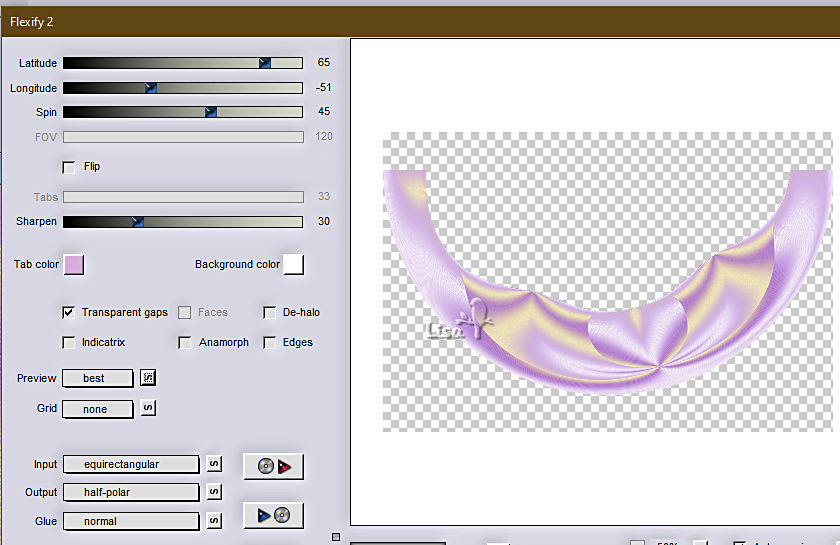
image => resize => untick « resize all layers » => 70%
objects => align => bottom
OR =>
enable the Pick tool with the following settings, to move the layer acurately => position X : 135 / position Y : 284
hit the « M » key of your keyboard to disable the tool
layers => duplicate
image => mirror => mirror vertical
layers => merge => merge down
image => resize => untick « resize all layers » => 95%
*** if you have difficulties with this step, you will find the resulting layer in the material. You just have to colorize it in your personal colors, then delete the geometric layer "circle" (copy of Raster 1).***
6
copy / paste « déco cercle » as new layer
don’t move it
blend mode of the layer : Soft Light
effects => 3D effects => drop shadow => 2 / 2 / 80 / 30 / color 2
effects => 3D effects => drop shadow => -2 / -2 / 80 / 30 / color 2
7
layers => new raster layer
enable the Selection tool / custom selection

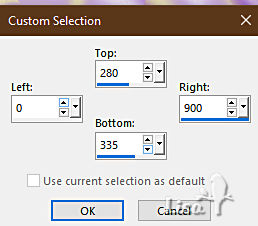
flood fill selection with color 2
effects => texture effects => blinds ( same settings as previously / color 1 )
selections => select none
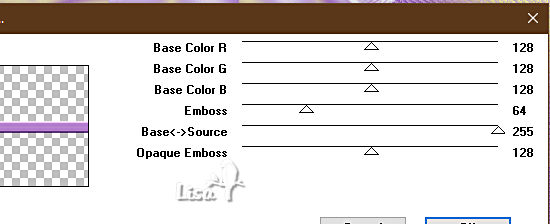
effects => plugins => Mura’s Seamless => Emboss at Alpha => default settings
8
layers => new raster layer
enable the Selection tool / custom selection

flood fill selection with color 1
effects => texture effects => blinds / White

selections => select none
effects => plugins => Mura’s Seamless => Emboss at Alpha => default settings
layers => merge => merge down
9
effects => distortion effects => Wave

image => resize => untick « resize all layers » => 115%
objects => align => center in canvas
OR =>
enable the Pick tool with the following settings, to move the layer acurately => position X : -68 / position Y : 200
hit the « M » key of your keyboard to disable the tool
layers => duplicate
image => mirror => mirror vertical
layers => merge => merge down
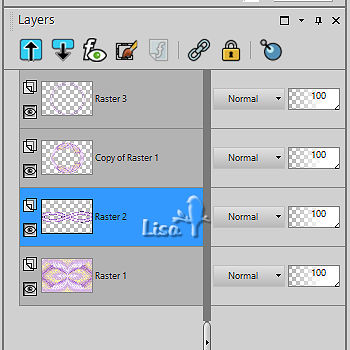
layers => arrange => move down Twice
10
keep this layer highlighted
selections => load-save selection => from alpha channel => selection # 1

hit the DELETE key of your keyboard
selections => select none
effects => 3D effects => drop shadow => 2 / 2 / 80 / 30 / color 2
effects => 3D effects => drop shadow => -2 / -2 / 80 / 30 / color 2
highlight Raster 1 and close the eye
highlight any other layer => layers => merge => merge visible
open the eye of Raster 1
11
highlight Raster 1
copy / paste the landscape tube as new layer
selections => load-save selection => from alpha channel => selection # 1
selections => invert
hit the DELETE key of your keyboard
selections => select none
effects => 3D effects => drop shadow => 0 / 0 / 80 / 30 / color 1
12
highlight top layer
copy / paste « déco 1 » as new layer
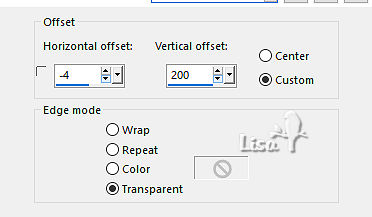
effects => image effects => offset => H : -4 / V : 200 / tick « custom » and « transparent»
layers => duplicate
image => mirror => mirror vertical
layers => merge => merge down
effects => 3D effects => drop shadow => 1 / 1 / 100 / 1 / color 2 => tick « shadow on new layer »
blend mode of the layer (shadow layer) : Multiply
13
copy / paste « déco 2 » as new layer
don’t move it
effects => 3D effects => drop shadow => 1 / 1 / 100 / 1 / color 2 => tick « shadow on new layer »
blend mode of the layer (shadow layer) : Multiply
14
image => add borders => tick « symmetric » => ...
2 px color 2
4 px color 3
2 px color 2
selections => select all
image => add borders => tick « symmetric » => ...
35 px white
selections => invert
effects => texture effects => texture / same settings as previously
effects => edge effects => enhance
selections => invert
effects => 3D effects => drop shadow => 0 / 0 / 30 / 40 / black => UNtick « shadow on new layer »
selections => select none
15
image => add borders => tick « symmetric » => ...
2 px color 2
4 px color 3
2 px color 2
selections => select all
image => add borders => tick « symmetric » => ...
50 px white
selections => invert
effects => plugins => Mehdi => Wavy Lab 1.1 => colors 1 / 1 / 3 / 4

16
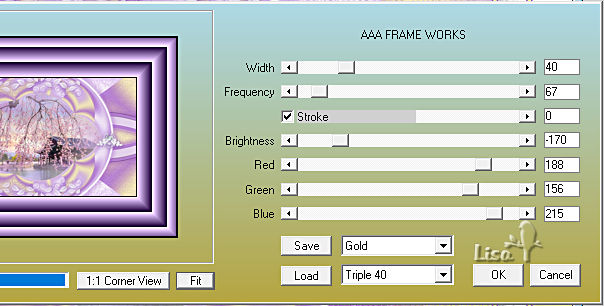
effects => plugins => AAA Frames => Frame Works => change the RGB values according to your color 1
selections => invert
effects => 3D effects => drop shadow => 0 / 0 / 30 / 40 / black => UNtick « shadow on new layer »
17
selections => select all
image => add borders => tick « symmetric » => ...
2 px color 2
50 px white
effects => 3D effects => drop shadow => 0 / 0 / 30 / 40 / black
edit => repeat => drop shadow
selections => select none
18
copy / paste the corner tube as new layer
colorize if necessary
effects => image effects => offset => H : -499 / V : 350 / tick « custom » and « transparent »
effects = > plugins => Simple => Top Left Mirror
effects => 3D effects => drop shadow => 1 / 1 / 100 / 1 / white / tick « shadow on new layer »
blend mode of the layer (shadow layer) : Multiply
19
copy / paste « déco Smile » as new layer
place on the left
optional => blend mode of the layer : Luminance (Legacy)
effects => 3D effects => drop shadow => 1 / 1 / 100 / 1 / color 2 => UNtick « shadow on new layer »
20
copy / paste the woman tube as new layer
place on the right
effects => 3D effects => drop shadow => 0 / 0 / 30 / 50 / black
adjust => sharpness => sharpen
image => add borders => tick « symmetric » => ...
3 px color 2
apply your watermark or signature
write your licence number if you used a licensed tube
layers => merge => merge all (flatten)
image => resize => tick « resize all layers » => 950 px width
save your work as... type .jpeg

My tag with my mist - Character tube by Colybrix

Don't hesitate to write to me if you have any trouble with her tutorial
If you create a tag (using other tubes than those provided) with this tutorial
and wish it to be shown, send it to Laurette !
It will be a real pleasure for her to add it to the gallery at the end of the tutorial


back to the boards of Laurette’s tutorials
board 1

|