

You will find the original tutorial here :

Thank you Laurette for your permission to translate
your work
This tutorial is a personal creation.
Any resemblance with another one would be only pure coincidence.
It is stricly forbidden to modify tubes, to change their
name or take off the matermarks,
To present them on your sites or blog,
To share them in groups,
to make a bank of images, or to use them on lucrative purposes.

Thank you to respect Laurette’s work and the tubers
work.
Don’t hesitate to warn me if you have any trouble
with this translation,
and I’ll try to fix the problem as quickly as I can

Laurette and I work with PSP2020 Ultimate
you can follow this tutorial with another version
of PSP, but the result might be slightly different
don’t hesitate to change blend modes and opacities
of the layers to match your personal colors and tubes
place the tools and materials provided into the appropriate
folders of My COREL PSP general folder
to import presets, double-click on them, or import
open the mask(s) and minimize to tray
duplicate all the tubes and decorations, and alpha layers, and work with
the copies to preserve originals
install the plugins necessary
this tutorial is the property of Laurette, and the
translation is my property

Supplies
alpha layer
tubes
mask
color palette

Hints and Tips
TIP 1 -> if you don’t
want to install a font -->
open it in a software as « Nexus Font » (or
other font viewer software of you choice)
as long as both windows are opened (software and font),
your font will be available in your PSP
TIP 2 -> from PSPX4,
in the later versions of PSP the functions « Mirror » and « Flip » have
been replaced by -->
« Mirror »has become --> image => mirror => mirror
horizontal
« Flip » has become --> image => mirror => mirror
vertical

Plugins needed
Medhi / Wavy Lab1.1
dsb flux / Linear Transmission
Simple / Half Wrap
Alien Skin I Eye Candy 5 Impact I Glass / Clear
Toadies / Ommadawn...
MuRa's Meister - Perspective Tiling
Carolaine and Sensibility / cs_texture
AAA Frame / Foto Frame
Graphics Plus

colors
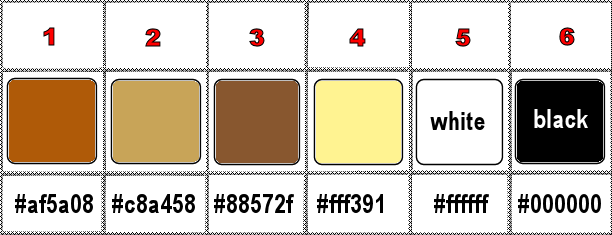
set FG to color 2 and BG to color 1 in materials
palette

Use the pencil to mark your place
along the way
hold down left click to grab and move it
 |

1
open the alpha layer, duplicate, close the original
and work with the copy
effects => plugins => Mehdi => Wavy Lab 1.1 => colors
2 / 1 / 3 / white
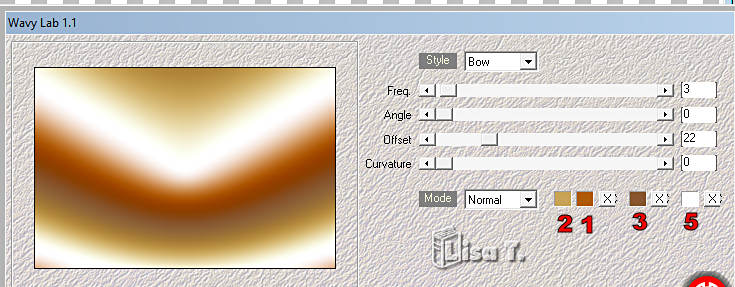
adjust => blur => gaussian blur => 60
2
layers => new raster layer
flood fill with color 4
selections => select all
copy / paste the character tube into selection
don’t forget to erase the watermark
selections => select none
3
effects => image effects => seamless tiling => default
settings
adjust => blur => gaussian blur => 60
adjust => add-remove noise => add noise
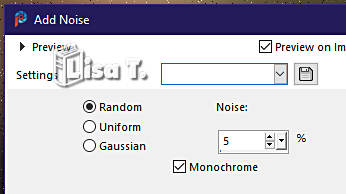
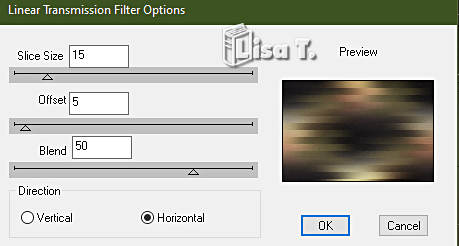
effects => plugins => DSB flux => Linear Transmission
4
effects = > plugins => Simple =>Half Wrap
effects = > plugins => Simple => Pizza Slice
Mirror
effects = > plugins => Simple => Blintz => apply
TWICE
effects => reflection effects => rotating Mirror
=> default settings
effects => image effects => seamless tiling => default
settings
adjust => sharpness => sharpen
5
highlight Raster 1
layers => arrange => bring to top
effects => geometric effects => Circle / Transparent
image => resize => untick « resize all layers » => 85%
effects => reflection effects => rotating Mirror
=> Side by Side
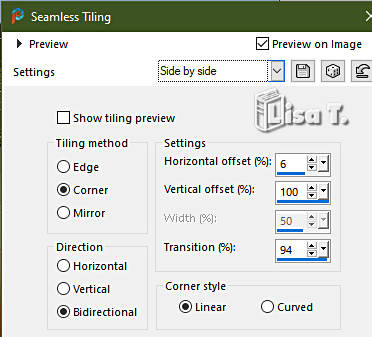
blend mode of the layer : Overlay
your layers palette looks like this
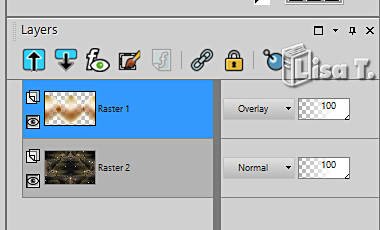
layers => merge => merge down
6
layers => duplicate
selections => load-save selection => from alpha channel
=> selection # 1
selections => promote selection to layer
selections => select none
image => mirror => mirror horizontal
layers => merge => merge down
blend mode of the layer : Hard Light
effects => 3D effects => drop shadow => 0 / 0
/ 60 / 40 / black
layers => merge => merge down
7
layers => new raster layer
selections => load-save selection => from alpha channel
=> selection # 2
selections => modify = > select selection borders
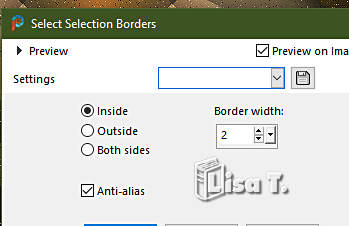
effects => 3D effects => Inner Bevel
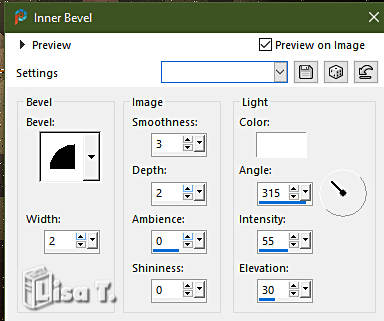
selections => select none
8
selections => load-save selection => from alpha channel
=> selection # 3
selections => modify = > select selection borders

flood fill selection with color 1
effects => 3D effects => Inner Bevel

selections => select none
9
selections => load-save selection => from alpha channel
=> selection # 4
selections => modify = > select selection borders

flood fill selection with color 1
effects => 3D effects => Inner Bevel

selections => select none
10
enable the magic wand tool tolerance and feather => 01
click in the middle of your tag
selections => modify => contract => 20 px
selections => modify = > select selection borders

flood fill selection with color 1
effects => 3D effects => Inner Bevel

selections => select none
your tag looks like this
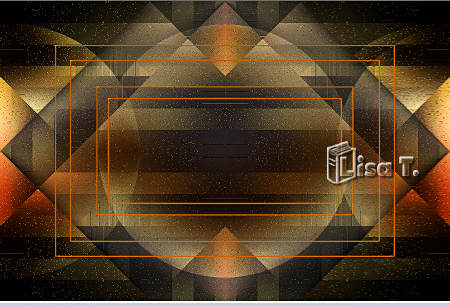
11
set the opacity of the Flood Fill tool to 50%
color 1 is the FG color in the materials palette
enable the magic wand tool
click inside the second selection
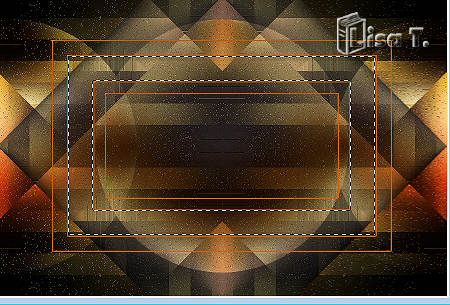
flood fill selection with color 1
effects => 3D effects => drop shadow => 0 / 0
/ 60 / 40 / black
reset the opacity of the Flood Fill tool to 100%
selections => select none
12
enable the magic wand tool
click inside the third selection and flood fill selection
with color 2
effects => texture effects => Weave / colors 4 and
1
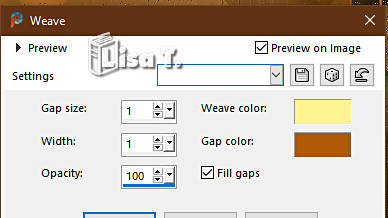
effects => 3D effects => drop shadow => 0 / 0
/ 60 / 40 / black
selections => select none
13
set FG to color 2
set the opacity of the Flood Fill tool to 20%
layers => new raster layer
selections => load-save selection => from alpha channel
=> selection # 5
flood fill selection with color 2
reset the opacity of the Flood Fill tool to 100%
14
layers => new raster layer
copy / paste the landscape tube into selection
effects => plugins => Alien Skin Eye Candy 5 Impact
/ Glass / prest « Clear »
optional => lower the opacity to 90%
layers => merge => merge down
selections => select none
15
highlight « Copy of Raster 2 »
effects => plugins => Toadies => Ommadawn

effects => plugins => Mura’s Meister => Perspective
Tiling
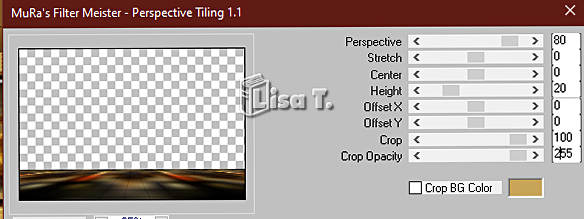
effects => 3D effects => drop shadow => 0 / 0
/ 60 / 40 / black
your layers palette looks like this
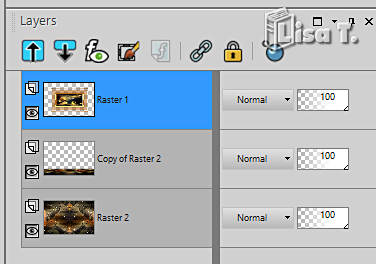
layers => merge => merge visible
16
layers => new raster layer
flood fill white
layers => new mask layer => from image
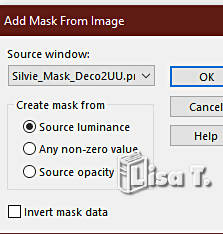
layers => duplicate
layers => merge => merge group
image => mirror => mirror horizontal
blend mode of the layer : Dodge
17
image => add borders => tick « symmetric » => ...
1 px black
edit COPY
(for security, paste as new image and save for later use)
back to your work
image => add borders => tick « symmetric » => ...
2 px color 2
2 px color 1
2 px color 2
selections => select all
image => add borders => tick « symmetric » => ...
25 px white
selections => invert
copy / paste into selection the image set aside at
the begining of this step
adjust => blur => gaussian blur => 40%
adjust => add-remove noise => add noise

selections => invert
effects => 3D effects => drop shadow => 0 / 0
/ 80 / 40 / black
selections => select none
18
image => add borders => tick « symmetric » => ...
2 px color 2
2 px color 1
2 px color 2
selections => select all
image => add borders => tick « symmetric » => ...
50 px white
selections => invert
effects => plugins => Graphics Plus => Quick
Tile II / default settings
adjust => blur => gaussian blur => 40%
effects => plugins => Carolaine and Sensibility
=> cs_texture / default settings
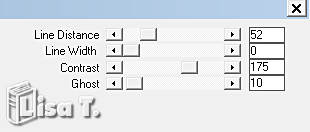
adjust => sharpness => sharpen more
selections => invert
effects => 3D effects => drop shadow => 0 / 0
/ 80 / 40 / black => apply TWICE
selections => select none
19
copy / paste the character tube as new layer
don’t forget to erase the watermark
image => resize => untick « resize all layers » => 90%
place properly
drop a shadow of your choice
20
copy / paste the flower tube as new layer
don’t forget to erase the watermark
image => resize => untick « resize all layers » => 70%
place properly
drop a shadow of your choice
21
copy / paste the Word Art tube as new layer
place properly
effects => 3D effects => drop shadow => 1 / 1
/ 80 / 1 / black
colorize if necessary
22
layers => merge => merge visible
selections => select all
effects => plugins => AAA Frames => Foto Frame
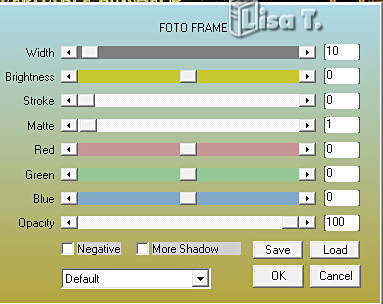
selections => select none
23
image => add borders => tick « symmetric » => 1
px color 2 (or another color of your choice)
apply your watermark or signature on a new layer
apply Laurette’s watermark
write your licence number if you used a licenced tube
layers => merge => merge all (flatten)
resize to 950 px width (or other)
file => save your work as... type .jpeg

My tag with my tubes

Don't hesitate to write to me if you have any trouble
with her tutorial
If you create a tag (using other tubes than those provided)
with this tutorial
and wish it to be shown, send it to Laurette !
It will be a real pleasure for her to add it to the gallery
at the end of the tutorial


back to the boards of Laurette’s tutorials
20 tutorials on each board
board 3 => 
at the bottom of each board you will find the arrows
allowing you to navigate from one board to another


|