Lana

original can be found Here

I am member of TWInc
this tutorial is protected

Material

tubes, an alpha layer with the selections, 2 presets Eye Candy
Double click on the plugis presets and they will be recorded in the good file
(Impact/Gradient Glow and Textures/Weave)
open the tubes with PSP ans reduce them
Thank you to the tubers : Grisi - Thafs - Kittys

Filters used
Mura’s Meister
Eye Candy 5 (Impact & Textures)
&BKG Kaleidoscope
Venderlee/Unpluged X
Unlimited 2
Italian Editors Effects (you MUST import this plugin in Unlimited)
Colors palette

Use the paintbrush to follow the steps
Left click to grab it

Realization
activate the layer “alpha lana”, window/duplicate, and close the original
we will work with the copy
in the materials palette, prepare a sunburst gradient
using two colors chosen in your main tube
dark color as foreground, and light color as background, as shown below

paint your layer with the gradient
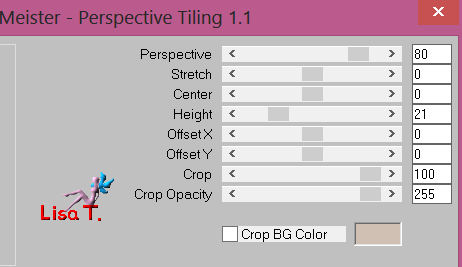
effects/plugins/Mura’s Meister/Perspective Tiling/default settings

effects/plugins/Simple/Top bottom wrap
effects/plugins/BKG Kaleidoscope/@Blueberry Pie
important : layers/merge/merge all (flatten)
effects/plugins/&BKG Kaleidoscope/Nomads rug

layers/duplicate
effects/plugins/Unlimited/Special Effects 1/Binoculars

in the layers palette, set the blend mode to “screen”
and the opacity between 40% ans 45% (it depends on your colors)
layers/merge/merge down
layers/promote background layer (and it becomes a “normal” raster : raster 1)
selections/load-save selection/from alpha channel/Selection #1

selections/promote selection to layer
selections/select none
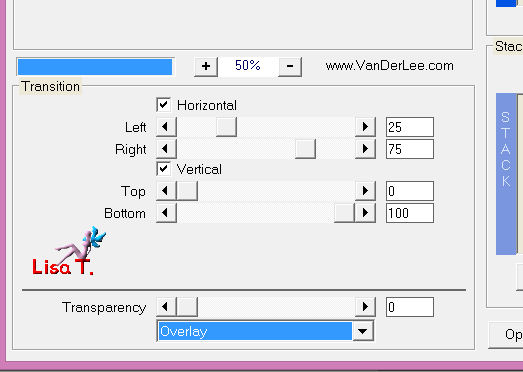
effects/plugins/VanDerLee/Unplugged-X/Transition
effects/3D effects/drop shadow : 0 / 0 / 20 / 20 / black
selections/load-save selection/from alpha channel/selection #2

selections/promote selection to layer
effects/plugins/Eye Candy 5/Textures/Weave -> preset Vivi 0613
in the layers palette, set the blend mode to “darken” (or other of your choice)
and the opacity to 50%
layers/new raster layer
effects/plugins/Eye Candy 5/Impact/Gradient Glow/preset Vivi 0613gg
layers/new raster layer
activate the landscape tube “Grisi misted paisage 359”
copy and paste into selection
selections/select none
layers/arrange/move down (1 times)
in the layers palette, set the blend mode to “luminance (legacy)” (or other)
and the opacity to 65%
activate the bottom layer of the stack (raster 1)
selections/load-save selection/from alpha channel/selection #3

selections/promote selection to layer
effects/texture effects/blinds

effects/3D effects/drop shadow : 0 / 0 / 50 / 15 / black
effects/Unlimited 2/It@lian Editors Effects/Effeto Fantasma(26/0)

selections/select none
effects/3D effects/drop shadow as before
in the layers palete, set the blend mode to “overlay” (or other), opacity : 100%
activate the promoted selection

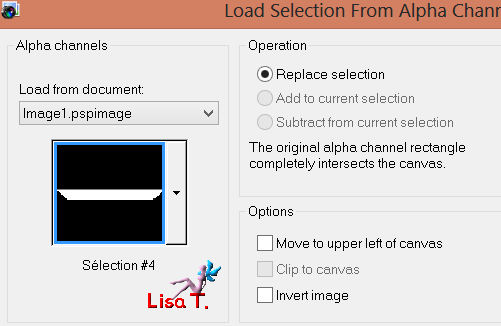
selections/load-save selection/from alpha channel/selection #4
selections/promote selection to layer
effects/texture effects/blinds/white

selections/select none
layers/duplicate – image/flip
layers/merge/merge down
effects/3D effects/drop shadow : 0 / 0 / 40 / 20 / black
in the layers palette, set the blend mode to “multiply” and the opacity to 90%
activate the bottom layer (raster 1) of the stack and duplicate
on the copy of raster 1 : adjust/blur/radial blur

effects/plugins/Mura’s Meister/Perspective Tiling

effects/3D effects/drop shadow : 0 / 0 / 40 / 20 / black
layers/merge/merge all (flatten)
activate the tube “Deco Vivi”, copy and paste as a new layer
effects/image effects/offset

adjust/hue and saturation/colorize (harmonize with your colors)
layers/merge/merge all (flatten)
image/add borders/enable symmetric
2 pixels dark color
2 pixels light color
2 pixels dark color
selections/select all
image/add borders/645 pixels/light color
edit/copy – selections/invert
edit/paste into selection
adjust/blur/gaussian blur/20
effects/plugins/Mura’s Meister/Perspective Tiling
selections/select none
activate the magic wand tool (default settings) and select the solid part of the framework
effects/texture effects/weave
(weave color n°1 and gap color n°2)

selections/promote selection to layer
effects/plugins/Eye Candy 5 Textures/Weave/preset Vivi 0613
selections/select none
effects/3D effects/drop shadow : 0 / 0 / 40 / 10 / black
in the layers palette, set the blend mode to “luminance” (or luminance legacy, or hard light)
opacity : 100%
layers/merge/merge all (flatten)
selections/select all
selections/modify/contract : 65 pixels
effects/3D effects/drop shadow : 0 / 0 / 75 / 35 / black and select none
activate the tube of the woman “Lana de Thafs”
image/resize to 83%
copy and paste as a new layer, and move it as shown
adjust/sharpness/sharpen
effects/3D effects/drop shadow : -8 / -12 / 40 / 15 / black
activate the tube “Kittys Flowers”, resize to 55%
copy and paste as a new layer
opposite to the woman
and drop shadow as before
new layer for your watermark
image/add borders/2 pixels color 1
resize if necessary, save as... type JPEG
Thank you for having realized this tutorial
If you want to send your creation to Vivi, she will be very glad to present it in her gallery

Here is my try with my tubes

Back to the boards of Vivi's tutorials
board 1  board 2 board 2

|