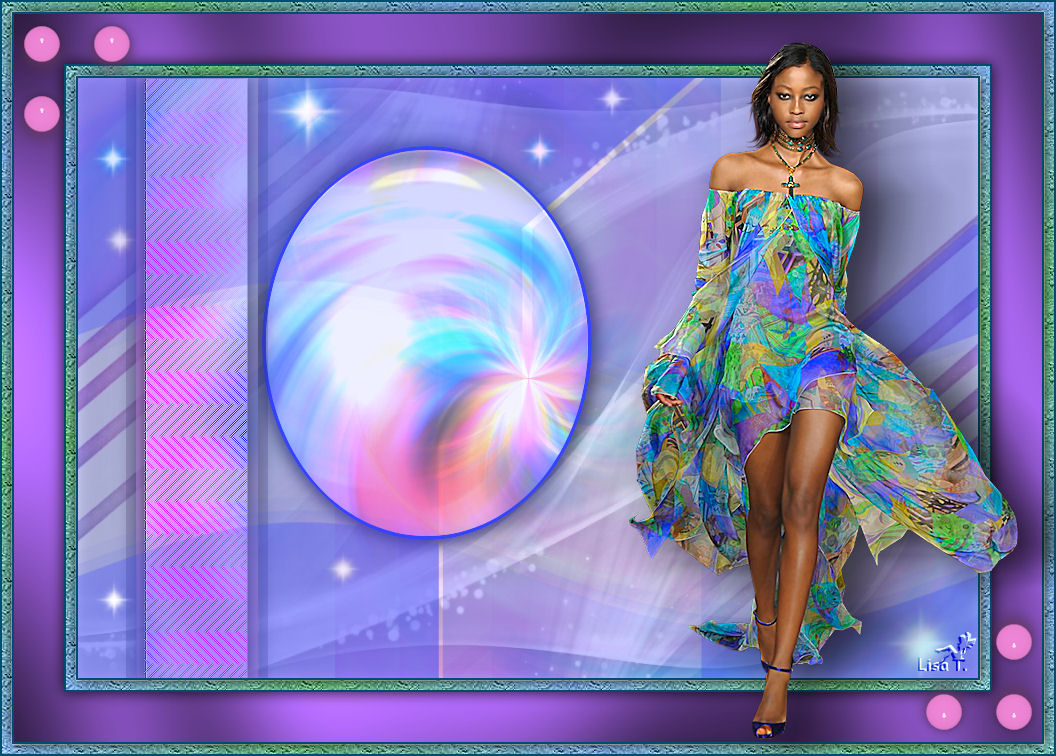
KATRINA

I am member of Tutorial Writers Inc.

Original can be found here

Franie works with PSP 13, and I use PSP 12
But this tutorial can be realized with another version of PSP

If you want to present her tutorials on your forums or sites
please ask her first.
If you publish your creation on a site or a blog
please put a link towards the tutorial.
Thank you to understand and respect the rules.

The tubes Franie uses have been sent by the authors on different groups
And she has their permission to use them
Some of them have been found on the WEB,
If you see a tube that belongs to you, contact Franie or myself
And a link towards your site will be added.

Filters used
Unlimited 2 – BKG Kaleidoscope
VanDerLee/UnPlugged-X
AP Lines/SilverLining
Unlimited 2 –Paper Textures
Graphic Plus/Cross Shadow
Alien Skin – Eye Candy 5 Impact/Glass

Material
1 tube by DBK
1 mask by Aditas
1 mask bu Domiela Goyave
1 layer Alpha channel (selections)
1 selection (to copy into the selections folder of My PSP Files)
1 preset – glass (double click on the preset and it will automatically be installed)
2 elements (PNG Files)
1 color palette
open all images in PSP, and reduce the 2 masks

grab the paintBrush to follow the steps

Tubers’ authorizations

Franie’s colors
Don’t hesitate to change them and to change the blend modes of the layers
According to your tubes and images

Execution
Step 1
activate the alpha layer – window/duplicate
we will work on the copy
Step 2
in the materials palette, set color 1 as foreground
paint the layer with color 1
selections/select all
Step 3
activate your main tube – copy and paste into selection
selections/select none
effects/image effects/seamless tiling

adjust/blur/radial blur

layers/duplicate
Step 4
effects/plugins/Unlimited 2 – BKG Kaleidoscope/Kaleidoscope 4

in the layers palette, set the blend mode on "dodge" (or other)
layers/merge/merge visible
layers/duplicate
Step 5
layers/new raster layer
in the materials palette, set color 2 as foreground
paint the transparent layer with color 2
layers/new mask layer/from image – select aditascreations_mask_08

layers/merge/merge group
in the layers palette, set the opacity on 50
Step 6
activate the layer "copy of merged"
selections/load-save selection/load selection from alpha channel/selection #1
selections/promote selection to layer
selections/select none
effects/plugins/Van Der Lee/UnPlugged-x

effects/3D effects/drop shadow

Step 7
selections/load selection from alpha channel/selection #2
effects/plugins/AP Lines/SilverLining

effects/edge effects/enhance
effects/3D effects/drop shadow as before
selections/select none
Step 8
activate the layer "copy of merged"
in the materials palette, set white as foreground color
layers/new raster layer/paint with white
layers/new mask layer/from image/choose "maskdomielagoyave30"

layers/merge/merge group
effects/3D effects/drop shadow as before
Step 9
layers/duplicate – image/mirror – image/flip
layers/merge/merge down
in the layers palette, set the opacity on 80%
effects/3D effects/drop shadow as before
Step 10
keep the layer "Group-Raster1" activated (the layer in the middle of the stack)
selections/load selection from alpha channel/selection #3
press the delete key of your keyboard
Step 11
activate the layer "copy of merged"
selectons/promote selection to layer
selections/modify/select selection borders

activate the flood fill tool

paint the selection with color 2
selections/select none
effects/3D effects/drop shadow

and again with -5 / -5 / 50 / 25
layers/arrange/move up
Step 12
activate the layer " copy of merged "
open element 1 /copy and paste as a new layer
effects/3D effects/drop shadow 0 / 0 / 50 / 20
in the layers alette, set the blend mode on Hard Light
Step 13
At this point, your layers palette hould be like this

and your work like this

Step 14
activate the upper layer
open elemnt 2/copy and paste as a new layer
layers/merge/merge visible
iamge/add borders/2 pixels/color 3

Step 15
in the materails palette set color 4 as foregrounds and color 5 as backgrounds
prepare a linear gradient

selections/select all
in the layers palette, promote background layer
image/canvas size

selections/invert
paint the transparent selection with the gradient
effects/plugins/Unlimited 2/Paper Textures/Wallpaper,Fine (default settings)

effects/edge effects/enhance
Step 16
selections/invert
effects/3D effects/drop shadow

and again with -2 / -2 / 50 / 20
selections/select none
Step 17
image/add borders/2 pixels/enable symmetric/color 3
image/add borders/ pixels/enable symetric/white
activate the magic wand tool and select the white border
in the materials palette, set color 1 as foreground and paint the selection
effects/plugins/Graphic Plus/Cross Shadow

selections/invert
effects/3D effects/drop shadow as before
2 / 2 / 50 / 20 -2 / -2 / 50 / 20
selections/select none
Step 18
layers/new raster layer
selections/load-save selection/from disk : selection (tuto57_1)
paint with color #ef85d6
effects/plugins/Alien Skin-Eye Candy Impact/Glass (preset tuto57_glass_franiemargot)

if you chage the colors, click on "Clear"
selections/select none
effects/3D effects/drop shadow : 0 / 0 40 / 10
Step 19
layers/duplicate
effects/image effects/offset

activate the layer : Raster 2
layers/duplicate
effects/image effects/offset

close the visibility toggle of raster 1, and activate the layer on top of the stack
layers/merge/merge visible
layers/duplicate – image/mirror – image/flip
open the visiblity toggle of raster 1
layers/merge/merge visible
image/add borders/2 pixels/color 3
Step 20
re-do step 15
with the following settings for the canvas size

and re-do step 16 too
Step 21
activate the main tube/copy and paste as a new layer
image/resize/65%/disable "resize all layers"
move to the right as shown on the final result
effects/3D effects/drop shadow

activate "Raster2 Shadow1"
effects/distortion effects/wind

activate the upper layer
adjust/sharpness/sharpen more
image/add borders/2 pixels/color #004d6e
don't forget to sign and save as ... type jpeg

Your tag is now finished
Written on 2013/03/01

You can send your creations to Franie.
It will be her pleasure to show it in her site
 to Franie to Franie
If you have any trouble following this tutorial
Contact Franie or myself
 To Lisa T. To Lisa T.
If you want to be informed about Franie’s new tutorials
Join her newsLetter

You will find your creations here

Back to the board of Franie's tutorials


|