Christmas
Sparkles

The original tutorial can be found HERE

Conditions of use of the material provided
It is forbidden to modifiy, change the name, take off the
watermarks or alter the tubes.
It is forbidden to share them in groups or offer them on
your site, blog or forum without permission
If you want to use them to create a tutorial, you must ask
the permission to the authors.
This is a personal work.
any resemblance with another tutorial would be pure coincidence
it is forbidden to share it or distribute it on the Web,
to present it in a group or forum without the author’s
permission
Rose de Sables is happy to share her work with you
she hopes it will help you dream and get away from your eveyday
life

Material

Translator's note : I used the font "Allegro" to write the english text
if you want me to send you the english Text layer, just mail me (click on flowers)

thank you to the tubers for their great work
open tubes, duplicate them and work with the copies
open mask and minimize it to tray
copy / paste selections into the folder « selections » of
Corel PSP Folder
copy / paste gradient into the folder « gradient » of
Corel PSP Folder
to prevent the theft of tubes, they are no longer provided
in the material ZIP
the only material provided is : decorations, masks and
selections
you will have to use your personal collection
thank you Verocreation - JofiaDevoe - EleaDesign - adb -
Narah for your great tubes

Filters Used
Xero / Clarity - Foto Frame


translator’s note
Rose des Sables works with PSP X, I use PSPX9 to create my
tag and write my translation
but this tutorial can be realized with another version
according to the version of PSP you use, the results might
be slightly differents
don’t hesitate to change the blend modes of the layers
to match your tubes and colors
Colors
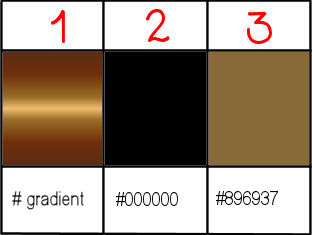
Rose de Sables chose these colors
color 1 --> foreground color --> FG --> gradient
provided
color 2 --> background color --> BG --> right click
--> #000000
color 3 --> #896937

Use the pencil to follow the steps
hold down left click to grab it and move it


Realization
1
open a new transparent image 950 * 650 pixels
flood fill with gradient
2
adjust -> blur -> gaussian blur

3
open Narah’s mask and minimize to tray
4
layers -> new raster layer -> flood fill black
5
layers -> new mask layer -> from image
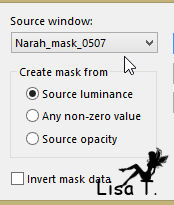
6
layers -> merge -> merge group
7
layers - duplicate
image -> mirror -> mirror horizontal
layers -> merge -> merge down
8
blend mode : Soft Light - opacity :
50%
9
effects -> edge effects -> enhance more TWICE
10
layers -> new raster layer
selections -> select all
11
copy / paste into selection background Star
selections -> select none
blend mode : Soft Light
12
copy / paste as new layer decoration tube by Verocreation
13
image -> mirror -> mirror vertical
image -> resize -> uncheck « resize all
layers » -> 80%
14
effects -> image effects -> offset
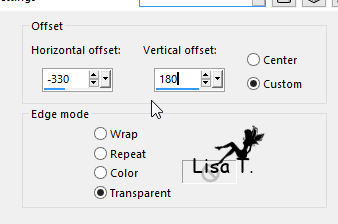
layers -> duplicate
image -> mirror -> mirror vertical
layers -> merge -> merge down
15
effects -> plugins -> Xero -> Clarity
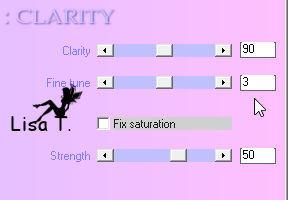
opacity : 75%
16
copy / paste as new layer « ornement »
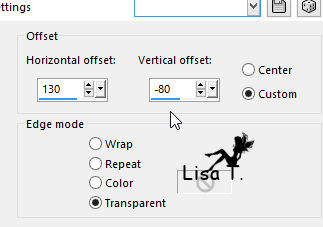
17
effects -> image effects -> offset
18
blend mode : Luminance (Legacy)
19
copy / paste as new layer « Boule/0_5bf83_aa40dc0c_L »
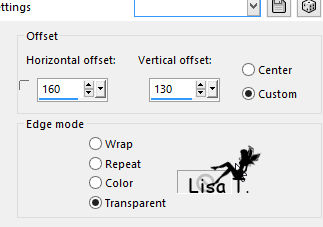
20
effects -> image effects -> offset
21
adjust -> sharpness - > sharpen
22
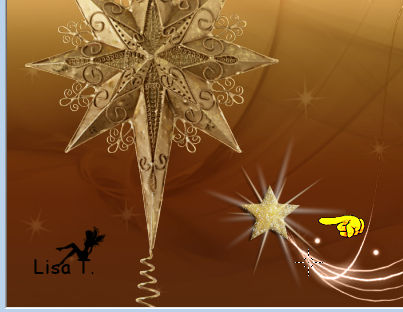
resize star tube bu JofiaDevoe to 30%
copy / paste as new layer
23
move it under merged star (see final result)
24
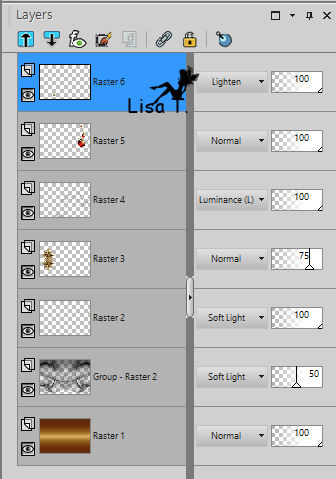
blend mode : Lighten
25
copy / paste as new layer EleaDesign’s tube (text)
26
image -> resize -> 40%
layers -> duplicate
layers -> merge -> merge down
27
adjust -> sharpness - > sharpen more
28
copy / paste as new layer « adb@christmas »
29
image -> mirror -> mirror horizontal
image -> resize -> uncheck « resize all layers » -> 80%
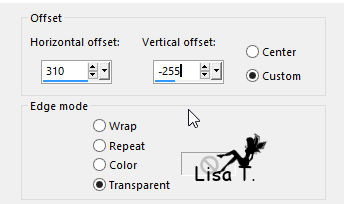
30
effects -> image effects -> offset
31
layers -> merge all (flatten)
32
image -> add borders -> check « symmetric » ->...
2 pixels black
2 pixels color 3
2 pixels black
25 pixels color 3
33
select large border with magic wand tool
layers -> new raster layer
34
flood fill with gradient
selections -> invert
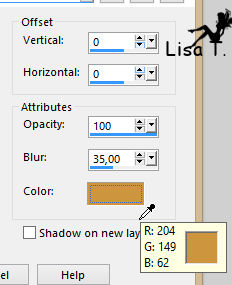
35
effects -> 3D effects -> drop shadow
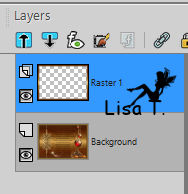
36
raster 1 is highlighted
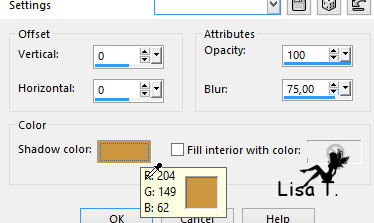
37
effects -> 3D effects -> cutout
38
selections -> invert
keep selection active
39
effects -> plugins -> AAA Frames -> Foto Frame
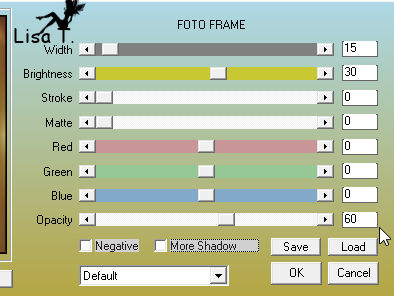
40
selections -> select none
41
image -> add borders -> check « symmetric » -> 2
pixels black
42
apply your watermrk
file -> save as... type .jpeg

Your tag is finished.
Thank you for following this tutorial
Don’t hesitate to send your creations
to Rose des Sables

It will be a real pleasure for her to show them in the
gallery dedicated to this tutorial
Don’t forget to indicate her your name and the adress
of your blog or site if you have one

My tag with my tubes (bear an bulbs) and Animabelle's tube
(holly)

Back to the boards of Rose des Sables’ tutorials
Board 1 

|