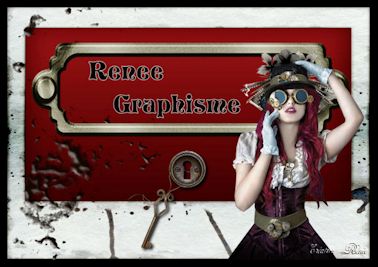
Mysterious

Original tutorial can be found HERE


Material
xxxxxxxxxxxx matos xxxxxxxxxxx
Filters Used
Simple : Pizza slice Miror
AP innovation : lines silver lining : Dotty grid
Unlimited : Penta com : VTR2
Thank you Renée and Cloclo for sharing your plugins' pages


use the pencil to follow the steps
hold down left click to grab it and move it

Realization
1
open alpha layer (with invisible selections)
layers -> duplicate
work with the copy and close original layer to preserve
it (in case you have to redo your work)
save your work often in case of problems with PSP
2
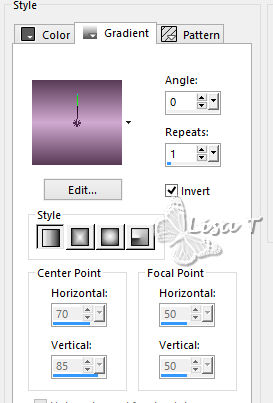
flood fill with a linear gradient
3
layers -> duplicate
4
effects -> artristic effects -> colored foil
blend mode : Luminance (Legacy)
layers -> merge -> merge down
5
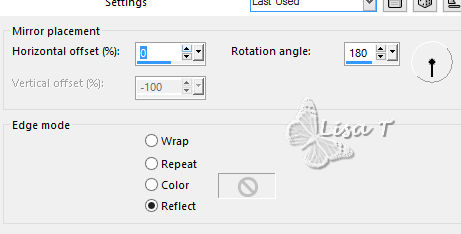
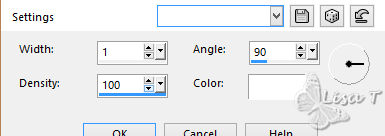
effects -> Simple -> Pizza Slice Mirror
6
effects -> reflection effects -> rotationg mirror
7
layers -> duplicate
image -> mirror -> mirror verticalm
layer’s opacity : 50%
layers -> merge -> merge down
8
selections -> load-save selection -> from alpha Channel
-> selection #1
selections -> promote selection to layer
9
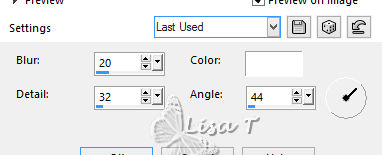
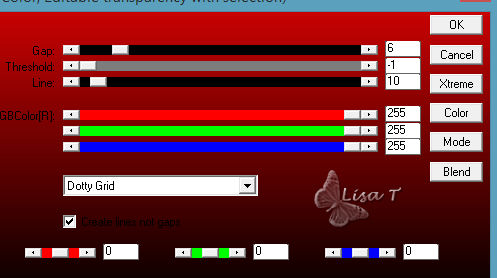
effects -> plugins -> AP Innovations / Lines Silverlining
/ Dotty Grid
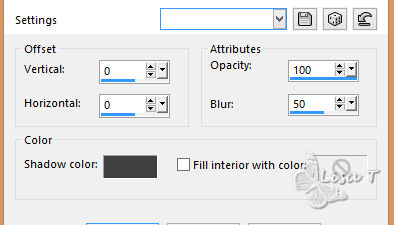
effects -> 3D effects -> drop shadow -> 0 / 0
/ 100 / 50 / black
selections -> select none
10
highlight alpha llayer
selections -> load-save selection -> from alpha Channel
-> selection #2
selections -> promote selection to layer
layers -> arrange -> bring to top
11
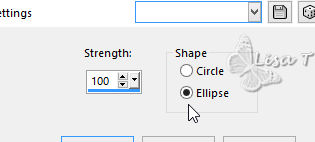
effects -> geometric effects -> spherize
effects -> edge effects -> enhance
12
effects -> 3D effects -> drop shadow -> 0 / 0
/ 50 / 25 / black
13
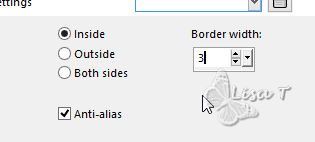
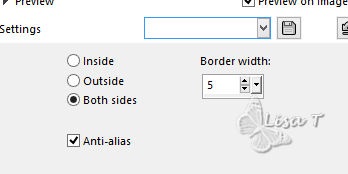
selections -> modify -> select selection borders
14
layers -> new raster layer
flood fill selection with color 1
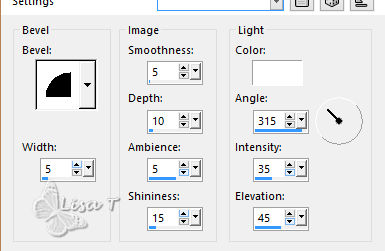
effects -> 3D effects -> inner bevel
selections -> select none
layers -> merge -> merge down
15
selections -> load-save selection -> from alpha Channel
-> selection #3
layers -> new raster layer
16
copy / pastge into selection landscape tube
effectgs -> edge effects -> enhance more
17
layers -> merge -> merge down
effects -> 3D effects -> drop shadow -> 0 / 0
/ 100 / 50 / black
selections -> select none
18
layers -> new raster layer
selections -> load-save selection -> from alpha Channel
-> selection #4
flood fill selection with a linear gradient -> 45 /
0 / uncheck « invert »
19
effects -> artistic effects -> topography
20
layers -> new raster layer
copy / paste into selection the woman’s misted face
adjust -> sharpness -> sharpen
layers -> merge -> merge down
21
lock layer
effects -> 3D effects -> cutout
22
unlock layer
selections -> modify -> select selection borders
23
layers -> new raster layer
flood fill selection with color 1
24
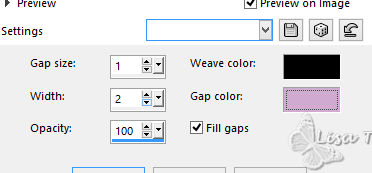
effects -> texture effects -> weave / color 1
25
effects -> 3D effects -> inner bevel
selections -> select none
layers -> merge -> merge down
26
set white as FG color
flood fill tool’s opacity : 60%
layers-> new raster layer
flood fill white
don’t forget to reset opacity of the tool to 100%
for later use
27
open mask 1 and minimize it to tray
layrs -> new mask layer -> from image
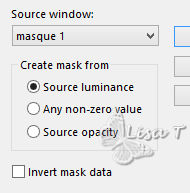
effects -> edge effects -> enhance
layers -> merge -> merge group
28
layers -> arrange -> move down TWICE
29
copy / paste as new layer Text tube
don’t move it
30
clove the eye of Alpha layer
highlight top layer
layers -> merge -> merge visible
31
image -> resize -> uncheck « resize all
layers » -> 85%
effects -> 3D effects -> drop shadow -> 0 / 0
/ 100 / 50 / black
32
open the eye of Alpha layer and highlight this layer
selections -> load-save selection -> from alpha Channel
-> selection #–5
selections -> promote selection to layer
effects -> plugins -> Unlimited 2 -> Penta.com
VTR 2
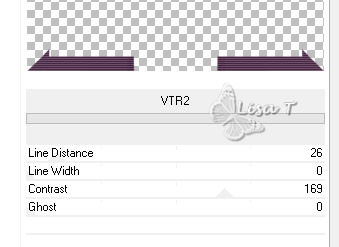
selections -> select none
33
layers -> arrange -> bring to top
effects -> 3D effects -> drop shadow -> 0 / 0
/ 60 / 30 / black
34
highlight « merged » layer
selections -> load-save selection -> from alpha Channel
-> selection #–6
layers -> new raster layer
flood fill with color 1
35
selections -> modify -> contract -> 5 pixels
DELETE
selections -> select none
36
effects -> texture effects -> weave (don’t
change settings)
effects -> 3D effects -> inner bevel (don’t
change settings)
layers -> merge -> merge down
37
layers -> merge -> merge visible
38
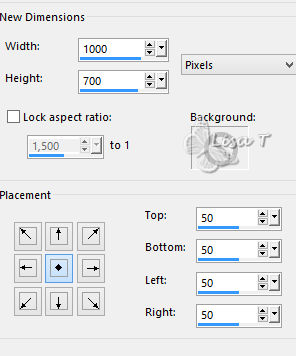
image -> canvas size
39
layers -> new raster layer
flood fill with a linear gradient -> 0 / 1 / uncheck « invert »
layers -> duplicate
effects -> artistic effects -> colored foil (don’t
change settings)
blend mode : Luminance (Legacy)
layers -> merge -> merge down
40
layers -> new raster layer
flood fill white
open Mask 2
layers -> new mask layer -> from image / mask 2
effects -> edge effects -> enhance
layers -> merge -> merge group
layers -> merge -> merge down
41
selections -> select all
alyers -> new raster layer
flood –> fill with color 1selections -> modify
-> contract / 10 pixels
DELETE
selections -> select none
42
effects -> texture effects-> weave (as before)
43
effects -> 3D effects -> inner bevel (as before)
layers -> merge -> merge dow
layers -> arrange -> move down
44
highlight Merged layer
selections -> select all
selections -> float - selections -> defloat
45
layers -> new raster layer
flood fill with color 1
selections -> modify -> contract / 5 pixels
DELETE
selections -> select none
46
effects -> texture effects-> weave (as before)
effects -> 3D effects -> inner bevel (as before)
47
layers -> merge -> merge dow
effects -> 3D effects -> drop shadow -> 0 / 0
/ 100 / 50 / black
48
copy / paste as new layer « Deco » tube
don’t move it
layers -> merge -> merge all (flatten)
49
image -> resize -> resize « all layers » checked
->900 pixels (width)
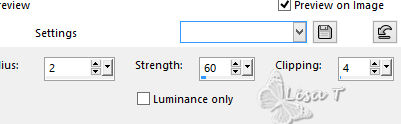
adjust -> sharpness -> unsharp mask
apply your watermark and save as... type.jpeg
apply your watermark and save as... type .jpeg
Your tag is finished
Thank you for following thisz tutorial
don’t hesitate to write to me if you have any trouble
with this translation
 to
Lisa T to
Lisa T
you can send your creations to Jacotte, she will be very
glad to see them
to
Jacotte
And to present them on her blog

If you want to be informed about Jacotte’s new creations
subscribe to her newsletter (fill the box at the bottom
of her home page)

back to the boards of Jacotte’s tutorials
board 1  board
2 board
3 board
4 board
2 board
3 board
4

|