My
best Friend

Original tutorial can be found HERE

Material

copy / paste « gold pattern » into
folder « patterns » of Corel PSP
Folder

Filters Used
AP Innovations Lines silverlining : Dotty grid
Penta com : Jeans
Unlimited : BKg designer sf10I : Corner Half wrap
Unlimited : VM Toolbox : Instant tile
AP Innovations : Lines silverlining : Lignes option vertical
Graphic plus : cross shadow
Simple : Pizza slice miror
Simple : 4 way average
AAA Frame : foto frame
thank you Cloclo and Renée for sharing you plugins' pages


Colors
in materials palette prepare FG color -> color 1
and BG color -> color 2


use the pencil to follow the steps
hold down left click to grab it and move it


Realization
1
open alpha layer
window -> duplicate
work with the ocpy and close original image
2
flood fill layer with color 2
3
layers -> new raster layer
flood fill with color 1
4
open « mask » and minimze to tray
layers -> new mask layer -> from image

layers -> merge -> merge group
effects -> edge effects -> enhance
5
selections -> load selection -> from alpha channel
-> selection #1
adjust -> add-remove noise -> add noise

selections -> select none
6
« group Raster 1 » is highlighted
selections -> load selection -> from alpha channel
-> selection #2
selections -> promote selection to layer
effects -> plugins -> AP01 [Innovations] -> Lines
Silverlining / Dotty Grid

selections -> select none
7
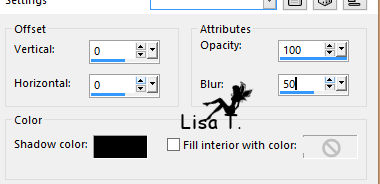
effects -> 3D effects -> drop shadow -> 0 / 0
/ 50 / 10 / black
8
layers -> duplicate
image -> mirror -> mirror horizontal
layers -> merge -> merge down twice
9
« group Raster 1 » is highlighted
selections -> load selection -> from alpha channel
-> selection #3
selections -> promote selection to layer
effects -> plugins -> Penta .Com / Jeans

selections -> select none
10
effects -> 3D effects -> drop shadow -> 0 / 0
/ 50 / 10 / black
11
layers -> duplicate
image -> mirror -> mirror horizontal
layers -> merge -> merge down twice
12
effects -> 3D effects -> drop shadow -> 0 / 0
/ 50 / 25 / black
13
« group Raster 1 » is still highlighted
selections -> load selection -> from alpha channel
-> selection #4
selections -> invert
DELETE
14
selections -> invert
selections -> modify -> select selection borders

15
layers -> new raster layer
flood f ill with « Gold Pattern » (provided)

16
effects -> 3D effects -> inner bevel

selections -> select none
17
layers -> merge -> merge down
18
in materials palette, set color 3 as FG color
19
in materials palette, prepare a sunburst gradient with
oclors 2 and 3

20
highlight Alpha layer
flood fill iwth gradient
effects -> plugins -> Unlimited 2 -> Bkg Designers
sf10 I / Corner Half Wrap

22
effects -> image effects -> seamless tiling

23
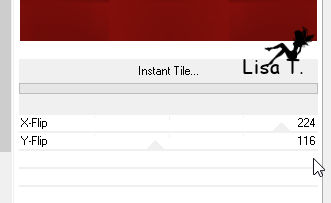
effects -> plugins -> Unlimited 2 -> VM Toolbox
/ Instant Tile

adjsut -> sharpness -> sharpen more
24
selections -> load selection -> from alpha channel
-> selection #5
selections -> promote selection to layer
25
effects -> 3D effects -> inner bevel

26
effects -> 3D effects -> drop shadow -> 0 / 0
/ 50 / 10 / black
selections -> select none
27
highlight Alpha Layer
selections -> load selection -> from alpha channel
-> selection #6
selections -> promote selection to layer
28
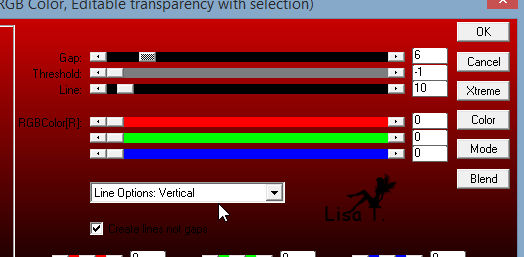
effects -> plugins -> AP01 [Innovations] -> Lines
Silverlining / lines option Vertical

29
effects -> 3D effects -> inner bevel as before
30
effects -> 3D effects -> drop shadow -> 0 / 0
/ 50 / 10 / black
selections -> select none
31
highlight Alpha Layer
selections -> load selection -> from alpha channel
-> selection #7
selections -> promote selection to layer
32
effects -> plugins -> AP01 [Innovations] -> Lines
Silverlining / lines option Vertical as before
33
effects -> 3D effects -> drop shadow -> 0 / 0
/ 50 / 25 / black
34
layers -> duplicate
image -> mirror -> mirror horizontal
layers -> merge -> merge down
35
highlight Alpha Layer
effects -> texture effects / Texture

36
highlight top layer
layers -> new raster layer
selections -> load selection -> from alpha channel
-> selection #8
37
copy / paste into selection « jacottea461 »
adjust -> sharpness -> sharpen more
38
layers -> new raster layer
effects -> 3D effects -> cutout

selections -> select none
layers -> merge -> merge down twice
39
your layers palette

40
top layer is highlighted
copy / paste decoration 1 as new layer
layers - arrange -> move down
effects -> 3D effects -> drop shadow -> 1 / 1
/ 50 / 2 / black
41
highlight top layer
copy / paste as new layer decoration 2
42
effects -> image effects -> offset

effects -> 3D effects -> drop shadow -> 1 / 1
/ 50 / 2 / black
43
layers -> duplicate
image -> mirror -> mirror horizontal
layers -> merge -> merge down
44
copy / paste as new layer decoration 3
45
effects -> image effects -> offset

effects -> 3D effects -> drop shadow -> 1 / 1
/ 50 / 2 / black
46
layers -> duplicate
image -> mirror -> mirror horizontal
layers -> merge -> merge down
47
copy / paste as new layer decoration 4
effects -> image effects -> offset

drop shadow as before
48
layers - merge -> merge visible
49
image -> add borders ->...
1 pixel color 1
1 pixel color 2
1 pixel color 3
50
image -> add borders -> 50 pixels color 2
select large border with magic wand tool
51
effects -> plugins -> Graphic Plus / Cross Shadow

52
effects -> plugins -> Simple / Pizza Slice Mirror
53
effects -> plugins -> Simple / 4 Way Average
effecst -> edge effects -> enhance more
54
effects -> plubins -> AAA Frame / Foto Frame

55
selections -> invert
layers -> new raster layer
effects - 3D effects -> cutout

selections -> select none
56
layers -> merge -> merge all (flatten)
57
adjust -> sharpness -> unsharp mask

58
apply your watermark and save as... type .jpeg
apply your watermark and save as... type .jpeg
Your tag is finished
Thank you for following it

don’t hesitate to write to me if you have any trouble
with this translation
 to
Lisa T to
Lisa T
you can send your creations to Jacotte, she will be very
glad to see them
 to
Jacotte to
Jacotte
And to present them on her blog

If you want to be informed about Jacotte’s new creations
subscribe to her newsletter (fill the box at the bottom
of her home page)


My tag with my tube (misted image)

back to the boards of Jacotte’s tutorials
 board
1 board
1  board
2 board
2  board
3 board
3  board
4 board
4 

|