Marinette

original tutorial can be found HERE


Material


Filters Used
Mura Meister : Perspective Tilling
L en K's Zitah
Graphic Plus : Cross Shadow
Simple : Horizontal Grain
Transparency : Eliminate White
FF Formula : Honeycomb
Miror Rave : Quadrand Flip
Toadies : What are you

Colors
color 1 -> foreground color -> #ffffff
color 2 -> background color -> #6e888c


translator’s note : I work with PSPX7,
but you can realize this tag with another version of course

use the pencil to follow the steps
left click to grab it

Realization
Step 1
prepare a linear gradient in the materials palette 0 / 0 / uncheck « invert »
Step 2
open the alpha layer « Marinette »
windows/duplicate
close the original and work with the copy
Step 3
selections/load selection/from alpha channel/selection #1
flood fill the selection with color 2
Step 4
selections/invert
flood fill the selection with the gradient (light color is at the bottom)
selections/select none
Step 5
selections/load selection/from alpha channel/selection #2
layers/new raster layer
flood fill with the gradient
selections/select none
effects/edge effects/enhance more
Step 6
selections/load selection/from alpha channel/selection #3
effects/plugins/Mura’s Meister/Perspective Tiling/default settings
selections/select none
opacity of the layer on 60%
Step 7
layers/new raster layer
selections/load selection/from alpha channel/selection #4
flood fill with a linear gradient 45 / 0 / uncheck « invert »
effects/plugins/L en K’s Zitah/default settings
selections/select none
Step 8
layers/new raster layer
selections/load selection/from alpha channel/selection #5
flood fill with the gradient prepared in step 7
Step 9
effects/plugins/Graphic Plus/Cross Shadow
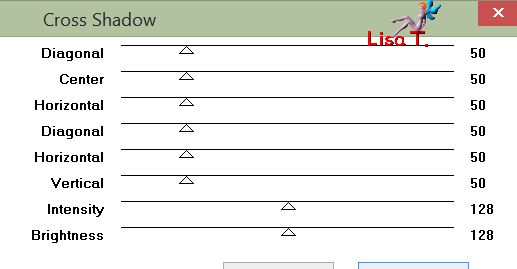
selections/select none
Step 10
layers/duplicate
image/mirror/vertical mirror
layers/merge/merge down
Step 11
selections/select all
layers/new raster layer
flood fill with color 1
selections/modify/contract/1 pixel
delete (hit the delete key of your keyboard)
selections/select none
Step 12
close the eye of the alpha layer
activate the top layer
layers/merge/merge visible
effects/3D effects/drop shadow/ 0 / 0 / 80 / 40 / black
open the eye of the alpha layer
Step 13
top layer is the active layer
layers/new raster layer
selections/load selection/from alpha channel/selection #6
set the opacity of the flood fill tool on 50%
flood fill with color 1
reset the opacity of the tool on 100%
Step 14
layers/new raster layer
flood fill with color 1
selections/modify/contract/1 pixel
delete
selections/select none
Step 15
layers/merge/merge down
Step 16
layers/duplicate
image/resize/uncheck « resize all layers »/95%
Step 17
selections/load selection/from alpha channel/selection #6
copy/paste into selection the landscape tube
selections/select none
effects/edge effects/enhance
Step 18
layers/merge/merge down
effects/3D effects/drop shadow/ 0 / 0 / 80 / 40 / black
opacity of the layer : 80%
Step 19
layers/new raster layer
selections/load selection/from alpha channel/selection #7
opacity of the flood fill toool on 50%
flood fill the selection with color 1
Step 20
layers/new raster layer
selections/load selection/from alpha channel/selection #8
opacity of the flood fill tool on 75%
flood fill the selection with the gradient of step 1
Step 21
effects/plugins/Simple/Horizontal Grain
selections/select none
effects/edge effects/enhance
Step 22
layers/merge/merge down
opacity of the layer on 50%
effects/3D effects/drop shadow as before
reset the opacity of the flood fill tool on 100%
Step 23
activate the bottom layer (alpha layer)
layers/new raster layer
selections/load selection/from alpha channel/selection #9
flood fill with color 2
Step 24
effects/artistic effects/halftone
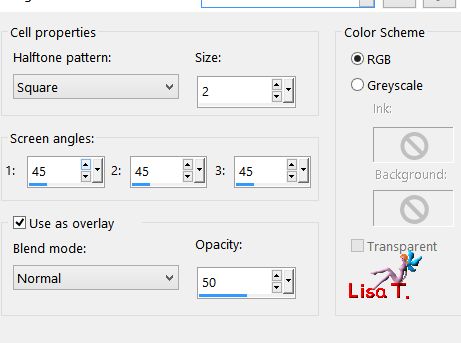
Step 25
effects/plugins/Transparency/Eliminate White
selections/select none
Step 26
activate the bottom layer
effects/plugins/FF Formula/Honeycom

effects/edge effects/enhance
Step 27
effects/plugins/Mirror Rave/Quadrant Flip
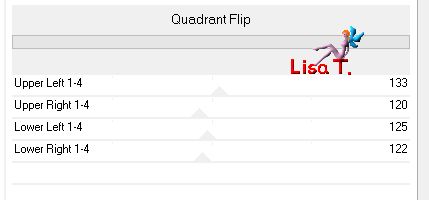
Step 28
layers/merge/merge all (flatten)
edit/COPY
Step 29
image/add borders à
1 pixel color 1
2 pixels color 2
1 pixel color 1
Step 30
image/add borders/50 pixels color 2
select this border with the magic wand
edit/paste into selection
Step 31
adjust/blur/gaussian blur/15
Step 32
effects/plugins/Graphic Plus/Cross Shadow

Step 33
selections/invert
effects/3D effects/drop shadow/ 0 / 0 / 100 / 50 / black
Step 34
selections/invert
layers/new raster layer
effects/3D effects/cutout
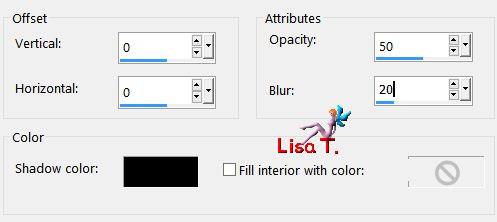
layers/merge/merge down
selections/select none
Step 35
image/add borders à
1 pixels color 1
2 pixels color 2
1 pixel color 1
Step 36
image/add borders/50 pixels color 2
Step 37
select this border with the magic wand tool
edit/paste into selection (the background is still in the clipboard)
adjust/blur/gaussian blur/15
Step 38
effects/plugins/Toadies/What Are You ?...

effects/edge effcts/enhance
selections/invert
effects/3D effects/drop shadow as before
selections/select none
Step 39
image/add bordersà
1 pixel color 1
1 pixel color 2
1 pixel color 1
1 pixel black
Step 40
iamge/resize/900 pixels wide
adjust/sharpness/unsharp mask

Step 41
copy/paste as ne layer the character tube
image/resize/uncheck « resize all layers »/85%
move it to the left (see final result)
effects/3D effects/drop shadow/ 3 / 3 / 75 / 50 / black *** -3 / -3 / 75 / 50 / black
Step 42
copy/paste as new layer the ship tube
move it to the right as shown
effects/3D effects/drop shadow/ 1 / 1 / 75 / 50 / black
Step 43
copy/paste as new layer the tube of the buoy
Step 44
effects/image effects/offset
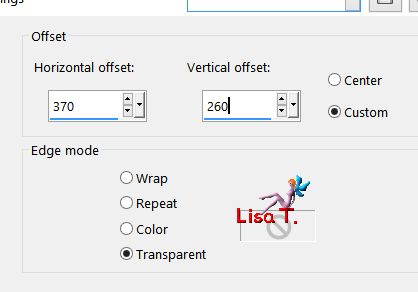
Step 45
layers/duplicate
image/mirror/mirror horizontal
layers/merge/merge down
Step 46
layers/duplicate
image/mirror/mirror vertical
layers/merge/merge down
effects/3D effects/drop shadow as before
Step 47
copy/paste as new layer the text tube
Step 48
effects/image effects/offset
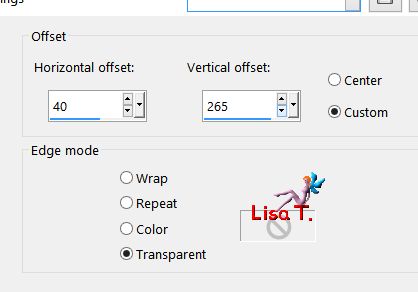
Step 49
layers/merge/merge all (flatten)
Step 50
apply your signature
file/save as… type JPEG

Your tag is finished
Thank you to have followed this tutorial

You can write to Jacotte (or to me) if you have any problem with this tutorial
don’t hesitate to send your creations to Jacotte, she will be very glad to see them

And to present them here


If you want to be informed about Jacotte’s new creations
subscribe to her newsletter (fill the box at the bottom of her home page)


back to the boards of Jacotte’s tutorials
board 2  board 3 board 3 
|