Magic Winter

Original tutorial can be found HERE

I am member of TWInc
this tutorial is protected


Material
tubes
1 mask
1 colors palette
1 alpha layer-selections (alpha_magie hiver)

Filters Used
Unlimited 2/BKG Kaleidoscope/Blue Berry Pie
Mirror RAve/Quadrant Flip
AP 01 Innovations/Lines Silverlining/Dotty Grid
Toadies/Weaver
AP 01 Innovations/Lines Silverlining/Arrow
AAA Frame/Foto Frame
Richerd Rosenman/Solid Border
Alien Skin/Impact/Nature/Snow Drift
Alien Skin Xenofex /Constellation
Colors
foreground color → color 1 → #f5f5f5
background color → color 2 →#66737b
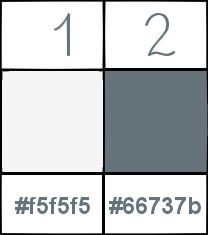

Use the paint brush to follow the steps
left click to grab it


Realization
Step 1
activate the alpha layer_selections « alpha_magie hiver »
window/duplicate
we will work with the copy
Step 2
in the materials palette, prepare a linear gradient 45/5 (uncheck “invert”)
paint the layer with this gradient
Step 3
layers/new raster layer
paint with color 1
adjust/add-remove noise/add noise
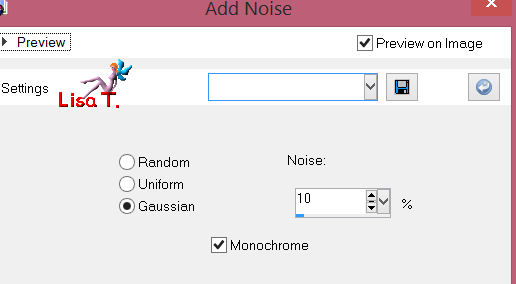
Step 4
activate the mask “WSL mask”, and minimize itlayers/new mask layer/from image
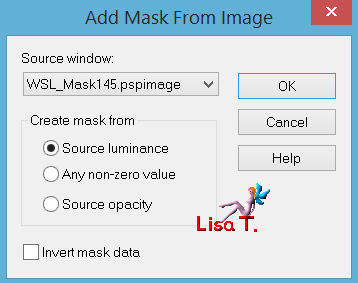
effects/edge effects/enhance
layers/merge/merge group
Step 5
layers/duplicate (group-raster 1)
effects/distortion effects/polar coordinates/rectangular to polar
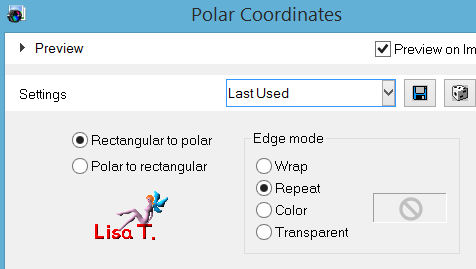
Step 6
layers/duplicate
iamge/flip
layers/merge/merge down
effects/3D effects/drop shadow → 0 / 0 / 80 / 40 / black
Step 7
layers/arrange/move down
Step 8
in the layers palette, activate the layer on top of the stack
effects/3D effects/drop shadow as before
layers/merge/merge down
Step 9
in the layers palette, activate the layer on top of the stack (alpha layer)
adjust/add-remove noise/add noise as on step 3
Step 10
in the layers palette, keep that layer active
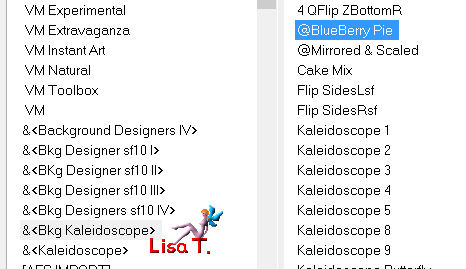
effects/plugins/Unlimited 2/BKG Kaleidoscope/@BlueBerry Pie
Step 11
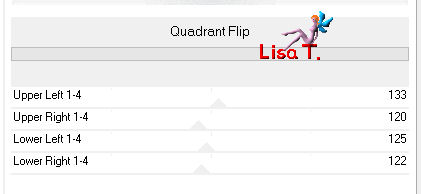
effects/plugins/Mirror Rave/Quadrant Flip
Step 12
selections/load-save selection/from alpha channel/selection #1
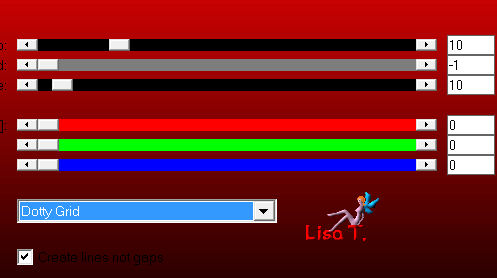
selections/promote selection to layereffects/plugins/AP 01 Innovations/Lines Silverlining/Dotty Grid
effects/3D effects/drop shadow as before
selections/select none
Step 13
layers/duplicate
iamge/mirror
layers/merge/merge down
Step 14
in the layers palette, activate the layer at the bottom of the stack (alpha layer)
selections/load-save selection/from alpha channel/selection #2
selections/promote selection to layer
selections/select none
Step 15
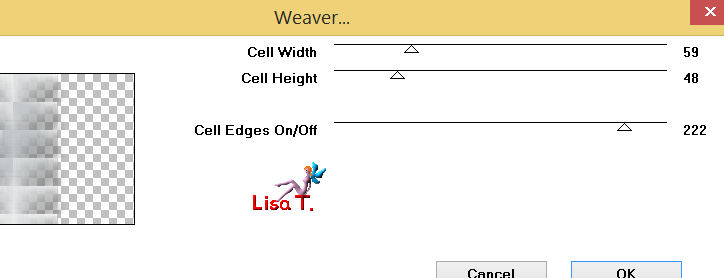
effects/plugins/Toadies/Weaver
effects/3D effects/drop shadow → 0 / 0 / 80 / 20 / black
Step 16
in the layers palette, activate the layer on top of the stack
selections/load-save selection/from alpha channel/selections/#3
layers/new raster layer
Step 17
activate the tube “paysage loups”
edit/copy - back to your work - edit/paste as a new layer
move it correctly into selection (see final result)
selections/invert, and press the delete key of your keyboard
Step 18
selections/invert once more
layers/new raster layer, fill with color 2
selections/modify/contract/1 pixel, and press the delete key of your keyboard
selections/select none
Step 19
layers/merge/merge down : 3 times
Step 20
your layers palette must be like this
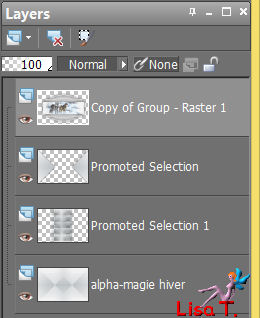
Step 21
in the layers palette, activate the promoted selection layer (second from the top)
selections/load-save selection/from alpha channel/selection #1
layers/new raster layer
paint with the linear gradient of the begining (45/0)
Step 22
acitvate the tube “paysage 2”
edit/copy - back to your work - edit/paste into selection
effects/edge effects/enhance
selections/select none
Step 23
layers/duplicate
iamge/mirror
layers/merge/merge down
Step 24
effects/geometric effects/spherize
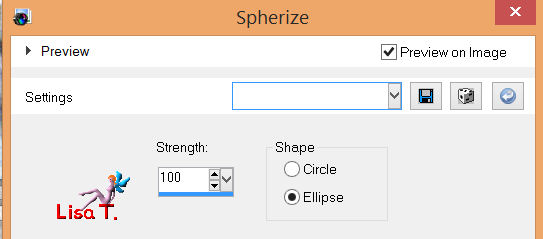
layers/arrange/move up
Step 25
effects/distortion effects/punch
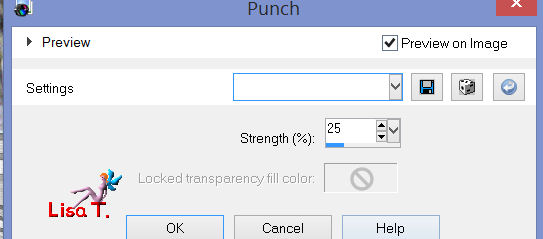
effects/3D effects/drop shadow → 0 / 0 / 80 / 20 / black
Step 26
activate the tube “deco 1”
edit/copy - back to your work - edit/paste as a new layer
effects/image effects/offset
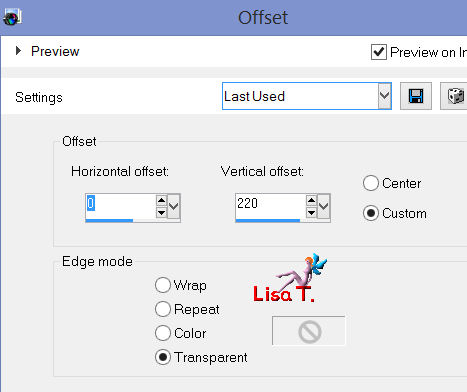
effects/3D effets/drop shadow → 1 / 1 / 50 / 5 / black
Step 27
layer/merge/merge visible
Step 28
image/add borders/check “symmetric”
50 pixels color 1
with the magic wand tool (default settings) select the border
effects/reflection effects/kaleidoscope
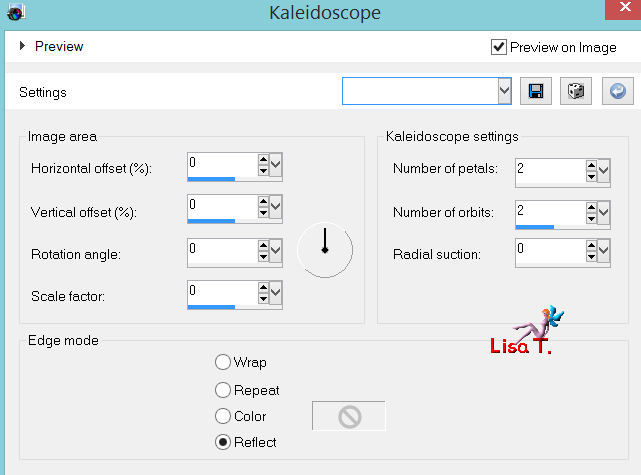
adjust/blur/gaussian blur/10
selections/promote selection to layer
Step 29
effects/plugins/AP 01 Innovations/Lines Silverlining/Arrow
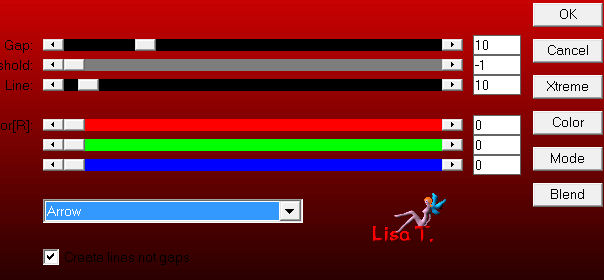
in the layers palette set the blend mode on “screen” (or other according to your colors)
layers/merge/merge down
Step 30
selections/invert
effects/3D effects/drop shadow → 0 / 0 / 100 / 50 / black
Step 31
selections/invert once more
effects/plugins/AAA Foto Frame
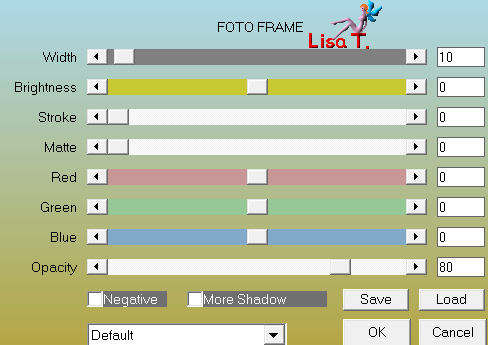
selections/select none
Step 32
effects/plugins/Richard Rosenman/Solid Color
color 1
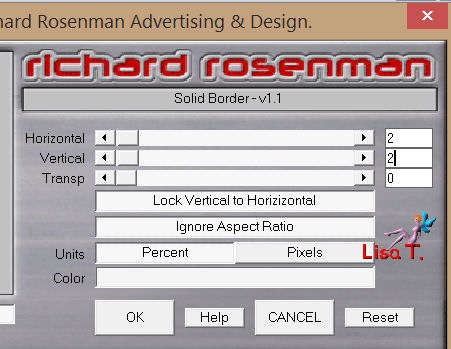
Step 33
activate all the different decoration tubes ( doe and white wolf)
edit/copy - back on your work - edit/paste new layers
place them correctly, and drop light shadows
you can decorate the way you like of course, and choose other tubes
Step 34
layers/merge/merge visible
Step 35
layers/new raster layer
effects/plugins/Alien Skin Eye Candy 5Nature/Snow Drift
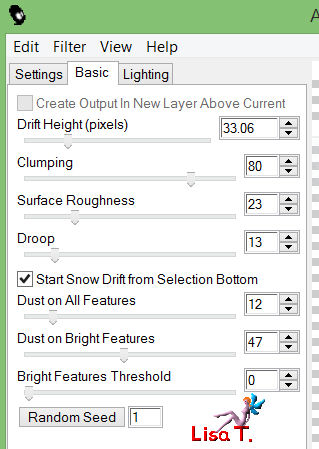
Step 36
layers/merge/merge visible
Step 37
acitvate the tube “”glaçons”
edit/copy - back to your worl - edit/paste as a new layer
place it on top of the tag (see example)
Step 38
activate the tube “sapin”
edit/copy - back to your worl - edit/paste as a new layer
place to the lsft of the tag (see example)
Step 39
in the layers palette, close the visibility toggle of the layer at the bottom of the stack
Step 40
in the layers palette, activate the layer at the top of the stack
layers/merge/merge visible (ice cubes and tree)
Step 41
layers/new raster layer
paint with color 2
selections/select all
selections/modify/contract/4 pixels
press the delete key of your keyboard
selections/select all
in the layers palette, open the visibility toggle of the background layer
Step 42
layers/new raster layer for your signature
Step 43
image/resize/900 pixels width (check “resize all layers”)
Step 44
your layers palette must be like this
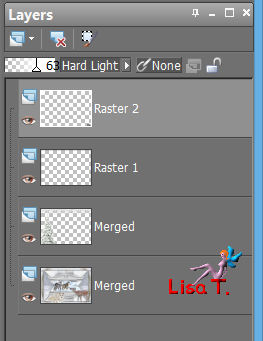
if you do not want to animate your tag, you can merge all layers,
and save as... type .jpeg

If you want to animate your tag
Animation
Step 1
in the layers palette, activate the merged layer (second from the bottom, the tree and the ice cubes)
Step 2
effects/plugins/Alien Skin Xenofex 2/Constellation
click on the “settings” tab, and choose the preset Bling-Bling
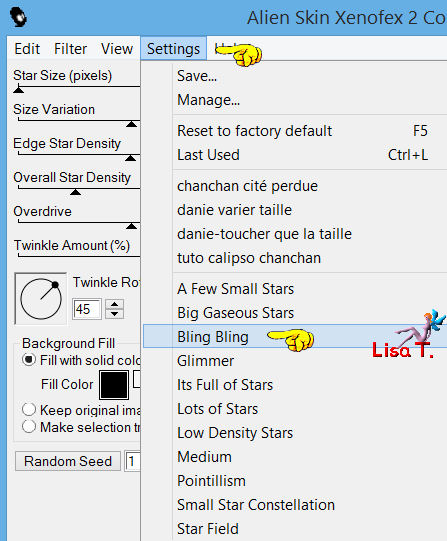
Step 3
place these settings
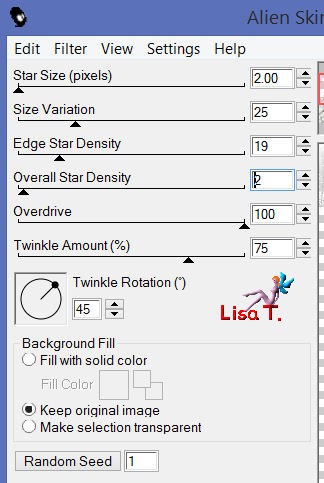
Step 4
edit/copy special/copy merged
Step 5
open Animation Shop
edit/paste as a new animation
Step 6
back in PSP, and undo last command
Step 7
effects/plugins/Alien Skin Xenofex 2/Constellation
keep all settings unchanged, and set « random seed » on 620
Step 8
edit/copy special/copy merged
Step 9
back in animation Shop
edit/paste after current frame
Step 10
edit/select all
Step 11
animation/frame property/20
view/animation
if your are satisfied,
file/save as... type .gif

Your tag is finished
Thank you to have realized it

You can write to Jacotte or to me if you have any trouble with this tutorial
you can send your creations to Jacotte, she will be very glad to see them

And to present them here


If you want to be informed about Jacotte’s new creations
join her newsletter


Back to the boards of Jacotte's tutorials
board 1  board 2 board 2 

|