I’am Flying !

original tutorial can be found HERE

xxxxxxxxxxx lien xxxxxxxxxxxxxx
Material
1 alpha layer (with selections on alpha layer) - 1 color palette - tubes by Jacotte


Filters Used
L en K's : Zitah
AFs Import : sq border 2
L en K's : Adonis
Simple : blinz
Simple : 4 Way Average
AP Innovatins : Lines Silverlining : Dotty grid
Mura Seamless : Checks
Mura Meister : Perspective tilling
Penta com : color dot
Screenworks : Pin hole

Colors
color 1 -> foreground color -> #
color 2 -> background color -> #


translator’s note : I work with PSPX7,
but you can realize this tag with another version of course

Use the pencil to follow the steps
left click to grab it
 |

Realization
Step 1
open the alpha layer, window/duplicate,
close the original and work with the copy
Step 2
fill the layer with a linear gradient 180 / 0 / uncheck « invert »

Step 3
effects/artistic effects/enamel

effects/edge effects/enhance
Step 4
layers/duplicate 3 times
rename these layers --> layer 1 - layer2 - layer3 - layer4
your layers palette looks like this

Step 6
close the eye of layers 3 and 4
activate layer 2
Step 6
effects/plugins/L&K’s Zitah

Step 8
layer 2 is still active
image/resize/70%/uncheck « resize all layers »
effects/image effects/seamless tiling

Step 9
effects/3D effects/drop shadow

and drop shadow again changing (5) by (-5)
Step 10
activate raster 3 and open the eye
Step 11
effects/plugins/sqborder2

Step 12
image/resize/60%/uncheck « resize all layers »
effects/image effects/seamless tiling as in step 8
Step 13
effects/3D effects/drop shadow as in step 9 (positive and negative)
Step 14
activate raster 4 and open the eye
effects/plugins/L&K’s Adonis

Step 15
image/resize/50%/uncheck « resize all layers »
Step 16
effects/image effects/seamless tiling as in step 8
Step 17
effects/3D effects/drop shadow as in step 9 (positive and negative)
Step 18
effects/plugins/Simple/Blintz
effects/plugins/Simple/4 Way Average
effects/edge effects/enhance
Step 19
your layers palette looks like this

Step 20
raster 4 is the active layer
selections/load selection/from alpha layer/selection 1
Step 21
layers/new raster layer
fill with color 1
selections/modify/contract/5 pixels
hit the delete key of your keyboard
selections/select none
Step 22
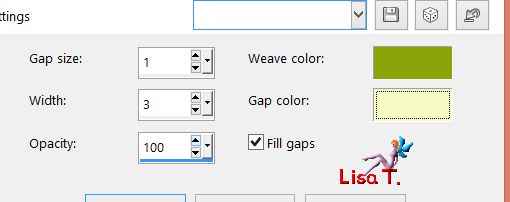
effects/texture effects/weave

Step 23
layers/duplicate
efects/image effects/seamless tiling as in step 8
Step 24
layers/merge down
effects/3D effects/ as in step 9
Step 25
the top layer is the active layer
selections/load selection/from alpha layer/selection 1
selections/modify/contract/5 pixels
Step 26
copy/paste the landscape tube as new layer
image/resize/85%/uncheck « resize all layers »
move it in the selection
Step 27
selections/invert
hit the delete key of your keyboard
selecitons/select none
Step 28
edit/copy the text tube as new layer (or write your own text)
effects/image effects/offset

effects/3D effects/drop shadow/ 1 / 1 / 50 / 2 / black
Step 29
activate Raster 1 (bottom layer)
effects/plugins/AP01[innovations]/Lines Silerlining/Dotty Grid

Step 30
layers/duplicate
effects/plugins/Mura’s Seamless/Checks

Step 31
layers/arrange/bring to top
Step 32
effects/plugins/Mura’s Meister/Perspective Tiling

Step 33
layers/merge/merge all (flatten)
Step 34
copy/paste the tube of the cage as new layer and place i to the left
Step 35
copy/paste the tube of the child with birds as new layer (don’t forget to erase the watermark)
image/resize/uncheck « resize all layer »/70%
image/mirror/mirror horizontal
Step 36
effects/image effects/offset

effects/3D effects/drop shadow/ 0 / 0 / 50 / 25 / black
Step 37
image/add borders --->
2 pixels color 2
2 pixels color 1
2 pixels color 2
Step 38
edit/COPY
Step 39
image/add borders/50 pixels color 1
select this border with the magic wand
edit/paste into selection
adjust/blur/gaussian blur/20
Step 40
effects/plugins/Penta.com/Color Dot

selections/select none
Step 41
image/add borders/color 1/uncheck « symmetric »

Step 42
image/add borders/check « symmetric »/30 pixels color 2
select this border with the magic wand
Step 43
effects/plugins/Screenworks/Pin Hole
Step 44
effects/3D effects/buttonize

Step 45
effects/3D effects/chisel

Step 46
selections/invert
layers/new raster layer
effects/3D effects/cutout

selections/select none
Step 47
image/add obrders/1 pixel black
Step 48
copy/paste the character tube as new layer
resize to 80% and place it to the right
effects/3D effects/drop shadow/ 0 / 0 / 60 / 25 / black
Step 49
layers/merge/merge all (flatten)
Step 50
image/resize/width : 900 pixels
adjust/sharpness/unsharp mask

save as... type jpeg
Your tag is finished
Thank you to have followed this tutorial

You can write to Jacotte (or to me) if you have any problem with this tutorial
you can send your creations to Jacotte, she will be very glad to see them

And to present them here


If you want to be informed about Jacotte’s new creations
subscribe to her newsletter (fill the box at the bottom of her home page)


back to the boards of Jacotte’s tutorials
board 1  board 2 board 2 

|