Dafina

Original tutorial can be found HERE

I am member of TWInc
This translation is protected


Filter used
Alien Skin Impact/Glass
AFS Import/sqborder2
Unlimited2/Tramages/Tow the Line
VM Distortion/RadiatorII
Material
tubes and decorations
1 alpha layer

Colors
color 1 --> foreground --> #ddc6b9 (light)
color 2 --> background --> #5b3c31 (dark)


Use the paint brush to follow the steps
Left click to grab it


Realization
Step 1
open the alpha layer « alpha-Dafina »
window/duplicate
always work on the copy
Step 2
activate the flood fill tool and paint the layer with color 2
Step 3
selections/load-save selection/from alpha channel/selection #1
layers/new raster layer
paint witn color 1
effects/plugins/Alien Skin/Impact/Glass

selections/select none
Step 4
layers/duplicate – image/mirror – image/flip
layers/merge/merge down
effects/3D effects/drop shadow/ 1 / 1 / 100 / 2 / black
Step 5
selections/load-save selection/from alpha channel/selections #2
layers/new raster layer
paint with color 1
effects/plugins/Alien Skin as on step 3
selections/select none
Step 6
layers/duplicate – image/mirror – image/flip
layers/merge/merge down
effcts/3D effects/drop shadow as before
Step 7
selections/load-save selection/from alpha channel/selection #3
layers/new raster layer
paint with color 1
effects/plugins/Alien Skin as on step 3
selections/select none
Step 8
layers/duplicate – image/mirror
layers/merge/merge down
effects/3D effects/drop shadow as before
Step 9
layers/duplicate
image/resize/uncheck “resize all layers”/85%
Step 10
selections/load-save selection/from alpha channel/selection #4
layers/new raster layer
activate the tube of the landscape, edit/copy
back on your work /edit/paste into selection
image/resize/uncheck “resize all layers”/120%
selections/invert, and press the delete key of your keyboard
selections/invert
layers/new raster layer, and paint with color 1
selections/modify/contract/2
press the delete key of your keyboard
selections/select none
layers/merge/merge down
Step 11
effects/3D effects/drop shadow/ 3 / 3 / 70 / 25 / black
and again with negative settings
-3 / -3 / 70 / 25 / black
Step 12
in tne layers palette, activate the background layer (layers alpha-dafina)
effects/plugins/AFS import/sqborder2

keep that layer active
selections/load-save selection/from alpha channel/selection #5
selections/promote selection to layer
effects/plugins/Unlimited 2/Tramages/Tow the Line

layers/new raster layer/paint with color 1
selections/modify/contract/2
press the delete key of your keyboard
layers/merge/merge down
Step 13
keep the selection active
layers/duplicate – image/mirror
selections/promote selection to layer
in the layers palette, set the opacity on 50%
layers/merge/merge down
Step 14
layers/duplicate – image/flip
selections/promote selection to layer, and set the opacity on 50%
layers/merge/merge down
selections/select none
layers/merge/merge down (2 times)
your layers palette is like this

Step 15
in the layers palette, the layer “promoted selection” is active
layers/duplicate
effects/distortion effects/polar coordinates

layers/duplicate – image/flip
set the opacity on 50%
layers/merge/merge down
Step 16
image/resize/uncheck “resize all layers”/83%
effects/3D effects/drop shadow/ 0 / 0 / 100 / 50 / black
set the opacity on 40%
Step 17
image/add borders/check “symmetric”/2 pixels/color 1
Step 18
image/add borders/50 pixels/color 2
select the border with the magic wand tool
paint with a radial gradient

Step 19
effects/plugins/VM Distortion/Radiator II

Step 20
image/free rotate
right – 180° - rotate single layer around canvas center

Step 21
keep the selection active
selections/promote selection to layer, set the opacity on 50%
layers/merge/merge down
Step 22
effects/distortion effects/pixelate

effects/edge effects/enhance more
Step 23
selections/invert
effects/3D effects/drop shadow/ 0 / 0 / 100 / 50 / black
Step 24
selections/invert
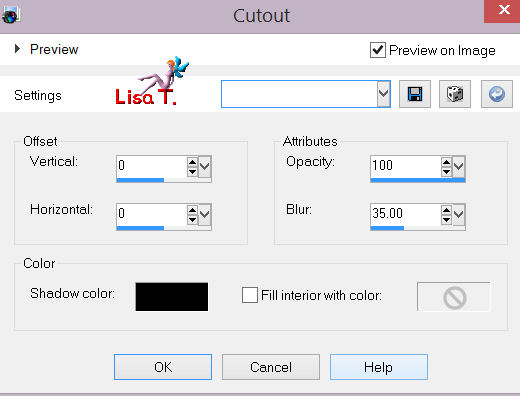
layers/new raster layer
effects/3D effects/cutout

layers/merge/merge down
selections/select none
Step 25
open the tube with the woman, copy and paste as a new layer
move it to the right as shown on the final result
effects/3D effects/drop shadow/ 3 / 3 / 70 / 25 / black
image/add borders/2 pixels/color 1
Step 26
open the decoration tube, copy ans paste as a new layer
move it to the left
effects/3D effects/drop shadow as before
step 27
place the Text where you want, or write your own text
effects/3D effects/drop shadow as before
Step 28
image/add borders/2 pixels/color 1
Step 29
image/resize/900 pixels width
adjust/sharpness/unsharp mask

Step 30
apply your watermark
save as... type jpeg
Your tag is now finished

Thank you to have realized this tutorial

Do not hesitate to send your tags to Jacotte

she will be very glad to see it
and to present it on her site, with your permission of course.


If you want to be informed about Jacotte’s latest tutorials
join her NewsLetter


My creation with my tubes, the tube of the lady is made by Didier

Back to the boards of Jacotte's tutorials
board 1  board 2 board 2 

|