Camille

original tutorial can be found HERE


Material


Filters Used
AAA Frame : Foto Frame
Simple : Pizza Slice Miror
Unlimited : VM Stylize : Zoom Blur
AP Innovations : Lines Silverlining : Dotty Grid
Flaming Pear : Flexify 2
Unlimited : Tramage : Tow the Line
Unlimited : Factory N : Different Sin

Colors
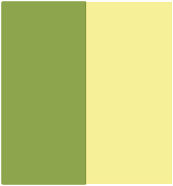

translator’s note : I work with PSPX8,
but you can realize this tag with another version of course

use the pencil to follow the steps
left click to grab it


Realization
Step 1
open tha alpha layer
window > duplicate
close the original and work with the copy
Step 2
in the materials palette, set color 1 as FG color and color 2 as BG color
prepare a linear gradient > 0 / 0
Step 3
flood fill tha lyer withe this gradient
Step 4
effects > AAA Frames > Foto Frame
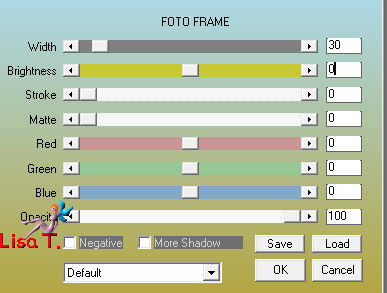
Step 5
layers > duplicate
image > resize > uncheck « resize all layers » > 95%
Step 6
layers > duplicate
image > resize > uncheck « resize all layers » > 95%
image > mirror > mirror horizontal
image > mirror > mirror vertical
Step 7
effects > 3D effects > drop shadow > 0 / 0 / 80 / 40 / black
Step 8
layers > merge > merge visible
Step 9
layers > duplicate
effects > plugins > Simple > Pizza Slice Mirror
Step 10
selections > load-save selections > from alpha channel > selection #1
DELETE
selections > select none
Step 11
selections > load-save selections > from alpha channel > selection #2
DELETE
selections > select none
Step 12
image > resize > uncheck « resize all layers » > 80%
Step 13
effects > image effects > offset
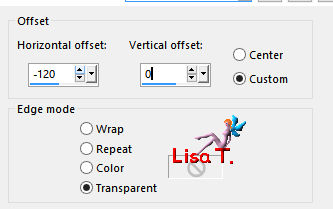
Step 14
layers > duplicate - image > mirror > mirror horizontal
layers > merge > merge down
Step 15
selections > load-save selections > from alpha channel > selection #3
DELETE
selections > select none
Step 16
layers > duplicate
image > mirror > mirror verticalbland mode : Overlay (or other according to your colors)
layers > merge > merge down
Step 17
selections > load-save selections > from alpha channel > selection #4
selections > modify > expand > 5 pixels
Step 18
layers > new raster layer
flod fill with the gradient of step 2 but check the box « invert »
Step 19
layers > new raster layer
copy/paste into selection the character tube
layers > merge > merge down
Step 20
effects > plugins > Unlimited 2 > VM Stylise > Zoom Blur
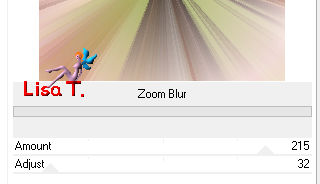
Step 21
layers > arrange > move down
blenc mode : Luminance (Legacy)
Step 22
activate the top layer
layers > merge > merge down
selecitons > select none
Step 23
effects > 3D effects > drop shadow > 0 /0 / 100 / 50 / black
Step 24
activate the bottom layer (merged)
selections > load-save selections > from alpha channel > selection #5
Step 25
in the materials palette, invert the colors --> set color 1 as BG color and color 2 as FG color
Step 26
prepare a linear gradient > 45 / 3 / uncheck « invert »
flood fill the seleciton with this gradient
Step 27
effects > plugins > Simple > Pizza Slice Mirror
Step 28
effects > edge effects > enhance more
Step 29
selections > promote selection to layer
selections > select none
Step 30
image > mirror > mirror horizontal
opacity : 50%
layers > merge > merge down
Step 31
the bottom layer is the active layer
selections > load-save selections > from alpha channel > selection #6
selections > promote selection to layer
Step 32
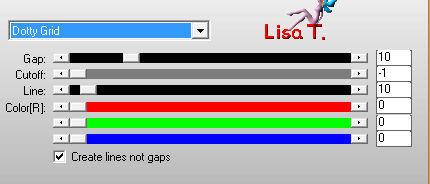
effects > plugins > AP (Innovations] > Lines Silverlining > Dotty Grid
Step 33
layers > new raster layer
flood fill with the FG color (light color)
selections > modify> contract > 3 pixels
DELETE
selections > select none
Step 34
layers > merge > merge down
Step 35
effects > 3D effects > drop shadow > 0 / 0 / 50 / 25 / black
Step 36
layers > duplicate – image > mirror > mirror horizontal
layers > merge > merge down
Step 37
layers > duplicate
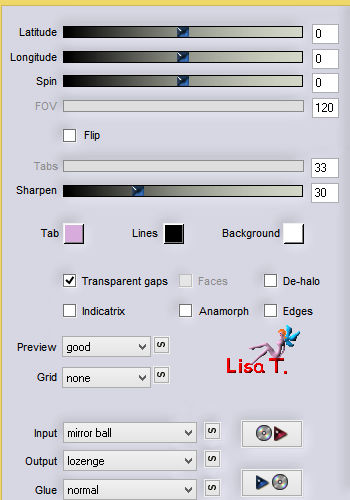
effects > plugins > Flaming Pear > Flexify 2
Step 38
selections > load-save selections > from alpha channel > selection #7
DELETE
selections > select none
Step 39
image > resize > uncheck « resize all layers » > 40%
Step 40
layers > arrange > move up
Step 41
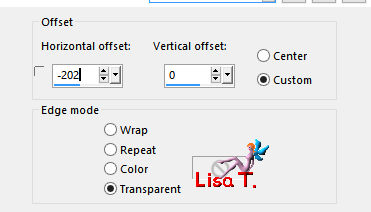
effects > image effects > offset
Step 42
layers > duplicate – image > mirror > mirror horizontal
layers > merge > merge down
Step 43
effects > 3D effects > drop shadow > 0 / 0 / 50 / 25 / black
Step 44
acitvate the bottom layer (merged)
selections > load-save selections > from alpha channel > selection #8
selections > promote selection to layer
Step 45
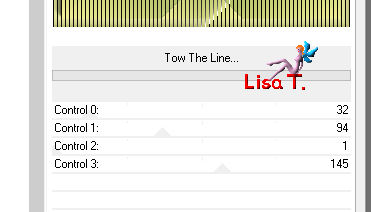
effects > plugins > Unlimited 2 > Tramages > Tow The Line
selections < select none
Step 46
layers > duplicate – image > mirror > mirror horizontal
opacity : 50%
layers > merge > merge down
Step 47
effects > 3D effects > drop shadow > 0 / 0 / 100 / 50 / black
Step 48
layers > merge > merge all (flatten)
Step 49
image > add borders >
5 pixels light color
2 pixels dark color
Step 50
image > add borders > 50 pixels light color
Step 51
select the large border with the magic wand tool
layers > new raster layer
flood fill the selection with a linear gradient > 0 / 1 / uncheck « invert »
Step 52
effects > Unlimited 2 > Filter Factor Gallery N > Different Sin
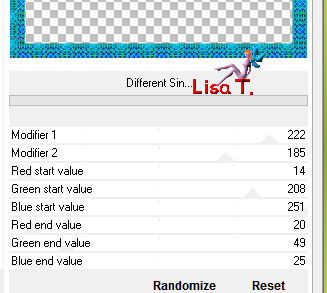
Step 53
bland mode of the layer : Luminance (Legacy)
layers > merge > merge down
Step 54
selections > invert
effects 3D effects > drop shadow > 0 / 0 / 100 / 25 / black
selections > select none
Step 55
image > add borders -->
5 pixels FG color
2 pixels BG color
Step 56
copy/paste as new layer the decoration tube
don’t move it
Step 57
copy/paste as new layer the decoration tube 2
don’t move it
Step 58
effects > 3D effects > drop shadow > 0 / 0 / 100 / 15 / black
Step 59
copy/paste as new layer the character tube
image > resize > uncheck « resize all layers » > 53% (if you choose Jacotte’s tube)
don’t move it
Step 60
effects > 3D effects > drop shadow > 25 / -30 / 50 / 30 / black
translator’s note : at this step I wished to erase the shadow around the frame
so I loaded selection #3 - selections > invert > delete - selections > select none
Step 61
layers > merge > merge all (flatten)
Step 62
image > resize > width : 900 pixels (or other of your choice)
Step 63
adjsut > sharpness > unsharp mask

Step 64
apply your watermark and save as... type jpeg

Your tag is finished
Thank you to have followed this tutorial

You can write to Jacotte if you have any problem with this tutorial
don’t hesitate to send your creations to Jacotte, she will be very glad to see them

And to present them here


If you want to be informed about Jacotte’s new creations
subscribe to her newsletter (fill the box at the bottom of her home page)


My tag with my tube (animated version,Animation Simone)

back to the boards of Jacotte’s tutorials
board 2  board 2 board 2 

|