Beautiful Autumn

original tutorial can be found HERE


Material


Filters Used
Simple : Blinz
Miror Rave : Quadrant Flip
Vanderlee Unplegged X : Vertical tile
L en K's : Zitah et Adonis
Mura Meister : Perspective Tilling
Unlimited : BKg Designer sf I0 I : Cruncher
AP Innovations Lines Silverlining : Dotty grid
Graphic Plus : Cross Shadow
AAA Frame : Foto Frame
Richard Roserman : Solid Border
Xero : Tekstya

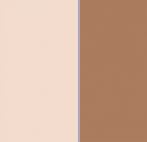
Colors

translator’s note : I work with PSPX8,
but you can realize this tag with another version of course

use the pencil to follow the steps
left click to grab it


Realization
Step 1
open the alpha layer
window > duplicate
close the original and work with the copy
Step 2
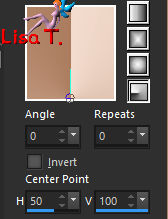
in the materials palette, prepare a radial gradient
FG color > choose a light color
BG color > choose a dark color
Step 3
flood fill the layer with the gradient
Step 4
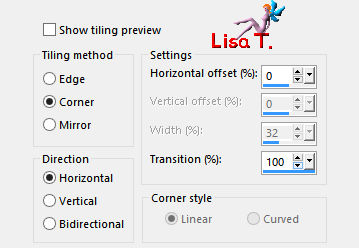
effects > image effects > seamless tiling
Step 5
effects > plugins > Simple > Blintz
Step 6
effects > edge effects > enhance more
Step 7
layers > duplicate – image > mirror > mirror vertical
blend mode of the layer : Overlay (or other of your choice)
layers > merge > merge down
Step 8
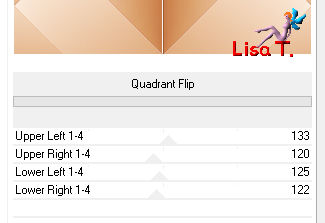
effects > plugins > Mirror Rave > Quadrant Flip
Step 9
selections > load-save selection > from alpha channel > selection #1
selections > promote selection to layer
selections > select none
Step 10
effects > image effects > seamless tiling

Step 11
layers > duplicate
blend mode of the layer : Multiply (or other)
layers > merge > merge down
Step 12
selections > load-save selection > from alpha channel > selection #1
selections > promote selection to layer
Step 13
copy/paste into selection the landscape tube
Step 14
layers > new raster layer
flood fill with the FG color
sleecitons > modify > contract > 5 pixels
DELETE
selections > select none
Step 15
blend mode of the layer : Overlay (or other)
layers > merge down
Step 16
effects > 3D effects > drop shadow > 0 / 0 / 80 / 40 / black
Step 17
activate the second layer from the bottom (promoted selection)
selections > load-save selection > from alpha channel > selection #2
selections > promote selection to layer
selections > select none
Step 18
effects > plugins > VanderLee > Unplugged X > Vertical Tile
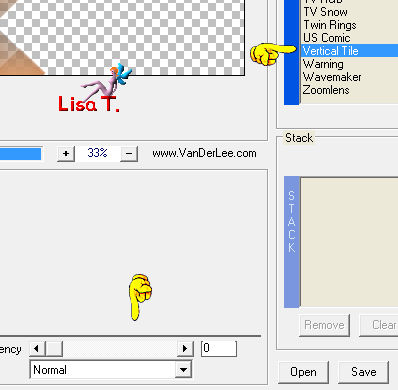
Step 19
layers > arrange > bring to top
blend mode of the layer : Multiply (or other)
Step 20
layers > duplicate – image > mirror > mirror horizontal
layers > merge > merge down
Step 21
activate the bottom layer
selections > load-save selection > from alpha channel > selection #3
selections > promote selection to layer
Step 22
effects > plugisn > L en K’s Zitah
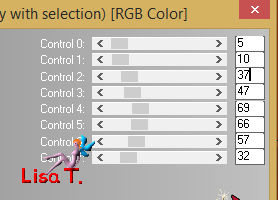
selections > select none
Step 23
effects > 3D effects > drop shadow > 0 / 0 / 100 / 50 / black
Step 24
layers > arrange > move up
Step 25
activate the bottom layer
layers > duplicate
Step 26
effects > plugins > Mura’s Meister > Perspective Tiling
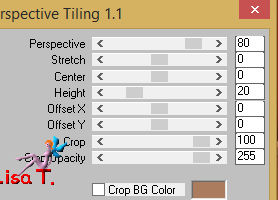
Step 27
layers > arrange > move up twice
effects > edge effects > enhance
Step 28
activate the layer « Promoted Selection 3 » (third from the bottom)
selections > load-save selection > from alpha channel > selection #4
selectionw > promote selection to layer
Step 29
effects > plugins > Bkg Designers sf10 I > Cruncher
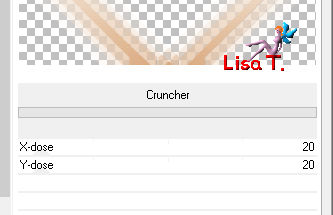
Step 30
adjust > sharpness > sharpen more
selections > select none
Step 31
blend mode of the layer : Multiply (or other)
Step 32
effects > 3D effects > drop shadow > 0 / 0 / 100 / 50 / black
Step 33
acivate the bottom layer
selections > load-save selection > from alpha channel > selection #5
selections > promote selection to layer
Step 34
effects > plugins > AP Innovations > Lines Silverlining > Dotty Grid
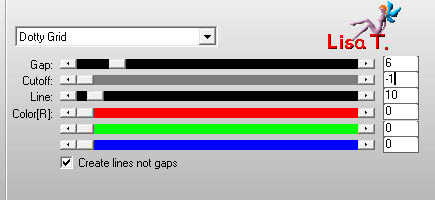
Step 35
effects > 3D effects > Inner Bevel
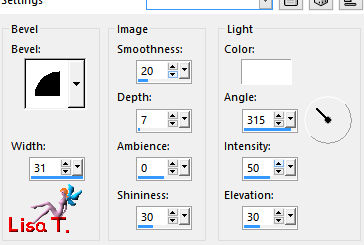
selections > select none
Step 36
layers > arrange > bring to top
adjust > sharpness > sharpen more
Step 37
layers > duplicate – image > mirror > mirror horizontal
layers > merge > merge down
Step 38
effects > 3D effects > drop shadow > 1 / 1 / 50 / 25 / black
Step 39
activate « promoted selection 2 » (second from the top)
selections > load-save selection > from alpha channel > selection #6
selections > promote selection to layer
Step 40
effects > plugins > L en K’s Adonis
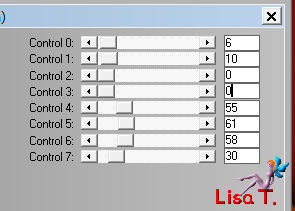
selections > select none
Step 41
layers > duplicate – image > mirror > mirror horizontal
layers > merge > merge down
Step 42
effects > 3D effects > drop shadow > 1 / 1 / 50 / 25 / black
Step 43
activate the bottom layer
edit < COPY
Step 44
layers > merge > merge all (flatten)
Step 45
selections > select all
image > add borders > 80 pixels FG color
Step 46
selections > invert
layers > new raster layer
edit/paste into selection
blend mode of the layer : Multiply
effects > plugins > Graphic Plus > Cross Shadow
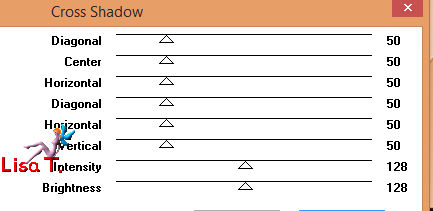
Step 47
effects > plugins > AAA Frames > Foto Frame
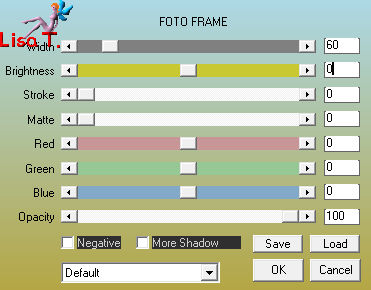
Step 48
same plugin but with new settings
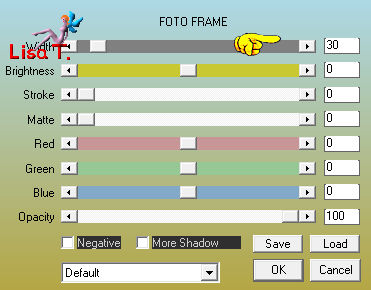
Step 49
effects > 3D effects > drop shadow > 0 / 0 / 100 / 50 / black
Step 50
selections > invert
activate the Background layer
Step 51
effects > plugins > Richerd Rosemman > Solid Border > BG color
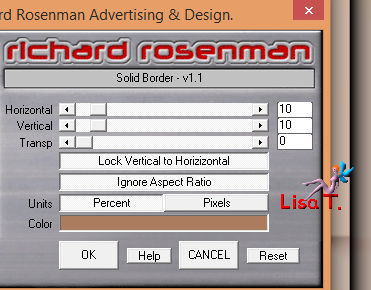
selections > select none
Step 52
select the small border created with the magic wand tool
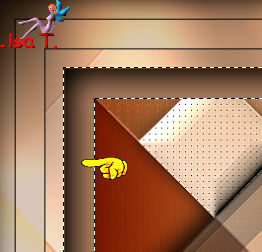
effects > plugins > Xero > Tekstya
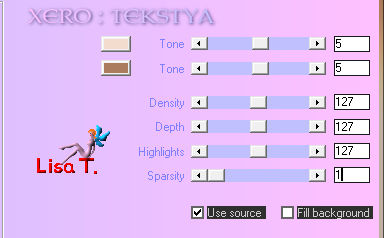
adjust > sharpness > sharpen more
selections > select none
Step 53
selections > select all
selections > modify > contract > 80 pixels
effects > 3D effects > Cutout
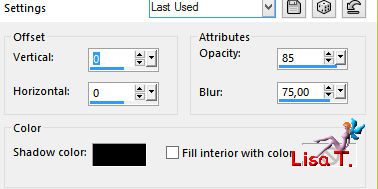
selections > select none
Step 54
layers > merge > merge visible
Step 55
image > add borders > 5 pixels FG color and 3 pixels BG color
Step 56
copy/paste as new layer the character tube
image > resize > uncheck « resize all layers » > 85%
move it to the right (see final result)
Step 57
effects > 3D effects > drop shadow > 25 / -30 / 50 / 30 / black
Step 58
copy/paste as new layer the flower tube
move it where you like
drop a shadow as before
Step 59
copy/paste as new layer the text tube
move it properly
effects > 3D effects > drop shadow > 1 / 1 / 100 / 0 / black
Step 60
layers > merge > merge all (flatten)
Step 61
image > resize > width : 900 pixels
Step 62
adjust > sharpness > unsharp mask

Step 63
apply your watermark and save as... type jpeg

Your tag is finished
Thank you to have followed this tutorial

You can write to Jacotte if you have any problem with this tutorial
don’t hesitate to send your creations to Jacotte, she will be very glad to see them

And to present them here


If you want to be informed about Jacotte’s new creations
subscribe to her newsletter (fill the box at the bottom of her home page)


back to the boards of Jacotte’s tutorials
board 2  board 3 board 3 

|