Balance

Original tutorial can be found HERE

I am member of TWInc
this tutorial is protected

 
Material
Tubes by jacotte
1 alpha layer (selections)

Filters Used
FM Tile Tools/Collage Linear
Toadies/What are You?
Unlimited 2/Tiles and Mirror/Mirror and scaled
Alien Skin Impact/Extrude
AP Innovations/Line Silverlining/Line option Vertical
Mura’s Meister/Perspective tiling
Unlimited 2/BKG Kaleidoscope/Kaleidoscope Persian
Mehdi/Sorting Tile
LenK/Palmyre
Sapphire 03/Sapphire 02388
AAA Frames/Foto Frame
Colors
foreground color -> color 1 -> #f1e4d3 (light)
background color -> background color -> #a9604d (dark)
set both colors in the materials palette

   
use the paint brush to follow the steps
left click to grab it

   
Realization
Step 1
activate the alpha layer
window/duplicate / close the original, and work with the copy
Step 2
fill the layer with a linear gradient 45 / 0 / uncheck “invert”
Step 3
effects/plugins/FM Tile Tools/Collage Linear

Step 4
effects/edge effects/enhance
Step 5
effects/plugins/Toadies/What Are You?/ X 20 / Y 20

Step 6
effects/plugins/Unlimited 2/Tile & Mirror/Mirrored and Scaled

Step 7
selections/load selection #1 from alpha channel
selections/promote selection to layer
Step 8
selections/modify/contract/2 pixels
effects/plugins/AP Innovations/Lines Silverlining/Line Options Vertical
10/-1/10/255/255/255

Step 9
effects/plugins/Alien Skin Impact/Extrude/backgroundcolor

selections/select none
Step 10
layers/duplicate - image/mirror
layers/merge/merge down
Step 11
effects/3D effects/drop shadow
3 / 3 / 70 / 25 / black
-3 / -3 / 70 / 25 / black
Step 12
effects/distortion effects/punch

Step 13
effects/image effects/offset/ 0 / -132

Step 14
in the layers palette, activate the background layer (alpha layer)
layers/duplicate
Step 15
effects/plugins/Mura’s Meister/Perspective Tiling
80 / 0 / 0 / 15 / 0 / 0 / 100 / 255

effects/3De ffects/drop shadow/ 0 / 0 / 75 / 35 / black
Step 16
in the layers palette, activate the background layer (alpha layer)
effects/plugins/BKG Kaleidoscope/Kaleidoscope Persian/ 255 / 255

effects/edge effects/enhance
Step 17
in the layers palette, the background layer is active (bottom layer)
effects/image effects/seamless tiling

Step 18
effects/plugins/Mehdi/Sorting Tiles
Block Range 300 / 500 - Crossed

Step 19
layers/duplicate - image/mirror
in the layers palette, set the blend mode on “overlay” (or other) and the opacityu on 40%
layers/merge/merge down
Step 20
in the layers palette, the alpha layer is active (bottom layer)
selections/load selection #2 from alpha channel
selections/promote selection to layer
Step 21
effects/plugins/LenK’s Palmyre/ 255 / 7

selections/select none
set the blend mode of the layer on “overlay” (or other)
Step 22
layers/duplicate - image/mirror
layers/merge/merge down
Step 23
in the layers palette, activate the bottom layer
selections/load selection #3 from alpha channel
selections/promote selection to layer
effects/Plugins/Sapphire 03/Sapphire plugin 0238

selections/select none
set the blend mode of the layer on “normal” and the opacity on 40%
Step 24
layers/duplicate - image/mirror
layers/merge/merge down
Step 25
in the layers palette, activate the bottom layer
selections/load selection #4 from alpha channel
selections/promote selection to layer
Step 26
activate the tube of the roses
edit/copy - back to you work - edit/paste as new layer
move it properly into the selection
Step 27
selections/invert, and press the Delete key of your keyboard
Step 28
selections/invert
in the layers palette, set the blend mode on “luminance (legacy)”
layers/merge/merge down
Step 29
selections/modify/select selection borders/inside/5

Step 30
layers/new raster layer
fill with a linear gradient / 45 / 5 / uncheck “invert”
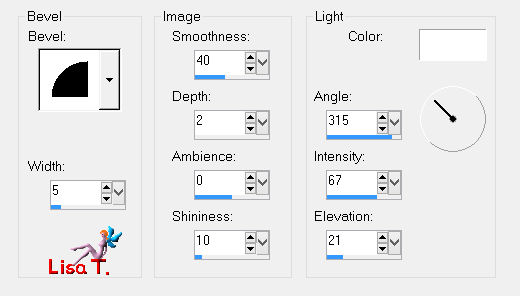
effects/3D effects/inner bevel

selections/select none
Step 31
layers/merge/merge down
effects/3D effects/drop shadow/ 0 / 0 / 75 / 35 / black
Step 32
layers/merge/merge all (flatten)
Step 33
image/add borders/check “symmetric/2 pixels/background color
Step 34
selections/select all
effects/plugins/AAA Frames/Foto Frame 10 / 0 / 0 / 2 / 0 / 0 / 0 / 100

Step 35
image/add borders/check “symmetric”/50 pixels/foreground color
selections/invert
fill this border with the linear gradient 45 / 5
adjust/blur/gaussian blur/35
Step 36
effects/texture effects/fine leather

Step 37
selections/invert
effects/3D effects/drop shadow/ 0 / 0 / 100 / 50 / black
Step 38
selections/invert
effects/plugins/AAA Frame/Foto Frame as before
selections/select none
Step 39
image/add borders/2 pixels/color 2
add borders/1 pixel/black
Step 40
activate the tube “decoration 1” (colorize if necessary according to the colors of you tubes)
edit/copy - back to your work - edit/paste as new layer
Step 41
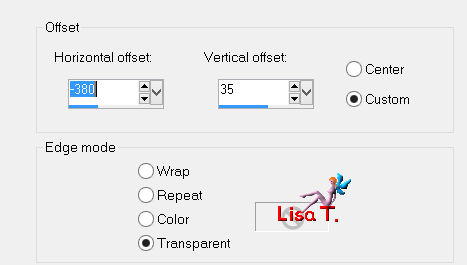
effects/image effects/offset -380 / 35

layers/duplicate - image/mirror
Step 42
activate the tube of the character
edit/copy - back to your work -edit/paste as new layer
move it as shown on the final result
effects/3D effects/drop shadow/ 5 / 5 / 30 / 15 / black
Step 43
activate the tube “decoration 2” (colorize if necessary according to the colors of you tubes)
edit/copy - back to your work -edit/paste as new layer
move it as shown on the final result
Step 44
activate the tube “decoration 3”
edit/copy - back to your work -edit/paste as new layer
effects/image effects/offset -1 / 185

Step 45
layers/duplicate - image/flip
image/resize/ 85 % (uncheck “resize all layers”)
effects/image effects/offset 1 / -8

Step 46
in the layers palette, activate the tube of the character
layers/arrange/bring to top
Step 47
layers/merge all (flatten)
image/resize/900 pixels width
adjust/sharpness/unsharp mask

Step 48
apply your signature, and save as … type jpeg
 
Your tag is finished
Thank you to have realized it
 
You can write to Jacotte or to me if you have any trouble with this tutorial
you can send your creations to Jacotte, she will be very glad to see them

And to present them here

 
If you want to be informed about Jacotte’s new creations
join her newsletter (fill the box at the bottom of her home page)

 
Back to the boards of Jacotte's tutorials
board 1  board 2 board 2 

|