Back to School

original tutorial can be found HERE

Material


Filters Used
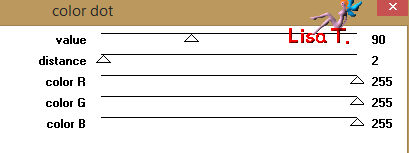
Pentacom : Color dot
Graphic plus : Button Beveler II
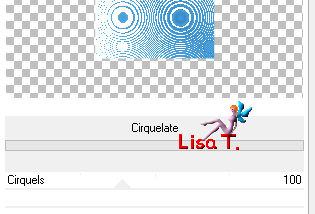
Unlimited Bkg Designer sf 10 I : Cirquelate
Simple : Half Wrap
Italian Editors : vetro-www.italianeditors.com
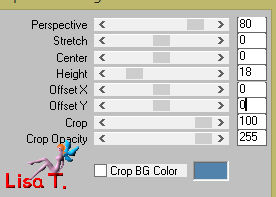
Mura Meister : Perspective Tilling
Colors
color 1 -> foreground color -> #b5d7fb
color 2 -> background color -> #5283ac


translator’s note : I work with PSPX8,
but you can realize this tag with another version of course

use the pencil to follow the steps
left click to grab it


Realization
Step 1
open the alpha layer
window/duplicate – close the original and work with the copy
Step 2
in the materials palette, prepare a sunburst gradient

Step 3
flood fill the layer with the gradient
Step 4
selections/load-save selection/from alpha channel/selection #1
selections/invert
Step 5
effects/plugins/Penta.Com/Color Dot

Step 6
effects/3D effects/drop shadow/ 1 / 1 / 50 / 15 / black
Step 7
selections/select none
Step 8
layers/duplicate
Step 9
image/free rotate

Step 10
activate the bottom layer (alpha layer)
selections/select all
image/crop to selection
Step 11
activate the top layer
blend mode : « Hard Light » (or other)
layers/merge/merge down
Step 12
effects/plugins/Graphic Plus/Button Beveler II

Step 13
selections/load-save selection/from alpha channel/selection #2
selections/promote selection to layer
selections/select none
Step 14
effects/plugins/Unlimited 2/&<Bkg Designers sf10 I>/Cirquelate

Step 15
image/resize/uncheck « resize all layers »/50%
Step 16
image/free rotate

Step 17
effects/plugins/Simple/Half Wrap
Step 18
effects/3D effects/drop shadow/ 1 / 1 / 50 / 15 / black
Step 19
activate the bottom layer (alpha layer)
selections/load-save selection/from alpha channel/selection #3
selections/promote selection to layer
effects/3D effects/chisel with color 1

Step 20
selections/select none
Step 21
blend mode of the layer : « Multiply » (or other)
Step 22
effects/3D effects/drop shadow/ 0 / 0 / 50 / 25 / black
Step 23
layers/duplicate – image/mirror/mirror horizontal
Step 24
layers/merge/merge down
Step 25
activate the bottom layer
selections/load-save selection/from alpha channel/selection #4
selections/promote selection to layer
Step 26
effects/plugins/Italian Editors Effect/Vetro-www.italianeditors.com

selections/select none
Step 27
layers/duplicate
image/mirror/mirror horizontal
opacity : 50%
layers/merge/merge down
Step 28
keep the same layer active
selections/load-save selection/from alpha channel/selection #4
layers/new raster layer
effects/3D effects/cutout

Step 29
selections/select none
layers/merge/merge down
Step 30
activate the bottom layer (alpha layer)
layers/duplicate
layers/arrange/bring to top
Step 31
effects/plugins/Mura’s Meister/Perspective Tiling

effects/3D effects/drop shadow/ 0 / 0 / 50 / 25 / black
Step 32
layers/arrange/move down TWICE
Step 33
activate the bottom layer
copy/paste as new layer the decoration tube 1
don’t move it
Step 34
activate the top layer
copy/paste as new layer the decoration tube 2
layers/arrange/move down
Step 35
layers/merge/merge visible
Step 36
copy/paste as new layer the tube « bonne rentrée »
image/resize/uncheck « resize all layers »/50%
don’t move it
effects/3D effects/drop shadow/ 1 / 1 / 100 / 15 / black
Step 37
copy/paste as new layer the tube « tube-jacotte-a382 »
Step 38
effects/image effects/offset

Step 39
effects/3D effects/drop shadow/ 0 0 / 50 / 25 / black
Step 40
copy/paste as new layer the character tube (don’t forget to erase the watermark)
image/resize/uncheck « resize all layers »/85%
Step 41
effects/image effects/offset

Step 42
effects/3D effects/drop shadow/ 0 / 0 / 50 / 15 / black
Step 43
copy/paste as new layer the books tube
image/resize/uncheck « resize all layers »/60%
Step 44
effects/image effects/offset

Step 45
effects/3D effects/drop shadow/ 0 0 / 50 / 25 / black
Step 46
activate the bottom layer
edit/copy
Step 47
layers/merge/merge visible
Step 48
image/add borders/2 pixels color 1
Step 49
image/add borders/30 pixels color 2
Step 50
select this border with the magic wand tool
eidt/paste into selection
Step 51
selections/invert
effects/3D effects/drop shadow/ 0 / 0 / 100 / 50 / black
Step 52
selections/select none
Step 53
image/add borders/5 pixels color 2
Step 54
adjust/sharpness/unsharp mask

Step 55
image/resize/900 pixels width (or other)
apply your watermark
file/save as... type jpeg

Your tag is finished
Thank you to have followed this tutorial

You can write to Jacotte if you have any problem with this tutorial
don’t hesitate to send your creations to Jacotte, she will be very glad to see them

And to present them here


If you want to be informed about Jacotte’s new creations
subscribe to her newsletter (fill the box at the bottom of her home page)


My tag with my tube

back to the boards of Jacotte’s tutorials
board 2  board 3 board 3 

|