A game of cards

original tutorial can be found HERE

Material


Filters Used
Visual Manipulation/Y-Mirror - L en K’s/Raïssa - Flaming Pear/Transline - Flaming Pear/Flexify 2
Unlimited 2/Willy/Tablet Lines - Screenworks/Block Tile
Colors
color 1 -> foreground color -> #d2b0a4
color 2 -> background color -> #743229


translator’s note : I work with PSPX7,
but you can realize this tag with another version of course

use this pencil to follow the steps
left click to grab it


Realization
Step 1
open the alpha layer, duplicate and close the original. Work with the copy
Step 2
flood fill with a linear gradient

Step 3
effects/plugins/Visual Manipulation/Y-Mirror

effects/edge effects/enhance
Step 4
effects/plugins/Unlimited 2/Tile & Mirror/Quadrant Mirror

Step 5
selections/load selection from alpha channel/selection #1
selections/promote selection to layer
selections/select none
Step 6
effects/plugins/L en K’s Raissa

Step 7
layers/duplicate
image/mirror/mirror vertical
layers/merge down
Step 8
layters/dupliclate - image/mirror/mirror horizontal
blend mode : overlay (or other according to your colors)
layers/merge down
bland mode : overlay
Step 9
effects/3d effects/drop shadow/ 0 / 0 / 50 / 25 / black
Step 10
layers/duplicate
effects/geometric effects/skew

Step 11
effects/plugins/Flaming Pear/Transline
effects/edge effects/enhance
layers/duplicate - image/mirror/mirror horizontal
Step 12
activate the bottom layer (alpha layer)
selections/load selection from alpha channel/selection #2
selections/promote selection to layer
selections/select none
Step 13
layers/duplicate - image/mirror/mirror horizontal
layers/merge down
effects/3D effects/drop shadow/ 0 / 0 / 50 / 25 / black
Step 14
layers/duplicate
effects/plugins/Flaming Pear/Flexify 2

Step 15
image/resize/15%/uncheck « resize all layers »
blend mode : screen
layers/arrange/bring to top
Step 16
activate the bottom layer (alpha layer)
selections/load selection from alpha channel/selection #3
selections/promote selection to layer
Step 17
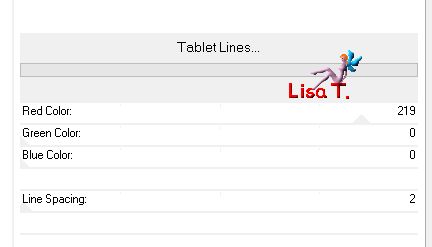
effects/plugins/Unlimited 2/Willy/Tablet Lines

adjust/sharpness/sharpen more
blend mode : hard light
Step 18
selections/modify/contract/20 pixels
effects/3D effects/drop shadow/ 0 / 0 / 80 / 40 / black
selections/select none
Step 19
layers/duplicate - image/mirror/mirror horizontal
layers/merge down
effects/3D effects/drop shadow/ 0 / 0 / 50 / 25 / black
Step 20
layers/duplicate - image/mirror/mirror vertical
layers/merge down
Step 21
activate the top layer (copy of promoted selection - the circle)
select inside the circle with the magic wand tool
layers/new raster layer
Step 22
copy/paste into selection a landscape tube
if you use the landcape provided, resize it to 120% (uncheck « resize all layers »)
and move it upwards (see final result)
Step 23
selections/invert
hit the delete key of your keybaord
Step 24
selections/invert
effects/edge effects/enhance and select none
Step 25
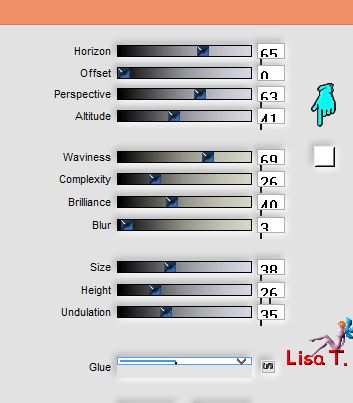
effects/plugins/Flaming Pear/Flood
65 - 0 - 63 - 41 * 69 - 26 - 40 - 3 * 38 - 26 - 35 * normal
click inside the small square box and choose white

Step 26
copy/paste as new layer the character tube
Step 27
image/resize/uncheck « resize all layers »/75%
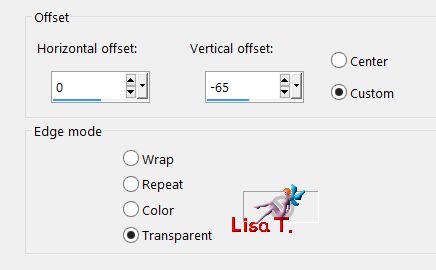
effects/image effects/offset

effects/3D effects/drop shadow/ 2 / 5 / 40 / 25 / black
Step 28
layers/merge/visible
edit/COPY
Step 29
change the colors in the materials palette
foreground color : #c6382f(dark)
background color : #d3cc91 (light)

Step 30
image/add borders -->
2 pixels color 2
50 pixels color 1
select the large border with the magic wand tool
edit/paste into selection
Step 31
adjust/blur/gaussian blur : 15
effects/plugins/Screenworks/Block Tile
Step 32
selections/invert
effects/3D effects/drop shadow/ 2 / 2 / 70 / 15 / black *** -2 / -2 / 70 / 15 / black
Step 33
selections/select none
Step 34
image/add borders -->
2 pixels color 2
2 pixels color 1
2 pixels black
Step 35
copy/paste as new layer the cards tube
move it to the left
effects/3D effects/drop shadow/ 2 / -2 / 70 / 15 / black
Step 36
copy/paste as new layer the lamppost tube
move it to the right
effects/3D effects/drop shadow/ 0 / 0 / 50 / 25 / black
Step 37
layers/merge all (flatten)
Step 38
image/reisze/width : 900 pixels
Step 39
adjust/sharpness/unsharp mask

Step 40
apply your signature and save as... type jpeg

Your tag is finished
Thank you to have realized it

You can write to Jacotte (or to me) if you have any problem with this tutorial
you can send your creations to Jacotte, she will be very glad to see them

And to present them here


If you want to be informed about Jacotte’s new creations
subscribe to her newsletter (fill the box at the bottom of her home page)


back to the boards of Jacotte’s tutorials
board 1  board 2 board 2 

|