2014
Original tutorial can be found HERE

I am member of TWInc
this tutorial is protected


Material
2 tubes created by myself
1 tube created by Jacotte
2 decoration tubes
1 alpha layer (with selections)
1 mask by Jacotte

Filters Used
VM Distortion/Vision Impossible
Simple/Blintz & Pizza Slice Mirror
Mirror Rave/Quadrant Flip
AP Innovations/Lines Silverlining/Dotty Grid
Mehdi/Wavy Lab
Unlimited
Colors/Special Effects/Shiver
Cybia Screenworks/Lace Screen
Penta.Com/VTR2
AAA Frame/Foto Frame
Colors used
Foreground color : color 1 : #9e0005 (dark color)
Background color : color 2 : White
and #fbebdf (when you use Mehdi /Wavy Lab)
Realization
Step 1
Open the alpha layer “meilleurs voeux”
window/duplicate
Close the original. You will work with the copy
Step 2
in the materials palette, prepare a linear gradient 250 / 0 (uncheck “invert”)
Step 3
paint the alpha layer with the gradient
Step 4
effects/plugins/Unlimited 2/VM Distortion/Vision Impossible

effets/edge effects/enhance more
Step 5
selections/load-save selection/from alpha channel/selection #1
selections/promote selection to layer
selections/select none
Step 6
effects/plugins/Simple/Blintz
Step 7
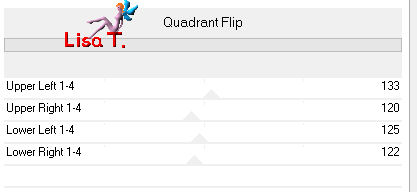
effects/plugins/Mirror Rave/Quadrant Flip
Step 8
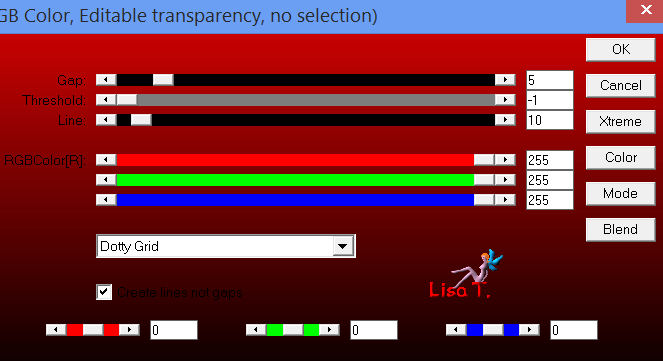
effects/plugins/AP Innovations/Lines Silverlining/Dotty Grid
Step 9
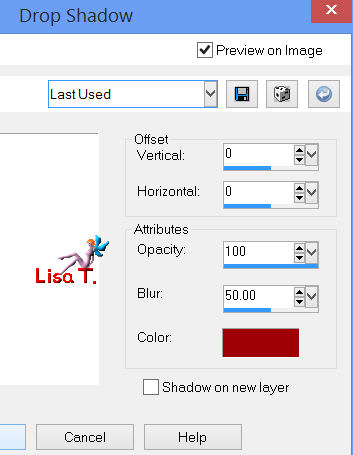
effects/3 D effects/drop shadow/ 0 / 0 / 100 / 50 / color 1
Step 10
layers/new raster layer
selections/load-save selection/from alpha channel/selection #1
paint with color 1
selections/select none
Step 11
effects/plugins/Simple/Blintz
Step 12
effects/plugins/Mirror Rave/Quadrant Flip
same settings as in step 7
Step 13
effects/plugins/Simple/Pizza Slice Mirror (apply 2 times this plugin)
in the layers palette, set the opacity on 35%
Step 14
layers/duplicate
image/mirror
layers/merge/merge down
effects/3D effects/drop shadow 0 / 0 / 100 / 50 / color 1
Step 15
layers/new raster layer
effects/plugins/Mehdi/Wavy Lab
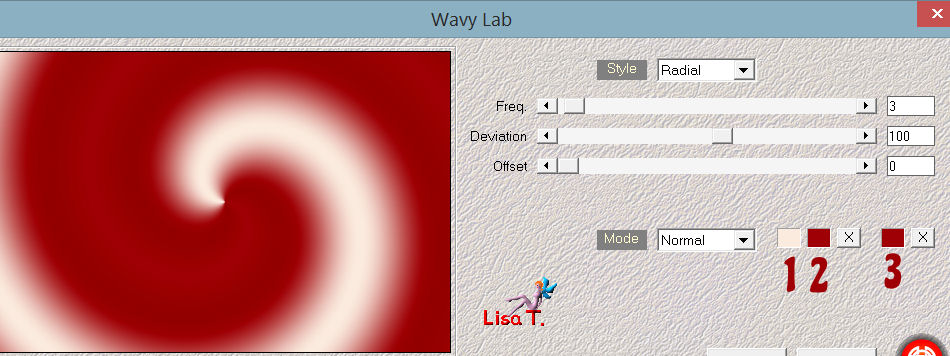
color #fbebdf
color 2 : foreground color
color 3 : foreground color
effects/edge effects/enhance
Step 16
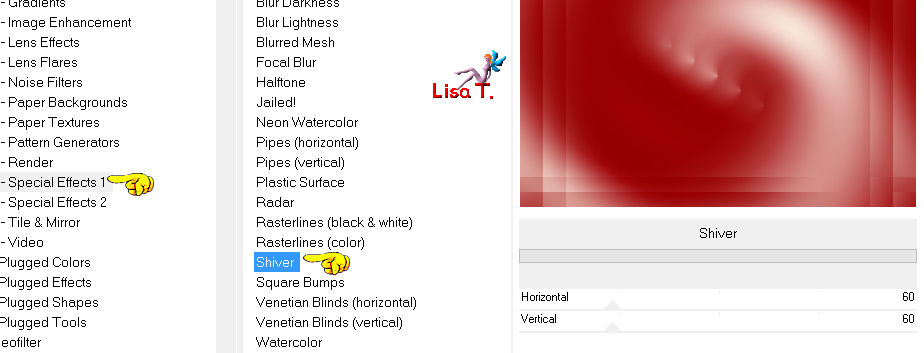
effects/plugins/Unlimited 2/Special effects 1/Shiver
Step 17
selections/load-save selection/from alpha channel/selection #2
press the delete key of your keyboard
selections/select none
Step 18
effects/3D effects/ 0 / 0 / 100 / 50 / black
in the layers palette, set the blend mode on “burn” (or other according to your colors)
opacity : 55%
Step 19
activate the tube “deco 1”
edit/copy - back to your work - edit/paste as a new layer
don’t move it
Step 20
selections/load-save selection/from alpha channel/selection #3
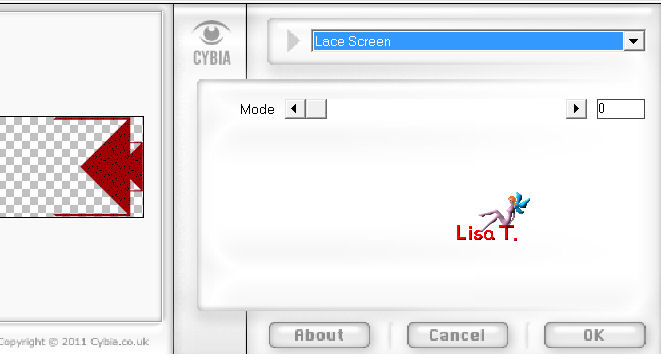
effects/plugins/Cybia/Screenworks/Lace Screen
effects/3D effects/drop shadow/ 0 / 0 / 100 / 50 / black
selections/select none
Step 21
layers/duplicate
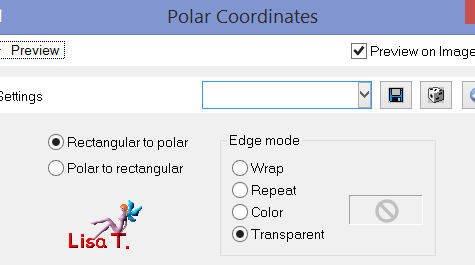
effects/distortion effects/polar coordinates
Step 22
layers/duplicate
image/flip
layers/merge/merge down
effects/3D effects/drop shadow/ 0 / 0 / 60 / 30 / black
Step 23
activate the tube of the book
edit/copy - back to your work - edit/paste as a new layer
image/resize/80% (uncheck “resize all layers” )
layers/arrange/move down
effects/3D effects/drop shadow/ 0 / 0 / 50 / 30 / black
Step 24
in the layers palette, activate the layer at the bottom of the stack (alpha layer)
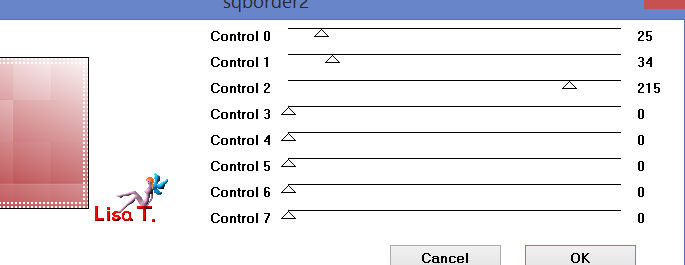
effects/plugins/AFS Import/sqborder2
Step 25
in the layers palette, make sure the alpha layer is still active
layers/new raster layer
paint with color 2
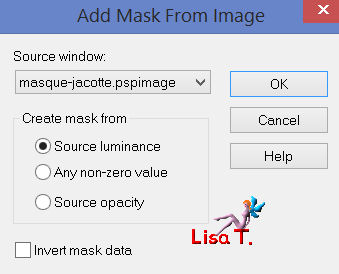
activate the tube “masque-jacotte” and reduce it
layers/new mask layer/from image
Step 26
layers/merge/merge group
layers/duplicate
image/flip
image/mirror
layers/merge/merge down
in the layers palette, set the opacity on 40%
Step 27
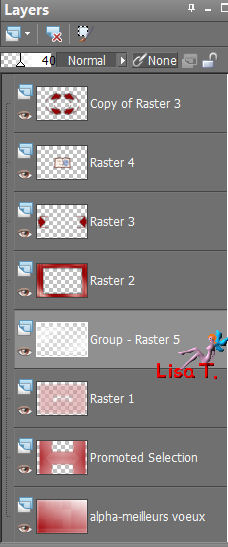
layers/arrange/move up (2 times)
your layers palette must be like this
Step 28
in the layers palette, make sure the layer “group-raster 5” (the mask) is still active
selections/select all
selections/modify/contract/50 pixels
selections/invert
press the delete key of your keyboard
selections/select none
Step 29
layers/merge/merge all (flatten)
Step 30
image/add borders/2 pixels/color 1
Step 31
selections/select all
image/add borders/50 pixels/color 2
Step 32
selections/invert
Step 33
selections/promote selection to layer
paint with a linear gradient 45 / 1 (uncheck “invert”)
Step 34
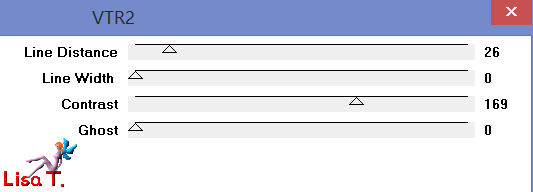
effects/plugins/Penta.com/VTR2
Step 35
effects/plugins/Simple/Pizza Slice Mirror
Step 36
layers/duplicate
image/mirror
selections/defloat
in the layers palette, set the opacity on 50%
layers/merge/merge down
effects/edge effects/enhance
Step 37
layers/merge/merge down
selections/invert
effects/3D effects/drop shadow/ 0 / 0 / 100 / 50 / black
selections/select none
Step 38
image/add borders
2 pixels/color 2
2 pixels/color 1
Step 39
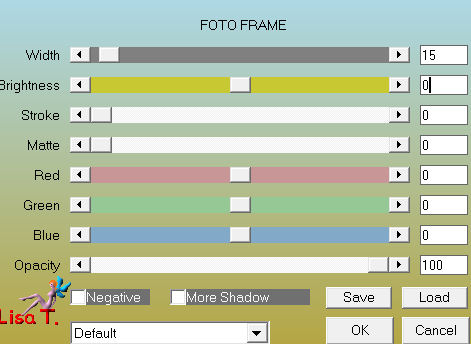
effects/plugins/AAA Frames/Foto Frame
Step 40
activate the tube of the snowman, erase the signature
edit/copy - back to your work - edit/paste as a new layer
image/resize/75% (uncheck “resize all layers”)
move to the left
effects/3D effects/drop shadow/ 0 / 0 / 60 / 25 / black
Step 41
activate the tube of the glasses, erase the signature
edit/copy - back to your work - edit/paste as a new layer
image/resize/30%/(uncheck “resize all layers”)
move to the right
layers/duplicate
layers/merge/merge down
effects/3D effects/drop shadow/ 1 / 1 / 60 / 2 / black
Step 42
activate the tube “2014”
edit/copy - back to your work - edit/paste as a new layer
image/resize/40% /(uncheck “resize all layers”)
move it as shown on the final result
effects/3D effects/drop shadow/ 1 / 1 / 60 / 2 / black
Step 43
image/add borders/1 pixel/black
Step 44
image/resize/900 pixels width
adjust/sharpness/unsharp mask
Step 45
apply your signature
save as… type jpeg

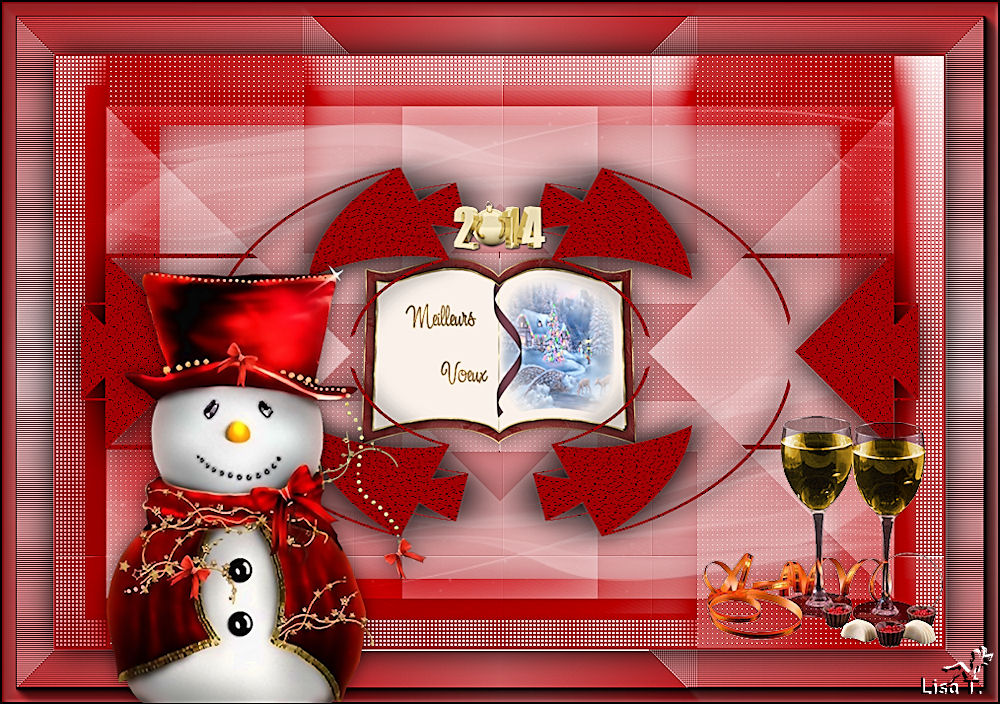
Your tag is finished
Thank you to have realized it
You can write to Jacotte or to me if you have any trouble with this tutorial
you can send your creations to Jacotte, she will be very glad to see them

And to present them here

If you want to be informed about Jacotte’s new creations
join her newsletter

Back to the board of Jacotte's tutorials


|