Annie loves lollipops

original tutorial can be found HERE

Material

you wil find other tubes for this tutorial


Filters Used
Graphic plus : Panel Stripes
Teph's Tricks : Ofset Wrap
Miror Rave : Quadrant Flip
AFs Import : Sq Border 2
Unlimited BKg Kaléidoscope : @BlueBerry Pie
L en K's Zitah
Unlimited : Toadies : Ommadawn
Néology : Transparent Pizza
Penta Com : Color dot
Penta Com : VTR2

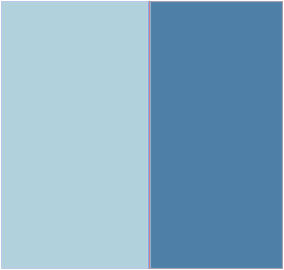
Colors

translator’s note : I work with PSPX8,
but you can realize this tag with another version of course

use the pencil to follow the steps
left click to grab it


Realization
Step 1
open the alpha layer
window > duplicate
close the original and work with the copy
Step 2
flood fill with a linear gradient > ( 45 / 1 / uncheck « invert »)
Step 3
adjust > blur > gaussian blur > 20
Step 4
effects > plugins > Graphic Plus > Panel Stripes

Step 5
effects > plugins> Tricks > Offset Wrap

Step 6
effects > edge effects > enhance
Step 7
selections > load-save selection > from alpha channel > selection #1
Step 8
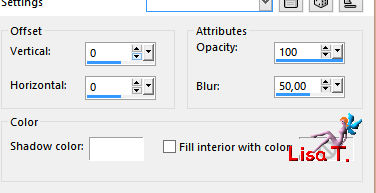
effects >3D effects > drop shadow > 0 / 0 / 100 / 50 / black
selections > select none
Step 9
effects > plugins > Mirror Rave > Quadrant Flip > default settings
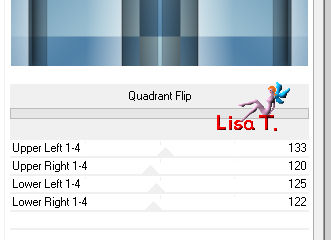
Step 10
selections > load-save selection > from alpha channel > selection #2
selections > promote selection to layer
Step 11
effects > texture effects > blinds > FG color
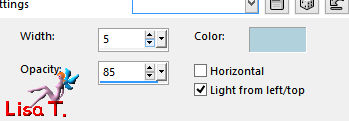
Step 12
effects > geometric effects > perspective vertical
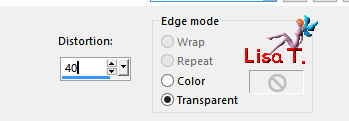
Step 13
right click on the layer « floating selection » > defloat
Step 14
effects > 3D effects > drop shadow > 0 / 0 / 80 / 40 / black
selections > select none
Step 15
layers > duplicate – image > mirror > mirror vertical
layers > merge > merge down
Step 16
activate the alpha layer
selections > load-save selection > from alpha channel > selection #3
selections > promote selection to layer
Step 17
effects > plugins > [AFS IMPORT] > Sq Border2
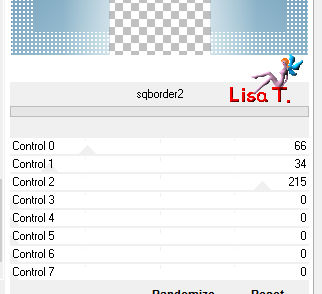
selections > select none
Step 18
effects > 3D effects > drop shadow same settings as before
Step 19
selections > load-save selection > from alpha channel > selection #4
selections > promote selection to layer
Step 20
effects > artistic effects > enamel
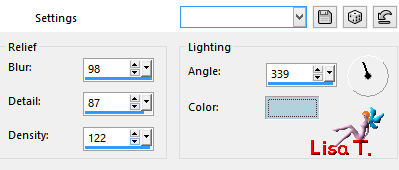
adjust > sharpness > sharpen more
Step 21
layers > new raster layer
effects > 3D effects > cutout
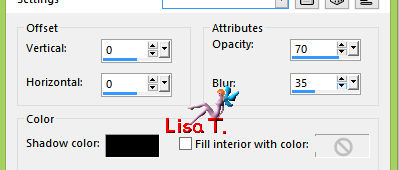
layers > merge > merge down
selections > select none
Step 22
layers > duplicate – image > mirror > mirror horizontal
layers > merge > merge down
Step 23
activate the alpha layer
selections > load-save selection > from alpha channel > selection #5
selections > promote selection to layer
Step 24
effects > plugins > Unlimited 2 > BKg Kaleidoscope > @BlueBerry Pie
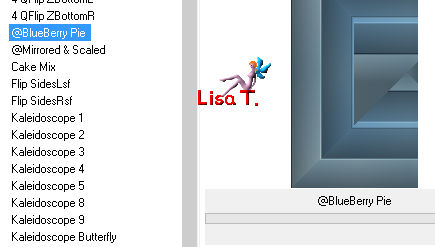
selections > select none
Step 25
layers > duplicate – image > mirror > mirror horizontal
opacity of the layer : 50%
layers > merge > merge down
Step 26
layers > duplicate – image > mirror > mirror vertical
opacity of the layer : 50%
layers > merge > merge down
Step 27
optional --> Jacotte found her layer too dark !
so she applied the plugin > Nik Software > Color Efex Pro 3.0 complete > Colore Stylizer
with the FG color
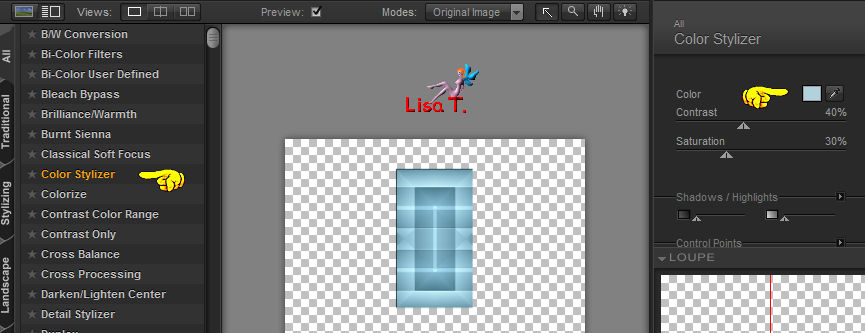
Step 28
copy / paste as new layer the tube « déco 1 »
don’t move it
Step 29
activate the top layer
copy / paste as new layer the tube « déco 2 »
don’t move it
layers > arrange > move down
Step 30
activate the top layer
copy / paste as new layer the lollipop tube (colorize if necessary)
Step 31
effects > image effects > offset
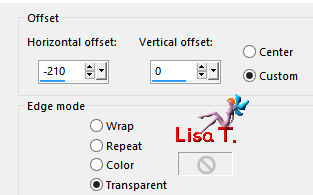
Step 32
layers > duplicate – image > mirror > mirror horizontal
layers > merge > merge down
Step 33
effects > 3D effects > drop shadow > 2 / 2 / 40 / 10 / black * -2 / -2 / 40 / 10 / black
Step 34
activate the bottom layer
selections > load-save selection > from alpha channel > selection #6
selections > promote selection to layer
Step 35
effects > plugins > L en K’s > Zitah
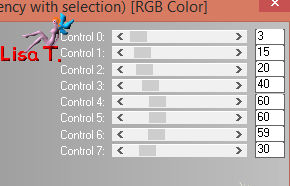
selections > select none
Step 36
effects > 3D effects > drop shadow > 0 / 0 / 100 / 50 / black
Step 37
layers > arrange > bring to top
Step 38
layers > duplicate – image > mirror > mirror horizontal
layers > merge > merge down
Step 39
copy / paste as new layer the character tube
image > resize > uncheck « all layers » > 75% (if you use the tube provided)
move it as shown on the final resutl
Step 40
effects > 3D effects > drop shadow > -10 / 20 / 35 / 40 / black
Step 41
copy / paste as new layer the text tube
move it where you like
Step 42
layers > merge > merge all (flatten)
Step 43
image > add borders > check « symmetric » >
1 pixel BG color
1 pixel FG color
Step 44
image > add borders > 5 ipxels BG color
Step 45
select the last border (5 pixels) with the magic wand tol
effects > 3D effects > inner bevel
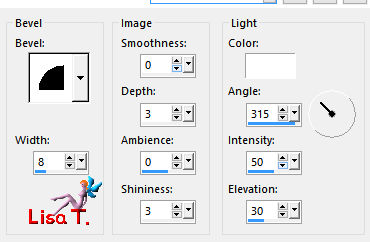
selections > select none
Step 46
image > add borders > 15 pixels FG color
Step 47
select this borders
effects > plugins > Unlimited 2 > Toadies > Ommadawn
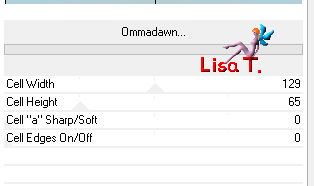
Step 48
effects > 3D effects > drop shadow > 0 / 0 / 100 / 50 / black
selections > select none
Step 49
image > add borders >
1 pixel BG color
1 pixel FG color
Step 50
image > add borders > 45 pixels white
select this border
Step 51
fill with a linear gradient > (45 / 1 / check « invert »)
effects < plugins > Neology > Transparent Pizza

Step 52
selections > promote selection to layer
selections > select none
Step 53
select the black parts
fill with a linear gradient > (45 / 1 / uncheck « invert »)
Step 54
effects > plugins > Penta.com > Color Dot
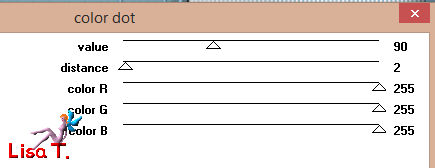
Step 55
selections > invert
effects > plugns > Penta.com > VTR2
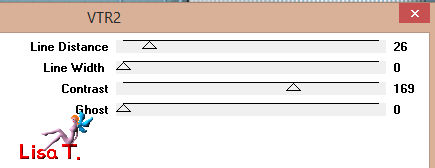
selections > select none
effects > edge effects > enhance
Step 56
effects > 3D effects < drop shadow > 0 / 0 / 80 / 40 / black
Step 57
layers > merge > merge down
Step 58
selections > select all
selections > modify > modify > 45 pixels
layers > new raster layer
effects > 3D effects > cutout > white
layers > merge > merge down
Step 59
selections > invert
effects > 3D effects > drop shadow > 0 / 0 / 100 / 50 / white
selections > select none
Step 60
image > add borders >
1 pixel BG color
2 pixels FG color
1 pixel BG color
1 pixel black
Step 61
image > resize > width : 900 pixels
adjust > sharpness > unsharp mask

Step 62
apply your watermark and save as... type jpeg

Your tag is finished
Thank you to have followed this tutorial

You can write to Jacotte if you have any problem with this tutorial
don’t hesitate to send your creations to Jacotte, she will be very glad to see them

And to present them here


If you want to be informed about Jacotte’s new creations
subscribe to her newsletter (fill the box at the bottom of her home page)


back to the boards of Jacotte’s tutorials
board 2  board 3 board 3 

|