Tenderness

original tutorial can be found HERE


Material
tubes 122


Filters Used
Placage de texture
L en K's : Elvida, Djin, Zitah
Toadies : what are you
Simple : Pizza slice miror, Blinz
Miror Rave : Quadrant Flip
Ap Innovations : Lines Silverlining : Dotty Grid
Mura Seamless : Emboss at Alpha

Colors
color 1 -> foreground color -> dark color
color 2 -> background color -> light color


translator’s note : I work with PSPX7,
but you can realize this tag with another version of course

use the pencil to follow the steps
left click to grab it


Realization
Step 1
open the alpha layer
window/duplicate
close the original and work with the copy
Step 2
flood fill with color 1
Step 3
effects/plugins/Textures/Placage de Texture/Grès

Step 4
in the materials palette, prepare a linear gradient/ 45 / 5 / uncheck « invert »
Step 5
layers/new raster layer/flood fill with the gradient
Step 6
adjust/blur/gaussian blur/70
Step 7
effects/plugins/L en K’s/Elvida

Step 8
effects/edge effects/enhance more
Step 9
image/resize/uncheck « all layers »/80%
Step 10
effects/plugins/Toadies/What are You ?...

adjust/sharpness/sharpen more
Step 11
effects/plugins/Simple/Pizza Slice Mirror
edit/repeat Pizza Slice Mirror
Step 12
selections/load selection from alpha channel/selection #1
DELETE (hit the delete key of your keyboard)
selections/select none
Step 13
selections/load selection from alpha channel/selection #2
edit/cut
edit/paste as new layer
selections/select none
Step 14
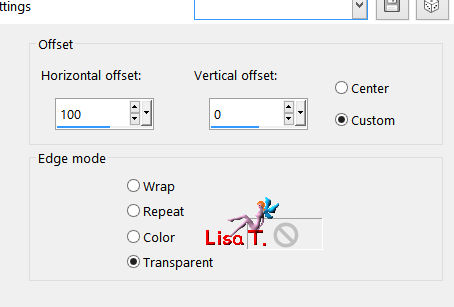
effects/image effects/offset

Step 15
layers/duplicate
Step 16
image/mirror/horizontal mirror
layers/merge/merge down
Step 17
effects/3D effects/drop shadow/ 0 / 0 / 50 / 25 / black
Step 18
selections/load selection from alpha channel/selection #3
layers/new raster layer
flood fill with the gradient prepared at the begining
adjust/blur/gaussian blur/30
Step 19
layers/duplicate
Step 20
effects/plugins/Simple/Blintz
effects/edge effects/enhance more
Step 21
effects/plugins/Mirror Rave/Quadrant flip

Step 22
layers/merge/merge down twice
selections/select none
Step 23
activate Raster 1
layers/arrange/bring to top
image/resize/75%
Step 24
effects/3D effects/drop shadow/ 0 / 0 / 50 / 15 / black
Step 25
layers/duplicate
image/resize/80%
layers/merge/merge down
adjust/sharpness/sharpen more
Step 26
layers/merge/merge down
effects/plugins/AP01|Innovations]/Lines Silverlining/Dotty Grid

Step 27
layers/new raster layer
selections/load selection from alpha channel/selection #4
flood fill with color 1
selections/select none
Step 28
effects/plugins/L en K’s/Djin

Step 29
layers/duplicate
image/mirror/mirror horizontal
Step 30
effects/image effects/offset

Step 31
layers/merge/merge down
Step 32
effects/plugins/Toadies/What are You ?...

Step 33
effects/plugins/L en K’s/Zitah

Step 34
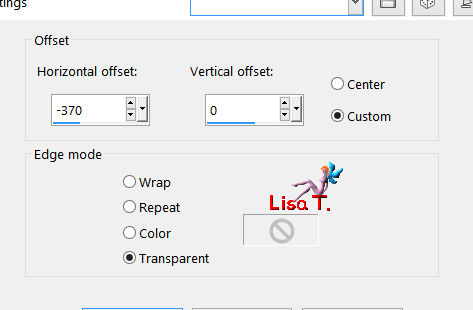
effects/image effects/offset -150 / 0

Step 35
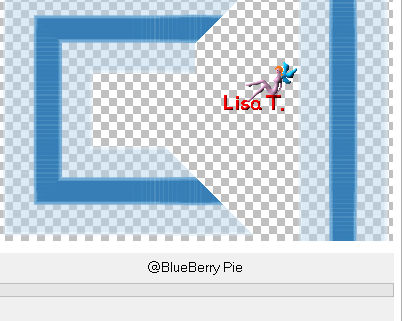
effects/plugins/Unlimited 2/Bkg Kaleidoscope/@BlueBerry Pie

Step 36
selections/load selection from alpha channel/selection #6
effects/texture effects/blinds/foreground color

selections/select none
layers/arrange/move down
Step 39
activate the top layer
layers/new raster layer
selections/load selection from alpha channel/selection #6
effects/3D effects/drop shadow/ 0 / 0 /100 / 50 / color 1
selections/select none
Step 40
layers/new raster layer
selections/load selection from alpha channel/selection #7
effects/3D effects/drop shadow/ 0 / 0 /100 / 50 / black
selections/select none
Step 41
layers/new raster layer
selections/load selection from alpha channel/selection #8
effects/3D effects/drop shadow/ 0 / 0 /100 / 50 / black
selections/select none
Step 42
layers/merge/merge visible
Step 43
image/add borders/2 pixels color 1 and 2 pixels color 2
Step 44
selections/promote selection to layer
Step 45
image/canvas size

Step 46
layers/new raster layer
selections/select all
Step 47
copy/paste into selection the blue background image (fond)
Step 48
layers/arrange/move down
Step 49
selections/modify/contract/55 pixels
activate the layer above
effects/3D effects/drop shadow/ 0 / 0 / 100 / 50 / black
selections/select none
Step 50
copy/paste as new layer the decoration tube 1
don’t move it
Step 51
copy/paste as new layer the decoration tube 2
don’t move ite
Step 52
activate the bottom layer
copy/paste as new layer the lace tube
Step 53
layers/merge/merge all (flatten)
Step 54
copy/paste as new layer the character tube
image/resize/90% (or other if you use another tube)
place to the right
effects/3D effects/drop shadow/ 0 / 0 / 75 / 45 / black
Step 55
copy/paste as new layer the flower tube
move it to the left
drop the same shadow as before
Step 56
copy/paste as new layer the text tube
move it where you like
image/negative image
effecgs/plugins/Mura’s Seamless/Emboss at Alpha

Step 57
layers/merge/merge all (flatten)
Step 58
image/resize/900 pixels wide
adjust/sharpness/unsharp mask

Step 59
apply your signature and save as... type jpeg

Your tag is finished
Thank you to have followed this tutorial

You can write to Jacotte (or to me) if you have any problem with this tutorial
don’t hesitate to send your creations to Jacotte, she will be very glad to see them

And to present them (see link at the end of the original tutorial)

If you want to be informed about Jacotte’s new creations
subscribe to her newsletter (fill the box at the bottom of her home page)


My tag with my tubes

back to the boards of Jacotte’s tutorials
board 2  board 3 board 3 

|