

You will find the original tutorial here :

This tutorial is a personal creation.
Any resemblance with another one would be only pure coincidence.
It is stricly forbidden to modify tubes, to change their name or take off the matermarks,
To present them on your sites or blog,
To share them in groups,
to make a bank of images, or to use them on lucrative purposes.

Thank you to Alyciane who tests Garances’ tutorials and is her valued advisor

Thank you to respect Garance’s work and the tubers work.
Don’t hesitate to warn me if you have any trouble with this translation,
and I’ll try to fix the problem as quickly as I can

Garances and I work with PSP 2020
you can follow this tutorial with another version of PSP, but the result might be slightly different

Supplies
selections - masks - images

open the tubes and duplicate. Work with the copies to preserve original files
place the supplies provided into the dedicated folders of My Corel PSP General folder
it is assumed you have some working knowledge of Paint Shop Pro
TIP 1 -> if you don’t want to install a font -->
open it in a software as « Nexus Font » (or other font viewer software of you choice)
as long as both windows are opened (software and font), your font will be available in your PSP
TIP 2 -> from PSPX4, in the later versions of PSP the functions « Mirror » and « Flip » have been replaced by -->
« Mirror »has become --> image => mirror => mirror horizontal
« Flip » has become --> image => mirror => mirror vertical

Plugins needed
Filter Factory Q
Flaming Pear
Flood

colors
color 1 => white
color 2 => BG color => choose a dark color into one of your images

Use the pencil to mark your place
along the way
hold down left click to grab and move it
 |

1
open a new image => transparent =900 * 600 px
2
flood fill with color 2
3
layers => new raster layer
selections => select all
copy / paste image 1 into selection
selections => select none
4
effects => plugins => Filter Factory => Gallery Q => Symmetrical Pattern 1

blend mode of the layer : Screen
5
layers => new raster layer
selections => select all
copy / paste image 1 into selection
selections => select none
image => resize => untick « resize all layers » => 60%
layers => duplicate
6
effects => 3D effects => cutout
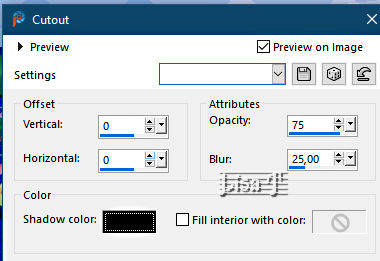
layers => merge => merge down
7
selections => select all / selections => float / selections => defloat
8
selections => modify = > select selection borders
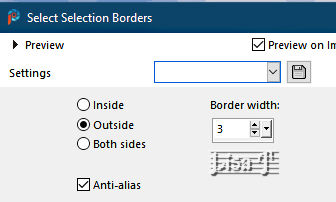
flood fill selection white
selections => select none
9
layers => new raster layer
flood fill white
10
layers => new mask layer => from image
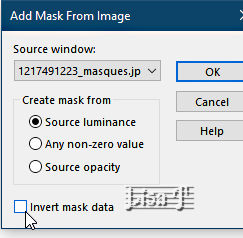
11
view => tick « Rulers »
enable the Pick, grab the middle button and pull up the mask to marker 120
12
view => UN-tick « Rulers »
layers => merge => merge group
13
layers => new raster layer
selections => load-save selection => from disk => selection « gauche 1 »
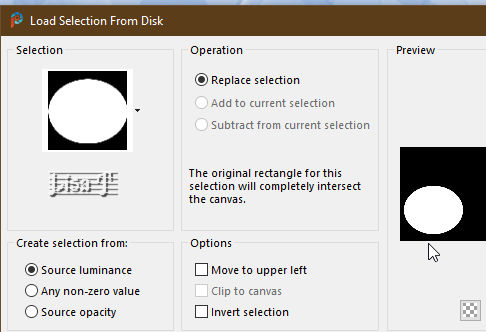
copy / paste image 2 into selection
14
layers => duplicate
effects => 3D effects => cutout ( same settings as previously )
selections => modify = > select selection borders ( same settings as previously )
flood fill selection white
layers => merge => merge down
layers => duplicate
selections => load-save selection => from disk => selection « gauche 1 »
15
effects => plugins => Filter Factory => Gallery Q => Mosaic

16
selections => modify => contract => 20 px
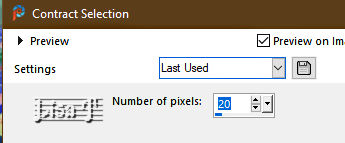
17
copy / paste image 2 into selection
layers => duplicate
effects => 3D effects => cutout ( same settings as previously )
selections => select none
layers => merge => merge down
18
layers => new raster layer
selections => load-save selection => from disk => selection « droite 1»
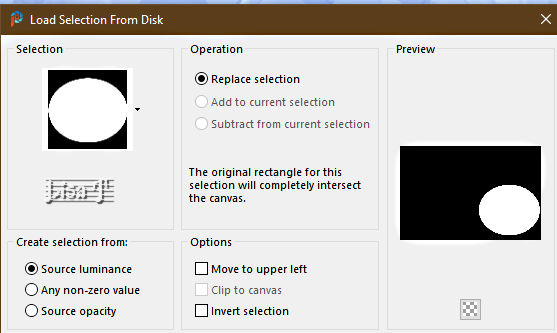
copy / paste image 3 into selection
effects => plugins => Filter Factory => Gallery Q => Cartoon Art

selections => modify => contract => same settings as previously
copy / paste image 3 into selection
19
layers => duplicate
effects => 3D effects => cutout ( same settings as previously )
selections => select none
layers => merge => merge down
20
highlight Raster 2
effects => plugins => Flaming Pear => Flood
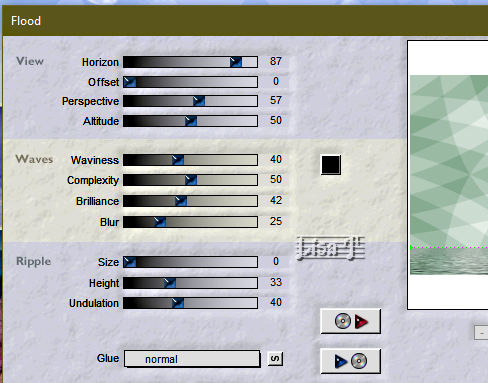
apply the same effect on the three images => changing « Horizon » to 85 on images 2 and 3
and « 75 » on image 1
21
highlight top layer before going on
layers => new raster layer
flood fill white
layers => new mask layer => from image / tick « invert mask data »
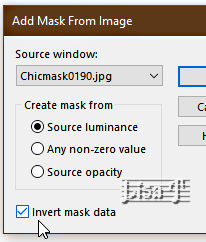
layers => merge => merge group
image => resize => untick « resize all layers » => 80%
objects => align => top
enable the Pick tool and stretch left and right to fit the sides of the tag
adjust => sharpness => sharpen more
22
effects => 3D effects => drop shadow => 1 / 1 / 100 / 1 / WHITE
23
copy / paste the character tube as new layer
drop a shadow of your choice, resize if necessary
24
layers => merge => merge all (flatten)
25
image => add borders => tick « symmetric » => 2 px color 2
edit => copy
selections => select all
effects => 3D effects => cutout ( same settings as previously )
selections => select none
26
image => add borders => tick « symmetric » => 25 px white
select inside the frame with the Magic Wand tool
edit => paste into selection
adjust => blur => gaussian blur => 50
27
effects => plugins => Filter Factory => Gallery Q => Streamer

selections => promote selection to layer
selections => select none
28
layers => duplicate
image => mirror => mirror vertical
opacity of the layer : 50%
layers => merge => merge down
29
layers => duplicate
image => free rotate
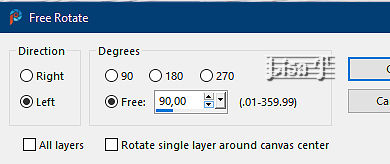
enable the Pick tool and stretch left and right to fit sides
image => add borders => tick « symmetric » => 3 px white
apply your watermark or signature
write your licence number if you used a licenced tube
save your work as... type .jpeg

My tag with my tubes

Don't hesitate to write to me if you have any trouble with her tutorial
If you create a tag (using other tubes than those provided) with this tutorial
and wish it to be shown, send it to Garances !
It will be a real pleasure for her to add it to the gallery at the end of the tutorial


back to the boards of Garances’ tutorials
board 1


|