
You will find the original tutorial here :

This tutorial is a personal creation.
Any resemblance with another one would be only pure
coincidence.
It is stricly forbidden to modify tubes, to change
their name or take off the matermarks,
To present them on your sites or blog,
To share them in groups,
to make a bank of images, or to use them on lucrative purposes.

Thank you to Alyciane who tests Garances’ tutorials
and is her valued advisor

Thank you to respect Garance’s work and the tubers
work.
Don’t hesitate to warn me if you have any trouble
with this translation,
and I’ll try to fix the problem as quickly as I can

Garances works with PSP2020 and I work with PSP 2020
you can follow this tutorial with another version
of PSP, but the result might be slightly different

Supplies
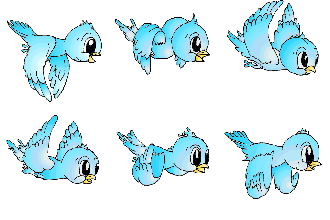
tubes – image - mask

open the tubes and duplicate. Work with the copies
to preserve original files
open all the tools provided and place into the dedicated
folders of My Corel PSP General folder
open the mask and minimize to tray
it is assumed you have some working knowledge of Paint
Shop Pro
TIP 1 -> if you don’t
want to install a font -->
open it in a software as « Nexus Font » (or
other font viewer software of you choice)
as long as both windows are opened (software and font),
your font will be available in your PSP
TIP 2 -> from PSPX4,
in the later versions of PSP the functions « Mirror » and « Flip » have
been replaced by -->
« Mirror »has become --> image => mirror => mirror
horizontal
« Flip » has become --> image => mirror => mirror
vertical

Plugins needed
L en K (Jouri, Antonia, Adonis, Elvida, Frederiek, Djin)
Simple (Pizza Slide Mirror)
FM Tile Tools (Blend Emboss)
Alien Skin/Impact (Glass)
Graphic + (Cross Shadow)
Nike Software/Color effect pro 3.0 complete

colors


Use the pencil to mark your place
along the way
hold down left click to grab and move it
 |

1
open a new image => transparent => 1000 *
700 px
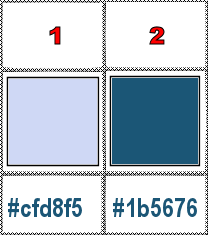
choose two colors in your main image or tube,set the light
color as FG color, and dark color as BG color
selections => select all
copy / paste the image into selection
selections => select none
adjust => blur => radial blur

2
effects => plugins => L en K’s => Jouri

layers => duplicate
image => mirror => mirror vertical
blend mode of the layer : Luminance (or other of your choice)
opacity of the layer : 50%
layers => merge => merge visible
layers => duplicate
image => resize => untick « resize all layers » => 80%
3
effects => plugins => L en K’s => Antonio

select the dark part with the Magic Wand tool
effects => plugins => L en K’s => Adonis

selections => select none
effects = > plugins => Simple => Pizza Slice
Mirror / default settings
apply once more / same settings
enable the Selection tool / custom selection

hit the DELETE key of your keyboard
selections => select none
effects => plugins => FM Tile Tools / Blend Emboss
/ default settings

4
select the dark part with the Magic Wand tool
effects => plugins => L en K’s => Elvida

effects => plugins => FM Tile Tools / Blend Emboss
/ default settings
effects => edge effects => Erode
effects => 3D effects => drop shadow => 0 / 0
/ 80 / 40 / black
selections => select none
5
selections => load-save selection => from disk => selection
#1
selections => promote selection to layer
selections => select none
effects => reflection effects => rotating Mirror

effects => plugins => L en K’s => Frederiek

effects => plugins => FM Tile Tools / Blend Emboss
/ default settings
effects => plugins => Alien Skin Eye Candy 5 Impact
/ Glass / presest « Clear »
6
selections => load-save selection => from disk => selection
#2
layers => new raster layer
copy / paste the image into selection
effects => 3D effects => drop shadow => 0 / 0
/ 80 / 40 / black
selections => modify = > select selection borders
/ Outside / 3
layers => new raster layer
flood fill with color 2
effects => 3D effects => Inner Bevel

effects => plugins => FM Tile Tools / Blend Emboss
/ default settings
selections => select none
layers => merge => merge down
lower down the layer unde the « merged » layer

7
highlight « merged » layer
layers => new raster layer
flood fill white
layers => new mask layer => from image

layers => duplicate
layers => merge => merge group
effects => edge effects => enhance more
8
close the eyes of both the merged layer and the mask layer
highlight top layer
layers => merge => merge visible
image => resize => untick « resize all layers » => 110%
open the eyes of the layers closed in previous step
layers => merge => merge visible
9
place all the tubes, drop a shadow on each one => 0
/ 0 / 50 / 15 / black
place the Word Art (or another one of your choice)
image => add borders => tick « symmetric » => 2
px color 2
10
prepare a linear gradient

image => add borders => tick « symmetric » => 30
px color white
select the white frame with the Magic Wand tool
flood fill selection with the gradient
effects => plugins => Graphics Plus => Cross
Shadow / default settings
effects => plugins => L en K’s => Djin

effects => edge effects => enhance
selections => invert
effects => 3D effects => drop shadow => 0 / 0
/ 80 / 40 / black
selections => select none
image => add borders => tick « symmetric » => 2
px color 2
layers => new raster layer
apply your watermark or signature
write your licence number if you used a licenced tube
layers => merge => merge all (flatten)
resize to 1000 px width (or other)
effects => plugins => Nik Software => Color Efex
Pro 3.0 Complete / Tonal Contrast (optional)
save your work as... type .jpeg

My tag with my tubes

Don't hesitate to write to me if you have any trouble with
her tutorial
If you create a tag (using other tubes than those provided)
with this tutorial
and wish it to be shown, send it to Garances !
It will be a real pleasure for her to add it to the gallery
at the end of the tutorial


back to the boards of Garances’ tutorials
20 tutorials on each board
last board => 
at the bottom of each board you will find the arrows
allowing you to navigate from one board to another


|