

You will find the original tutorial here :

This tutorial is a personal creation.
Any resemblance with another one would be only pure coincidence.
It is stricly forbidden to modify tubes, to change their name or take off the matermarks,
To present them on your sites or blog,
To share them in groups,
to make a bank of images, or to use them on lucrative purposes.

Thank you to Alyciane who tests Garances’ tutorials and is her valued advisor

Thank you to respect Garance’s work and the tubers work.
Don’t hesitate to warn me if you have any trouble with this translation,
and I’ll try to fix the problem as quickly as I can

Garances and I work with PSP 2020
you can follow this tutorial with another version of PSP, but the result might be slightly different

Supplies

open the tubes and duplicate. Work with the copies to preserve original files
open all the tools provided and place into the dedicated folders of My Corel PSP General folder
open the mask and minimize to tray
it is assumed you have some working knowledge of Paint Shop Pro
TIP 1 -> if you don’t want to install a font -->
open it in a software as « Nexus Font » (or other font viewer software of you choice)
as long as both windows are opened (software and font), your font will be available in your PSP
TIP 2 -> from PSPX4, in the later versions of PSP the functions « Mirror » and « Flip » have been replaced by -->
« Mirror »has become --> image => mirror => mirror horizontal
« Flip » has become --> image => mirror => mirror vertical

Plugins needed
Atténuation - Mehdi - Variations - Carolaine and Sensibility - VM1
Graphic Plus - File Factory H - Alien Skin Impact

colors


Use the pencil to mark your place
along the way
hold down left click to grab and move it
 |

open a new image => transparent => 1000 * 700 px
flood fill layer with color 1
selections => select all
copy / paste the character tube into selection
selections => select none
effects => image effects => seamless tiling => default settings
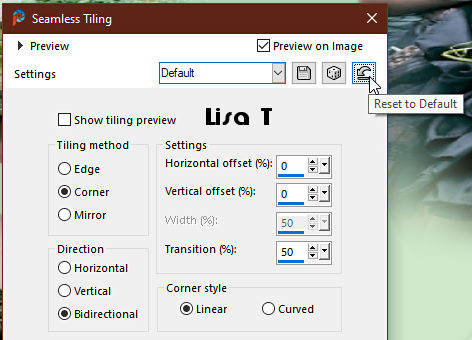
effects => plugins => Atténuation => flou radial / 25

adjust => blur => gaussian blur => 25

layers => duplicate
effects => plugins => Mehdi => Sorting Tiles

image => resize => untick « resize all layers » => 90%
layers => duplicate
close the eye of the layer
highlight layer below (copy of Raster 1)
effects => geometric effects => Perspective / Horizontal

effects => geometric effects => Perspective / Horizontal

effects => distortion effects => Warp

enable the Pick tool with the following settings, to move the layer acurately => position X : -4 / position Y : 5
hit the « M » key of your keyboard to disable the tool
layers => duplicate
image => mirror => mirror vertical
layers => merge => merge down
effects => 3D effects => inner bevel

effects => 3D effects => drop shadow

open the eye of « copy 2 of Raster 1 »
effects => plugins => Unlimited 2 => Variations => Button Maker Round

image => resize => untick « resize all layers » => 85%
enable the Pick tool with the following settings, to move the layer acurately => position X : 403 / position Y : 52
hit the « M » key of your keyboard to disable the tool
layers => arrange => place this layer under « Copy of Raster 1 »
selections => load-save selection => from disk / selection 1 provided
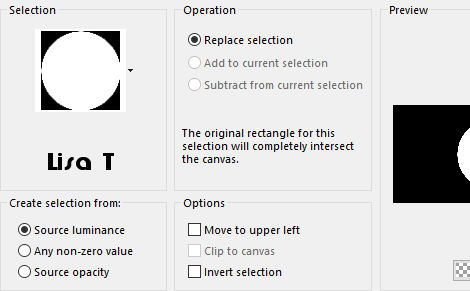
selections => promote selection to layer
adjust => blur => gaussian blur => 25
copy / paste the misted tube into selection
effects => distortion effects => Punch

layers => merge => merge down
keep selection active
selections => modify = > select selection borders
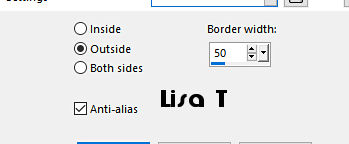
adjust => blur => gaussian blur => 25
effects => plugins => Carolaine and Sensibility => cs-texture

effects => 3D effects => inner bevel ( same settings as previously )
effects => 3D effects => drop shadow ( same settings as previously )
selections => select none
highlight Raster 1
selections => load-save selection => from disk / selection 2 provided
selections => promote selection to layer
effects => texture effects => weave / colors 1 and 2

selections => select none
highlight Raster 1
selections => load-save selection => from disk / selection 3 provided
selections => promote selection to layer
effects => plugins => Unlimited 2 => VM1 => Mighty Maze

selections => select none
blend mode of the layer : Multiply
highlight top layer
layers => new raster layer
flood fill layer with color 2
layers => new mask layer => from image

layers => merge => merge group
effects => edge effects => enhance more
copy / paste « Mimiconcept » as new layer and place where you like
layers => merge => merge visible
image => add borders => tick « symmetric » => 2 px dark color
edit => copy
selections => select all
image => add borders => tick « symmetric » => ...
3 px light color
2 px dark color
effects => 3D effects => drop shadow ( same settings as previously ) (TWICE)
selections => select all
image => add borders => tick « symmetric » => 20 px light color
selections => invert
effects => plugins => Graphic Plus => Cross Shadow / default settings
selections => select all
image => add borders => tick « symmetric » => ...
2 px dark color
3 px light color
2 px dark color
effects => 3D effects => drop shadow ( same settings as previously )
selections => select all
image => add borders => tick « symmetric » => 30 px light color
selections => invert
edit => paste into selection
adjust => blur => gaussian blur => 25
effects => plugins => Unlimited 2 => Filter Factory => Gallery H / Zoom Blur / 169 / 95

selections => select none
copy / paste the character tube as new layer / place as shown on final result
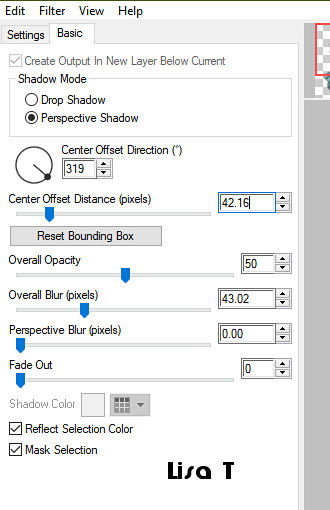
effects => plugins => Alien Skin Eye Candy 5 Impact / Perspective Shadow / preset « Nature » provided
apply your watermark or signature
write your licence number if you used a licensed tube
image => resize => tick « resize all layers » => 1000 px width
image => add borders => tick « symmetric » => 1 px dark color
if your don’t want to animate your tag, save your work as... type .jpeg optimized
Animation
edit => copy
open Animation Shop => paste as new animation
duplicat 5 times => you have 6 frames
edit => select all
open the gif provided (butterfles) => edit => select all
click on the first frame => edit => copy
back on your main animation (your tag)
edit => paste into selected frame (Ctrl + E)
choose the place and left click
you can add the butterflies in another place if you like
view your animation
save your work as... type .gif

My tag with my tube and misted image

Don't hesitate to write to me if you have any trouble with her tutorial
If you create a tag (using other tubes than those provided) with this tutorial
and wish it to be shown, send it to Garances !
It will be a real pleasure for her to add it to the gallery at the end of the tutorial


back to the boards of Garances’ tutorials
board 1


|