

Original
can be found here

Franie works with PSPX9, and I use PSP 2020 Ultimate
But this tutorial can be realized with another version
of PSP
however, some differences might be noticed according to
the version you use

If you want to present
Franie’s tutorials on your
forums or sites
please ask her first
If you publish your creation on a site or a blog
please put a link towards the tutorial if you create a
tag
Thank you to understand and respect the rules.

The tubes Franie uses have
been sent by the authors on different groups
And she has their permission to use them
If you see a tube that might belong to you, contact Franie
or myself
And a link towards your site will be added if necessary
Please, don’t use tubes found on the web with no
watermark
all tubers apply their watermark without any exception !!!!!
no watermark ---> stolen tube

Hints and Tips
TIP 1-> if you don’t
want to install a font -->
open it in a software as « Nexus Font » (or
other font viewer software of you choice)
as long as both windows are opened (software and font),
your font will be available in your PSP
TIP 2 -> from PSPX4, in the later versions of PSP the functions « Mirror » and « Flip » have
been replaced by -->
image -> Mirror - has become ===> image
=> mirror => mirror horizontal
image -> Flip - has become ===> image
=> mirror => mirror vertical

Plugins
VM Distortion – Radial Pox
VM Distortion – Circulor
Flaming Pearl - Flexify 2
Alien Skin – Eye Candy 5 : Textures – Diamond
Plate


Supplies
2 misted landscapes - 1 woman tube - 2 objects tubes -
1 selection
translator’s note :
I used my own woman tube instead of the one provided
by Franie

place (or import) the supplies provided into the appropriate
folders of « My Corel PSP »
Tubers’ authorizations


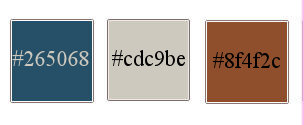
colors

Use the pencil to mark your place
along the way
hold down left click to grab and move it
 |

Realization
1
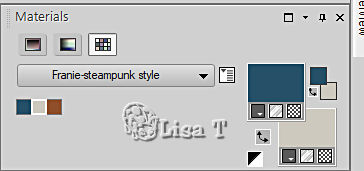
set colors 1 and 2 as FG and BG colors into the materials
palette
2
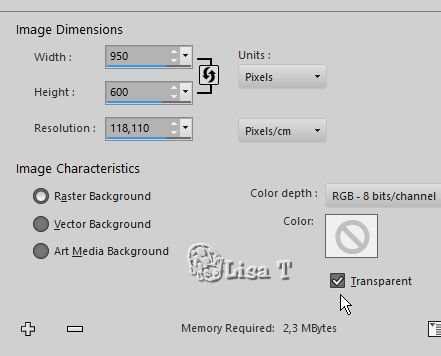
open a new transparent image 950 * 600 px
selections => select all
copy / paste the imlage « paysage_steampunk_1 » into
selection
selections => select none
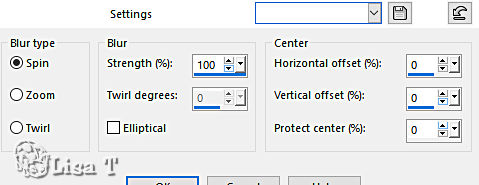
adjust => blur => radial blur
effects => image effects => seamless tiling => default
settings
effects => plugins => VM Distortion => Radial
Pox
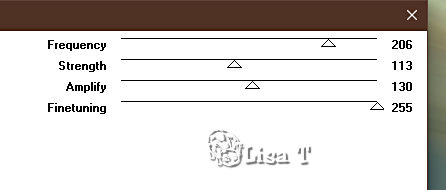
adjust => sharpness => sharpen more
3
layers => duplicate
effects => plugins => VM Distortion => Circulator
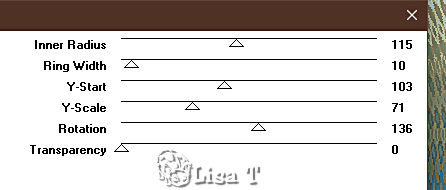
enable the Pick tool => stretch
the shape to the left and right up as shown on the screenshot
below
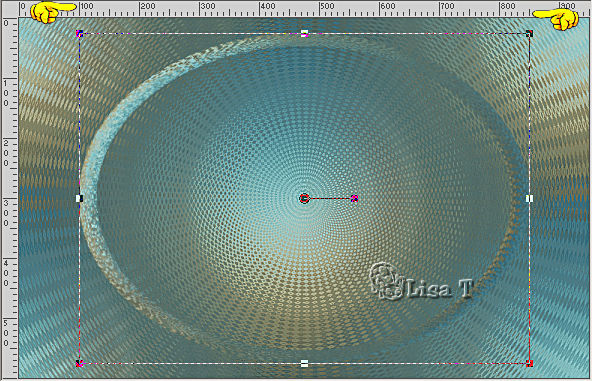
hit the « M » key of your keyboard to disable
the tool
4
selections => load-save selection => from disk => selection
# 1
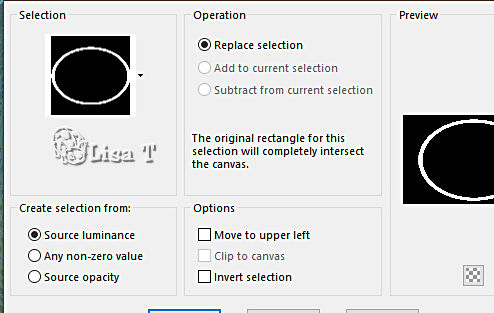
effects => 3D effects => Buttonize
/ color 3
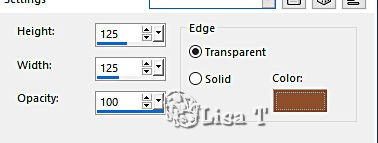
effects => 3D effects => inner
bevel
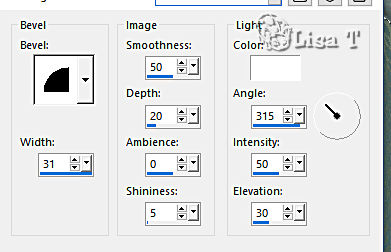
selections => select none
5
layers => duplicate
effects => plugins => Flaming Pear => Flexify
2
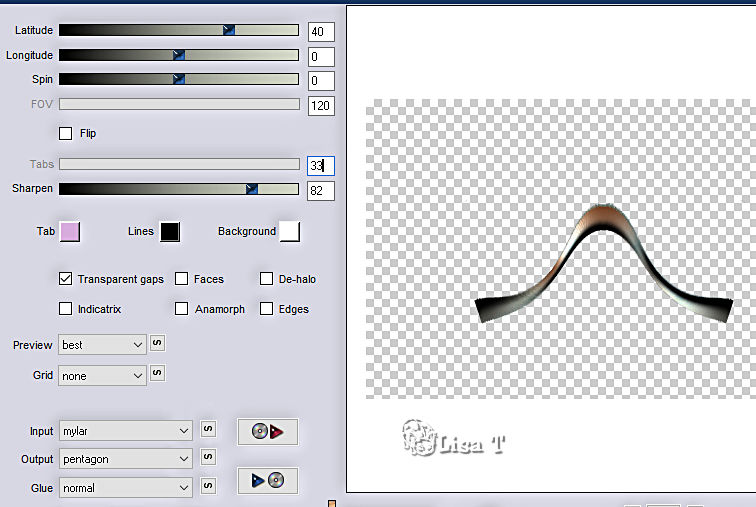
image => resize => untick « resize all layers » => 50
%
image => free rotate / left / 45° free
effects => image effects => offset => H : -
400 / V : 235 / tick « custom » and « transparent »
layers => duplicate
image => mirror => mirror horizontal
image => mirror => mirror vertical
layers => merge => merge down
effects => 3D effects => drop shadow => 5 / 5
/ 50 / 25 / black
6
highlight middle layer (copy of Raster 1)
select inside the circle with the magic wand tool
selections => modify => expand => 10 px
layers => new raster layer
copy / paste «paysage_steampunk1_franiemargot » into
selection
adjust => sharpness => sharpen more
layers => arrange => move down
7
selections => modify => contract => 6 px
layers => new raster layer
effects => 3D effects => cutout
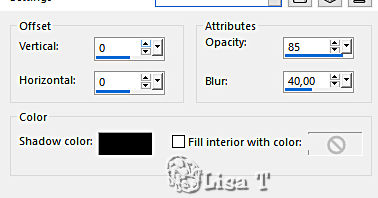
selections => select none
8
your layers palette looks like this
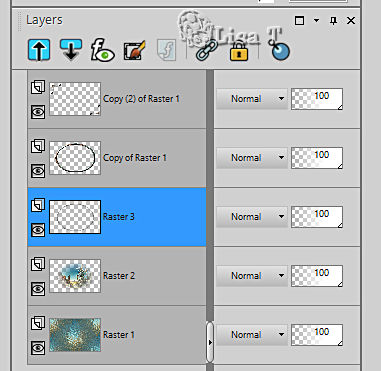
highlight « copy of Raster 1 »
layers => merge => merge down TWICE
effects => 3D effects => drop shadow => 5 / 5
/ 50 / 25 / color 3
effects => 3D effects => drop shadow => - 5 /
- 5 / 50 / 25 / color 3
9
layers => duplicate
image => resize => untick « resize all layers » => 50
%
effects => image effects => seamless tiling
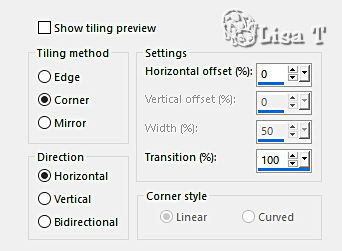
layers => arrange => move down
blend mode of the layer : Dodge (or other according to
your colors)
10
layers => merge => merge visible
selections => select all
layers => new raster layer
effects => 3D effects => cutout ( same settings as
previously )
selections => select none
layers => merge => merge visible
11
image => add borders => tick « symmetric » => 5
px color 2
selections => select all
image => add borders => tick « symmetric » => 50
px color 2
selections => invert
effects => plugins => VM Distortion => Radial
Pox
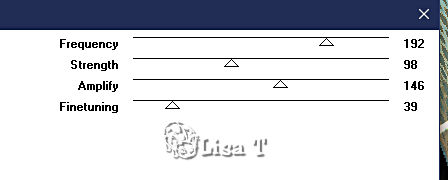
selections => invert
effects => 3D effects => drop shadow => 0 / 0
/ 100 / 25 / color 1
selections => select none
12
copy / paste « steampunk_girl38_franiemargot » as
new layer
image => resize => untick « resize all layers » => 90
%
place as shown on final result
adjust => sharpness => sharpen
13
copy / paste « steampunk_objet40_franiemargot » as
new layer
image => resize => untick « resize all layers » => 50
%
place as shown on final result
adjust => sharpness => sharpen
14
image => add borders => tick « symmetric » => 50
px color 1
select the border with the magic wand tool
selections => promote selection to layer
effects => plugins => Alien Skin Eye Candy 5 : Textures
/ Diamond Plate
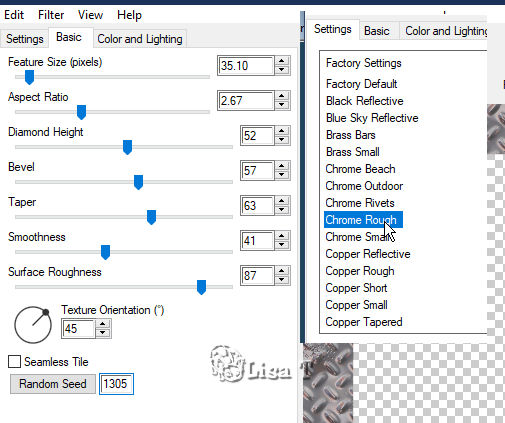
blend mode of the layer
: Hard Light
layers => merge => merge down
selections => invert
effects => 3D effects => drop shadow => 0 / 0
/ 100 / 45 / black
selections => select none
15
image => resize => tick « resize all layers » => 950
px width
apply your watermark or signature
write your licence number if you used a licensed tube
save your work as... type .jpeg

My
tag with my tubes

Thank you for following
this tutorial
You can send your creations to Franie.

It will be a real pleasure for her to show it in the gallery
of the tutorial

If you have any trouble
with this translation, if you notice something wrong
don’t hesitate to contact me, I will do my best to
fix the problem


If you want to be informed
about Franie’s new tutorials
subscribe to her newsLetter


Back to the boards of Franie’s tutorials
board 1 board 2 board 2 board
3 board
3 board 4 board 4 board
5 board
5 board 6 board 6


|