
Original can be found here

Franie works with PSP 18, and I use PSP 19
But this tutorial can be realized with another version of PSP

If you want to present her tutorials on your forums or sites
please ask Franie first
If you publish your creation on a site or a blog
please put a link towards the tutorial.
Thank you to understand and respect the rules.

The tubes Franie uses have been sent by the authors on different groups
And she has their permission to use them
If you see a tube that might belong to you, contact Franie or myself
And a link towards your site will be added if necessary
Please, don’t use tubes found on the web with no watermark
all tubers apply their watermark without any exception !!!!!
no watermark ---> stolen tube

Filters used
Unlimited 2
VM Etravaganza – Whites Lines
AP[Lines] – Lines - Silverlining
Alien skin – Eye candy Impact – Extrude
AAA Frames – FOTO FRAME


Material
1 layer-Alpha_selections
2 tubes Pierrot-Columbine (see HERE  for
more tubes) for
more tubes)
2 elements
1 color palette
1 preset - double click on it to install it (or import)

Tubers’ authorizations


Franie’s colors
Don’t hesitate to change colors and blend modes of the layers
According to your tubes and images
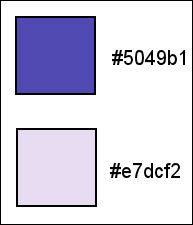
color 1 -> foreground color --> FG color -> #5049b1
color 2 -> background color --> BG color -> #e7dcf2


Use this pencil to follow the steps
hold down left click to grab and move it


Realization
1
prepare your colors into the materials palette
prepare a sunburst gradient into FG box

2
open the alpha layer, duplicate it
work with this copy and close the original layer to preserve
it, in case you have to redo your work
3
flood fill layer with the gradient
layers -> duplicate
effects -> plugins -> Unlimited 2 -> VM Extravaganza
/ White Lines

important note : if your result is non-compliant (due to your colors),
don’t apply this plugin
but do this ---> selections -> load selection -> from
alpha channel -> selection #5

DELETE
selections -> select none
effects -> 3D effects -> drop shadow / color 1

drop shadow again changing (5) by (-5)
4
layers -> duplicate
image -> free rotate

highlight Raster 1
selections -> select all
image -> crop to selection
5
highlight top layer
selections -> load selection -> from alpha channel
-> selection #1

DELETE
selections -> select none
effects -> image effects -> offset

layers -> duplicate
effects - distortion effects -> wave

image -> mirror -> mirror horizontal
6
highlight Raster 1
selections -> load selection -> from alpha channel
-> selection #2

selections -> promote selection to layer
adjsut -> add-remove noise -> add noise

effects -> edge effects -> dilate
selections -> select none
7
hiaghlight top layer
layers -> new raster layer
selections -> load selection -> from alpha channel
-> selection #3

flood fill selection with color 1
selections -> select none
effects -> geometric effects -> cylinder horizontal

image -> mirror -> mirror vertical
effects -> plugins -> AP[Lines] / Lines - Silverlining

effects -> plugins -> Alien Skin Eye Candy 5 - Impact
/ Extrude
click on the preset provided
here are the settings

effects -> image effects -> offset

effects -> 3D effects -> drop shadow -> -5 / -5
/ 80 / 30 / black
8
copy / paste as new layer « pierrot-colombine3 »
image -> mirror -> mirror horizontal
place it as shown
adjust -> sharpness -> sharpen
layers -> duplicate
adjust -> blur -> guassian blur / 30
effects -> distortion effects -> wind

arrange this layer under Raster 3
highlight Raster 3
effects -> 3D effects -> drop shadow / color 1

9
in materials palette, set White as FG color
layers -> new raster layer
selections -> load selection -> from alpha channel
-> selection #4

flood fill selection white (only one click)
keep selection active
effects -> illumination effects -> sunburst / color
1

adjust -> sharpness -> sharpen
selections -> select none
10
copy / paste as new layer « element_tuto133_1 »
effects -> image effects -> offset

11
copy / paste as new layer « element_tuto133_2 »
move it as shown
12
image -> add borders -> check « symmetric » -> 4
pixels color 1
COPY
image -> add borders -> 50 pixels / light color
select this border with the magic wand tool
edit -> paste into selection
adjust -> blur -> motion blur

adjust -> sharpness -> sharpen
selections -> invert
effects -> 3D effects -> drop shadow -> 0 / 0
/ 75 / 30 / black
selections -> select none
13
image -> add borders -> check « symmetric » -> 4
pixels color 1
image -> add borders -> check « symmetric » -> 50
pixels / light color
select this border with the magic wand tool
effects -> plugins -> Simple / Quick Tile
adjust -> blur -> gaussian blur / 20
adjust -> add noise as before
effects -> plugins -> AAA Frames / Foto Frame

selections -> invert
effects -> 3D effects -> drop shadow -> 0 / 0
/ 75 / 30 / black
selections -> select none
14
apply your watermark
merge all layers (flatten)
resize if necessary
save your work as... type .jpeg

Thank you for following this tutorial
You can send your creations to Franie.

It will be a real pleasure for her to show it in the gallery
of the tutorial


If you have any trouble with this translation, if you notice
sometihing wrong
don’t hesitate to contact me, I will do my best to
fix the problem


If you want to be informed about Franie’s new tutorials
Join her newsLetter


Back to the board of Franie’s tutorials
board 1  board
2 board
2  board
3 board
3  board
4 board
4 

|