

Original can be found here

Franie works with PSPX9, and I use PSP 2020 Ultimate
But this tutorial can be realized with another version of PSP
however, some differences might be noticed according to the version you use

If you want to present Franie’s tutorials on your forums or sites
please ask her first
If you publish your creation on a site or a blog
please put a link towards the tutorial if you create a tag
Thank you to understand and respect the rules.

The tubes Franie uses have been sent by the authors on different groups
And she has their permission to use them
If you see a tube that might belong to you, contact Franie or myself
And a link towards your site will be added if necessary
Please, don’t use tubes found on the web with no watermark
all tubers apply their watermark without any exception !!!!!
no watermark ---> stolen tube

Hints and Tips
TIP 1-> if you don’t want to install a font -->
open it in a software as « Nexus Font » (or other font viewer software of you choice)
as long as both windows are opened (software and font), your font will be available in your PSP
TIP 2 -> from PSPX4, in the later versions of PSP the functions « Mirror » and « Flip » have been replaced by -->
image -> Mirror - has become ===> image => mirror => mirror horizontal
image -> Flip - has become ===> image => mirror => mirror vertical

Plugins
MuRa’s Meister – Perspective Tiling
VM Extravaganza – James Bondage
AAA Frames – Texture Frame


Supplies
tubes - mask - selections - color palette

place (or import) the supplies provided into the appropriate folders of « My Corel PSP »
open the mask(s) and minimize to tray
Tubers’ authorizations


colors
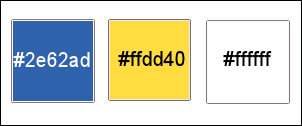
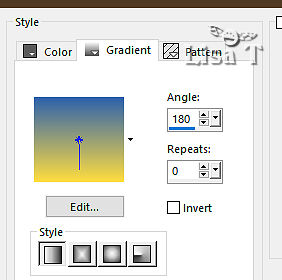
set FG to color 1 and BG to color 2 in materials palette
prepare a linear gradient

Use the pencil to mark your place
along the way
hold down left click to grab and move it
 |

Realization
1
open a new image => transparent => 1000 * 800 px
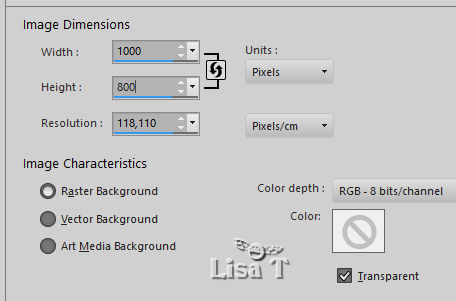
flood fill layer with the gradient
2
set white as FG color into the materials palette
layers => new raster layer
flood fill white
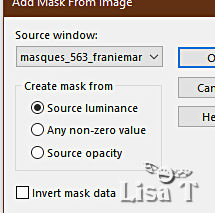
layers => new mask layer => from image
layers => duplicate
layers => merge => merge group
opacity of the layer : 60%
3
selections => load-save selection => from disk => selection # 1
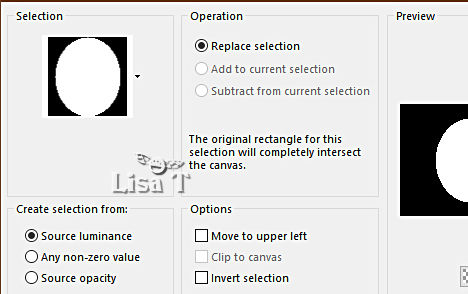
layers => new raster layer
flood fill selection with the gradient

copy / paste the misted tube into selection
adjust => sharpness => sharpen
4
selections => modify = > select selection borders
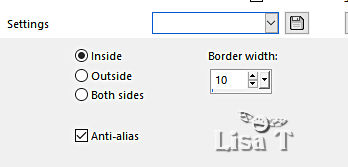
flood fill selection with color 1
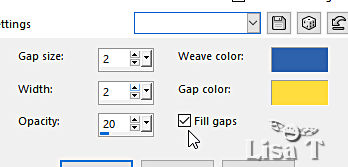
effects => texture effects => weave
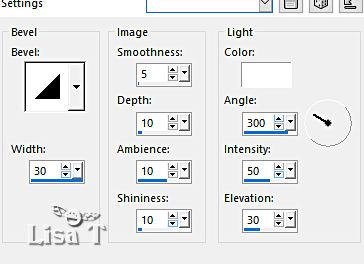
effects => 3D effects => inner bevel
adjust => sharpness => sharpen
selections => select none
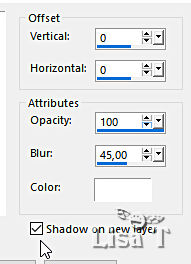
effects => 3D effects => drop shadow
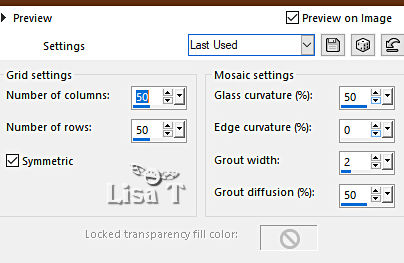
effects => texture effects => mosaic / Glass
opacity of the layer : 35% - if your background layer is light, choose 50%
effects => edge effects => enhance more
5
open « Birds_on_a_feather_13 »
file => export => custom brush
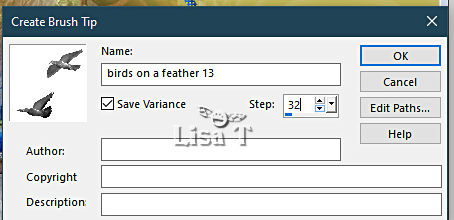
set white as FG color into the materials palette
highlight top layer
layers => new raster layer
enable the Brush tool, choose the brush created and apply top right

effects => 3D effects => drop shadow => 10 / 10 / 50 / 20 / black => untick « shadow on new layer »
tip => if you add a tube instead of using the brush, do this after adding borders
6
open «SS-cloudsII_23 »
file => export => custom brush
set white as FG color into the materials palette
highlight top layer
layers => new raster layer
enable the Brush tool, choose the brush created and apply top left

7
highlight Raster 1
enable the Selection tool / custom selection
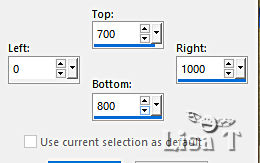
selections => promote selection to layer
effects => texture effects => tile

effects => plugins => Mura’s Meister => Perspective Tiling / default settings (click on « reset » to be sure)
selections => select none
selections => load-save selection => from disk => selection # 2
hit once the DELETE key of your keyboard
selections => select none
8
layers => merge => merge visible
prepare a linear gradient
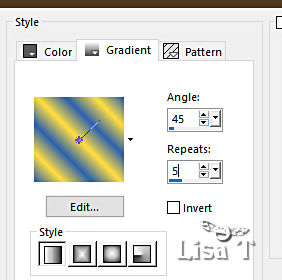
image => add borders => tick « symmetric » => ...
5 px white
select inside the white frame with the Magic Wand tool
flood fill selection with the gradient
9
selections => select all
image => add borders => tick « symmetric » => ...
50 px white
selections => invert
effects => plugins => VM Extravaganza / James Bondage

selections => promote selection to layer
selections => select none
image => mirror => mirror horizontal
image => mirror => mirror vertical
opacity of the layer : 50%
layers => merge => merge down
selections => select all
selections => modify => contract => 50 px
selections => invert
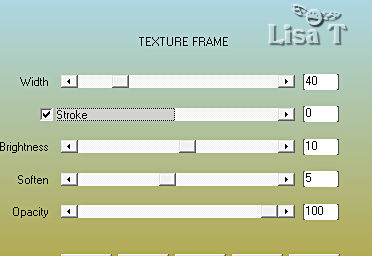
effects => plugins => AAA Frames => Texture Frame
adjust => sharpness => sharpen more
selections => invert
effects => 3D effects => drop shadow => 0 / 0 / 100 / 8 / color #404040
selections => select none
10
copy / paste the decoration tube as new layer
place top left as shown on final result
image => mirror => mirror horizontal
image => mirror => mirror vertical
layers => merge => merge down
effects => 3D effects => drop shadow => 1 / 1 / 100 / 1 / color 2
adjust => sharpness => sharpen more
11
copy / paste the character tube as new layer
don’t forget to erase the watermark
place as shown on final result
adjust => sharpness => sharpen more
layers => duplicate
highlight layer below (original)
adjust => blur => gaussian blur => 100
highlight top layer
effects => 3D effects => drop shadow => 15 / 15 / 45 / 45 / black
12
copy / paste the animal tube as new layer
image => mirror => mirror horizontal
image => resize => untick « resize all layers » => 75%
place as shown on final result
adjust => sharpness => sharpen
effects => 3D effects => drop shadow => 15 / 15 / 45 / 45 / black
13
prepare a linear gradient

image => add borders => tick « symmetric » => ...
5 px white
select inside the white frame with the Magic Wand tool
flood fill selection with the gradient
selections => select none
14
apply your watermark or signature
write your licence number if you used a licensed tube
layers => merge => merge all (flatten)
image => resize => tick « resize all layers » => 900 px width

My tag with my tube

Thank you for following this tutorial
You can send your creations to Franie.

It will be a real pleasure for her to show it in the gallery of the tutorial

If you have any trouble with this translation, if you notice something wrong
don’t hesitate to contact me, I will do my best to fix the problem


If you want to be informed about Franie’s new tutorials
subscribe to her newsLetter


Back to the boards of Franie’s tutorials
board 1 board 2 board 2 board 3 board 3 board 4 board 4 board 5 board 5
board 6


|