Look

Original can be found here


Franie works with PSP 13, and I use PSP 18
But this tutorial can be realized with another version of PSP

If you want to present her tutorials on your forums or sites
please ask her first.
If you publish your creation on a site or a blog
please put a link towards the tutorial.
Thank you to understand and respect the rules.

The tubes Franie uses have been sent by the authors in different sharing groups
And she has their permission to use them
she also creates her own tubes
If you see a tube that belongs to you, contact Franie or myself
And a link towards your site will be added.

Filters used
Unlimited 2 – Visual Manipulation / Transmission
Simple / Left Right Wrap
MuRa's Meister / Copie
AP 01 [Innnovations] / Lines - SilverLining
Distort / Shear
MuRa's Meister / Perspective Tiling
Toadies / Weaver
Simple / 4 Way Average


Material
1 alpha layer (selections included)
2 elements
1 mask
2tubes fleurs
2 characters tubes
2 tubes « misted eyes » (see here and here)
1 color palette


Tubers’ authorizations


Franie’s colors
Don’t hesitate to change them and to change the blend modes of the layers
According to your tubes and images
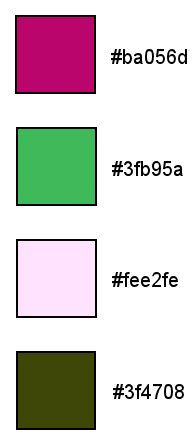
color 1 -> foreground color -> #ba056d
color 2 -> background color -> #3fb95a
color 3 -> #fee2fe
color 4 -> #3f4708

Use the pencil to follow the steps
left click to grab it


Realization
Step 1
open the alpha layer – window > duplicate (or Ctrl + D)
close the original and work with the copy > rename it : Raster 1
Step 2
in the materials palette, set color 1 as FG color
and color 2 as BG color
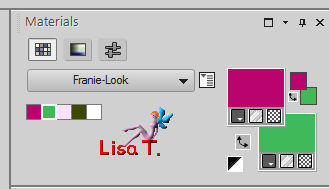
Step 3
prepare a linear gradient
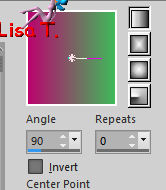
flood fill the layer with this gradient
Step 4
layers > duplicate (TWICE)
the active layer is « Copy2 of Raster 1 »
open the mask and minimize it to tray
layers > new mask layer > from image
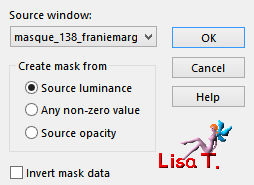
layers > merge > merge group
effects > edge effects > enhance
effects > image effects > seamless tiling
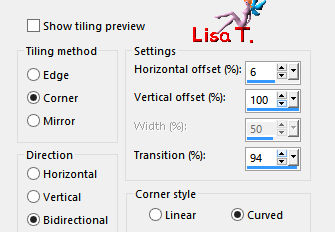
if you changed the colors and chose light color > adjust > sharpness > sharpen
Step 5
acitvate the layer « copy of Raster 1 »
effects > plugins > Unlimited 2 > Visual Manipulation > Transmission
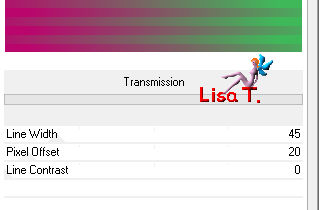
image > mirror > mirror horizontal
blend mode of the layer : Overlay
adjust > shrapness > sharpen more
Step 6
« copy of Raster 1 » is still active
layers > duplicate
layers > arrange > bring to top
image > resize > uncheck « all layers » >30%
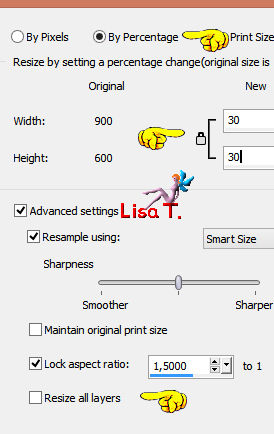
effects > image effects > seamless tiling > default settings
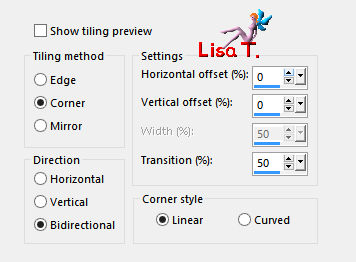
Step 7
selections > load-save selection > from alpha channel > selection #1
edit > cut – edit > paste as new layer (Raster 2)
selections > select none
Step 8
activate « Copy 2 of Raster 1 »
effects > plugins > Simple > Left Right Wrap
image > free rotate
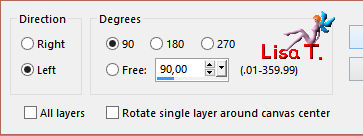
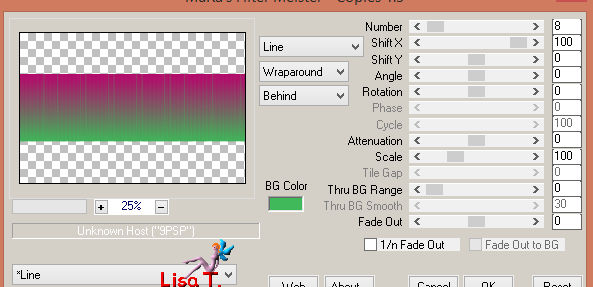
effects > plugins > Mura’s Meister > Copies
effects > image effects > seamless tiling
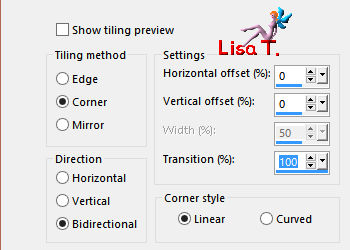
Step 9
copy / paste as new layer the element 1
don’t move it
if you changed the colors, set the blend mode on « Luminance (Legacy) » (or other)
Step 10
in the materials palette, prepare a linear gradient with colors 3 (FG) and 4 (BG)
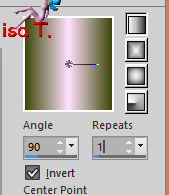
Step 11
activate the selection tool, custom selection

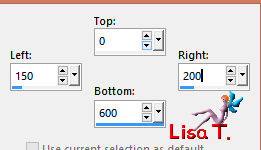
Step 12
layers > new raster layer
flood fill the selection with the gradient
effects > plugins > AP 01[Innovations] > Lines – Silverlining
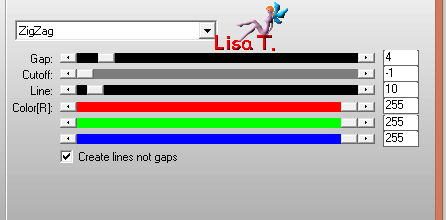
selections > select none
Step 13
effects > plugins > Distort > Shear
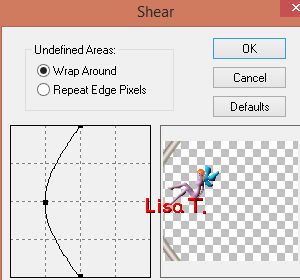
layers > duplicate – image > mirror > mirror horizontal
layers > merge > merge down
effects > image effects > seamless tiling
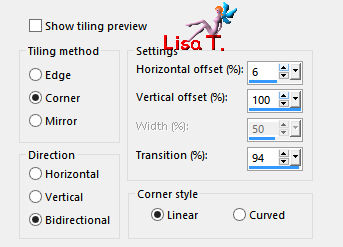
blend mode of the layer : Luminance (Legacy) – opacity : 50%
Step 14
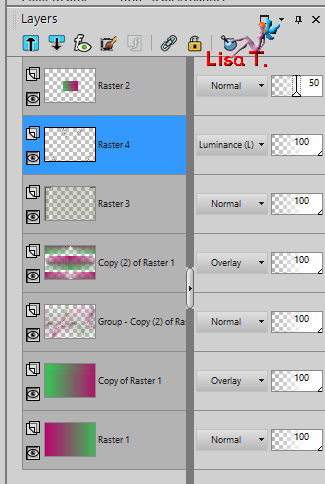
your layers palette looks like this
Step 15
activate the top layer (Raster 2)
selections > load-save selection > from alpha channel > selection #1
adjust > blur > gaussian blur > 10
layers > new raster layer
copy/paste into selection the eye tube 15
adjust > sharpness > sharpen
layers > merge > merge down
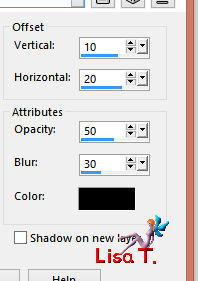
effects >3D effects > drop shadow
selections > select none
Step 16
selections > load-save selection > from alpha channel > selection #2
layers > new raster layer (Raster 5)
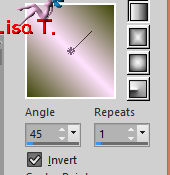
flood fill the selection with the following gradient
(colors 3 and 4 as FG and BG colors)
effects > 3D effects > drop shadow as before
selections > select none
layers > arrange > move the layer under « Raster 2 »
activate « Raster 2 » - layers > merge > merge down
Step 17
activate the Pick Tool with the following settings
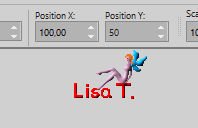
press the M key to disable the Pick Tool
Step 18
activate the layer « Copy 2 of Raster 1 » (middle layer of the stack)
layers > duplicate
effects > plugins > Mura’s Meister > Perspective Tiling
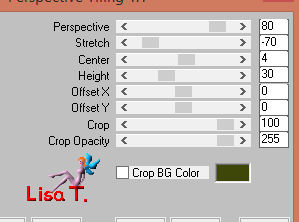
blen mode of the layer : Normal
adjsut > sharpness > sharpen more
Step 19
activate the top layer
copy / paste as new layer the tube « woman_629 »
move it to the right as shown on the final result
adjust > sharpness > sharpen more
effects > 3D effects > drop shadow as before
Step 20
copy / paste as new layer the tube « fleurs_265 »
image > resize > 75%
place it as shown on the final result
adjust > sharpness > sharpen more
effects > 3D effects > drop shadow as before
Step 21
image > add borders > check « symmetric -->
2 pixels color 2
2 pixels color 3
2 pixels color 1
40 pixels white
Step 22
select the white border with the magic wand tool
effects > plugins > Toadies > Weaver
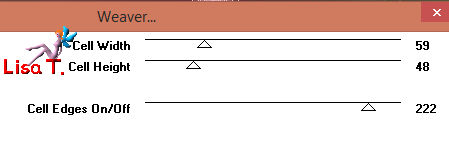
effects > plugins > Simple > 4 Way Average
effects > edge effects > enhance
selections < invert
effects > 3D effects > drop shadow > 10 / 20 / 50 / 30 / black * -10 / -20 /50 / 30 / black
selections > select none
Step 23
image > add borders -->
2 pixels color 4
2 pixels color 3
2 pixels color 1
Step 24
copy / paste as new layer the element 2
don’t move it
colorize as you want
Step 25
apply your watermark
layers > merge > merge all (flatten)
file > save as... type jpeg
Your tag is finished

You can send your creations to Franie.
It will be her pleasure to show it in her site


If you have any trouble following this tutorial
don’t hesitate to Contact Franie

If you want to be informed about Franie’s new tutorials
Join her newsLetter


You will find your creations here


Back to the boards of Franie’s tutorials
board 2  board 3 board 3 

|