
Original can be found here

Franie works with PSP 18, and I use PSP 19
But this tutorial can be realized with another version of
PSP
however, some differences might be noticed according to the
version you use

If you want to present Franie’s tutorials on your
forums or sites
please ask her first
If you publish your creation on a site or a blog
please put a link towards the tutorial if you create a tag
Thank you to understand and respect the rules.

The tubes Franie uses have been sent by the authors on different
groups
And she has their permission to use them
If you see a tube that might belong to you, contact Franie
or myself
And a link towards your site will be added if necessary
Please, don’t use tubes found on the web with no
watermark
all tubers apply their watermark without any exception !!!!!
no watermark ---> stolen tube

Filters used
AP [Lines] Lines - SilverLining
Alien Skin - Eye Candy 5 Impact - Glass
AAA Frames - Foto frame
MuRa's Seamless - Emboss at Alpha


Material
1 layer-Alpha_selections
2 tubes (voir ici)
1 mask - 1 police
1 texture (copy / paste into the folder « textures » of
Corel PSP folder)
1 styled de line (copy / paste into the folder « styled
lines » of Corel PSP folder)
1 color palette

Tubers’ authorizations


Franie’s colors
Don’t hesitate to change colors and blend modes of
the layers
to match your tubes and images
color 1 -> foreground color FG color -> #e2e7eb
color 2 -> background color BG color -> #33496e


Use this pencil to follow the steps
hold down left click to grab and move it


Realization
1
open the Alpha layer, window -> duplicate
close the original and work with the coppy (to preserve
original layer)
2
flood fill with color 2
effects -> texture effects -> Texture

3
layers -> new raster layer
flood fill with color 1
open mask 93 and minimize it to tray
layers -> new mask layer -> from image

layers -> merge -> merge group
effects -> edge effects -> enhance
blend mode of the layer : Luminance (Legacy)
4
layers -> new raster layer
in the materials palette, prepare a linear gradient

selections -> load-save selection -> from alpha channel
-> selection #1
flood fill selection with the gradient
adjust -> blur -> gaussian blur

effects -> plugins -> AP [Lines] Lines - SilverLining

keep selection active
5
layers -> new raster layer
in the materials palette, prepare a linear gradient

selections -> modify -> select selection borders

flood fill selection with the gradient
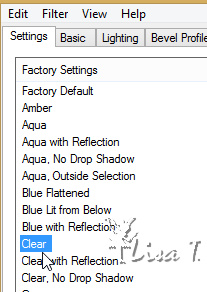
effects -> 3D effects -> inner bevel

selections -> select none
6
select inside the circle with the magic wand tool
selections -> modify -> expand -> 2 pixels
open tube « accessoires_79 »
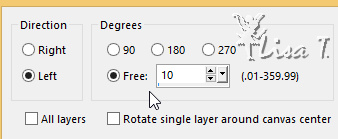
image -> free rotate

COPY
back to your work
edit -> paste as new layer
image -> resize -> untick « resize all
layers » -> 70%
move it as shown in the final result
effects -> 3D effects -> drop shadow

selections -> invert
hit DELETE key of your keyboard
selections -> select none
layers -> arrange -> move down
effects -> 3D effects -> drop shadow (twice)

close the eyes of the two bottom layersn & highlight
top layer
layers -> merge -> merge visible
effects -> image effects -> offset

open the eyes of the two bottom layers
effects -> 3D effects -> drop shadow as before
7
in the materials palette, set color 1 as FG color
close the eye of the background layer
activate the preset shape, rectangle
in the Styled Line, choose « Vyp_ligne_justine » /
width 2.00

draw a rectangle as shown below

layers -> convert to raster layer
effects -> 3D effects -> drop shadow

8
layers -> new raster layer
selections -> load-save selection -> from alpha channel
-> selection #3
flood fill selection with the gradient
selections -> select none
in the materials palette, close the FG box
make sure color 2 is the BG color
activate the Text tool, using the following settings with
the police provided (Milano LET)

write your text
layers -> convert to raster layer
move the tube as shown on the final result
effects -> 3D effects -> drop shadow -> 0 / 0
/ 100 / 1 / black
9
layers -> new raster layer
selections -> load-save selection -> from alpha channel
-> selection #2
flood fill selection with the BG color
effects -> plugins -> Alien Skin Eye Candy 5--Impact
/ Glass

selections -> select none
10
layers -> new raster layer
selections -> load-save selection -> from alpha channel
-> selection #4
flood fill with FG color
selections -> modify -> contract -> 4 pixels
flood fill selection with BG color
selections -> select none
effects -> 3D effects -> drop shadow

effects -> plugins -> Mura’s Seamless / Emboss
at Alpha / default settings
11
layers -> new raster layer
image -> mirror -> mirror vertical
effects -> image effects -> offset

13
image -> add borders -> tick « symmetric » -> 2
pixels color 2
image -> add borders -> tick « symmetric » -> 40
pixels color 1
select the large border with the magic wand tool
selections -> invert
effects -> 3D effects -> drop shadow -> 10 / 10
/ 60 / 20 / black ** -10
/ -10 / 60 / 20 / black
selections -> select none
effects -> plugins -> AAA Frames / Foto Frame

14
apply your watermark
merge all layers (flatten)
save as... type .jpeg

Thank you for following this tutorial
You can send your creations to Franie.
 to
Franie-Margot to
Franie-Margot
It will be a real pleasure for her to show it in the gallery
of the tutorial


If you have any trouble with this translation, if you notice
something wrong
don’t hesitate to contact me, I will do my best to
fix the problem
 to
Lisa T to
Lisa T

If you want to be informed about Franie’s new tutorials
subscribe to her newsLetter


My tag with my tube

Back to the boards of Franie’s tutorials
board 1  board
2 board
2  board
3 board
3  board
4 board
4 

|