Emelyne

Original can be found here


Franie works with PSP 13, and I use PSP 12
But this tutorial can be realized with another version of PSP

If you want to present her tutorials on your forums or sites
please ask her first.
If you publish your creation on a site or a blog
please put a link towards the tutorial.
Thank you to understand and respect the rules.

The tubes Franie uses have been sent by the authors on different groups
And she has their permission to use them
Some of them have been found on the WEB,
If you see a tube that belongs to you, contact Franie or myself
And a link towards your site will be added.

Filters used
Carolaine and Sensibility/Cs_Reflecction & Cs_Texture
Mura’s Meister/Copies
Redfiled/Water Ripples
DragonFly/Sinedots II
Alien Skin Eye Candy 5 Impact/Perspective Shadow & Glass


Material
1 alpha layer
1 mask (copy and paste into the « mask » folder of « My PSPS Files »)
1 element Sinedots
1 tile to copy and into the texture folder of « My PSP Files »
1 preset « Perspective Shadow » (double click on it to install it)
1 character - 1 animal - 1 color palette


tubers authorizations --> 

Franie’s colors
Don’t hesitate to change them and to change the blend modes of the layers
According to your tubes and images
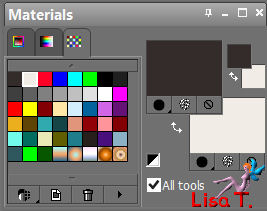
color 1 -> foreground color -> #352d2b
color 2 -> background color -> #f1ece6
color 3 -> #fe0027


Use the pencil to follow the steps
left click to grab it
 |

Realization
Step 1
open the alpha layer (selections) and duplicate it
work with the copy, close the original
rename it « Raster 1 »
Step 2
in the materials palette, set color 1 as foreground and color 2 as background
Step 3
fill the layer with color 1
layers/new raster layer (Raster 2)
fill with color 2
layers/new mask layer/fom disk/mask « masque_85_franimergot »
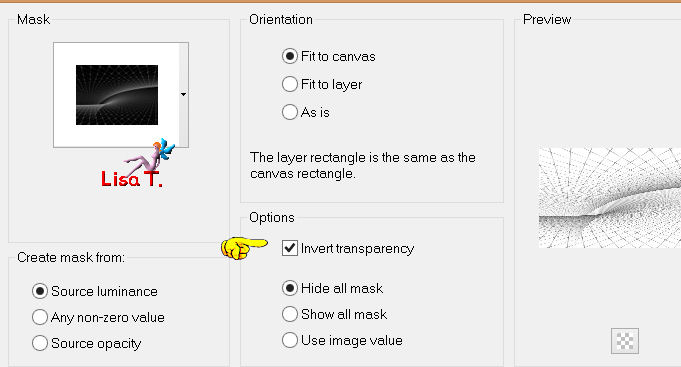
effects/edge effects/enhance
layers/merge/merge group
layers/merge/merge visible
Step 4
layers/new raster layer (Raster 1)
set the opacity of the flood fill tool on 50%

fill with color 3
layers/merge/merge visible
Step 5
layers/new raster layer (Raster 1)
selections/load selection/from alpha channel/selection #1
reset the opacity of the flood fill tool on 100%
fill the seltions with color 2 and keep the selection active
Step 6
layers/new raster layer (Raster 2)
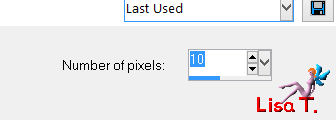
selections/modify/contract/10 pixels
fill the selection with color 3
effects/plugins/Carolaine and Sensibility/Cs_Reflection (defautl settings)
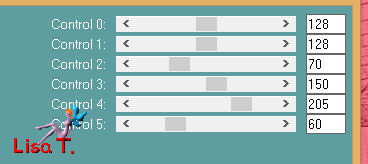
effects/plugins/Carolaine and Sensibility/Cs_Texture
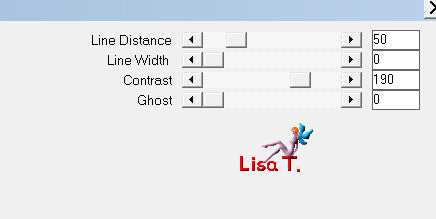
maybe you will notice a slight difference with the example, it is not important
adjust/sharpness/sharpen
effects/3D effects/drop shadow
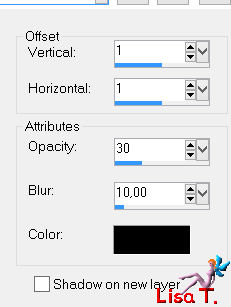
again, drop shadow -1 / -1 / 30 / 10 / black
selections/select none
Step 7
layers/merge/merge down
effects/3D effects/drop shadow (with (1) and (-1) ) as in step 6
adjust/sharpness/sharpen
Step 8
layers/duplicate (copy of Raster 1)
effects/plugins/Mura’s Meister/Copies
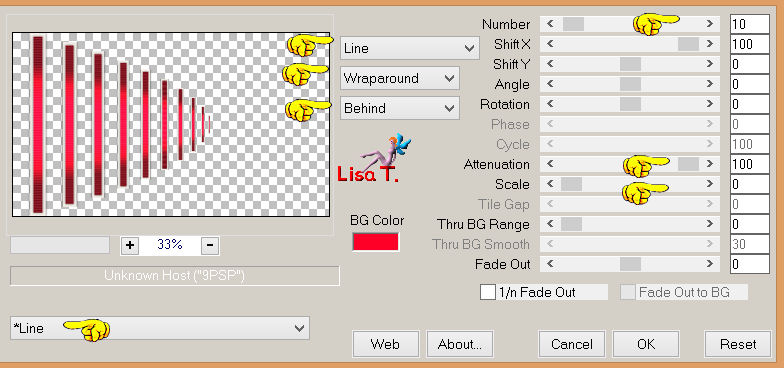
Step 9
activate the tube of the woman
edit/copy - back to your work - edit/paste as new layer (Raster 2)
image/resize/uncheck « resize all layers »/65%
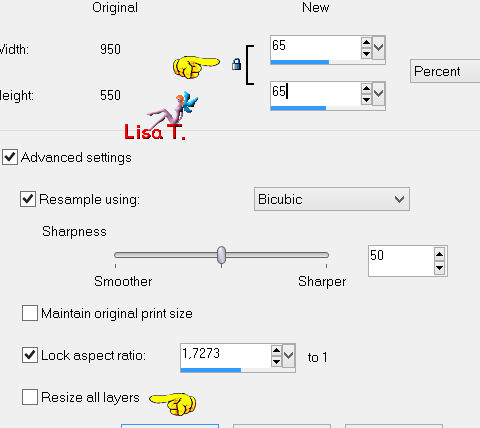
effects/image effects/offset
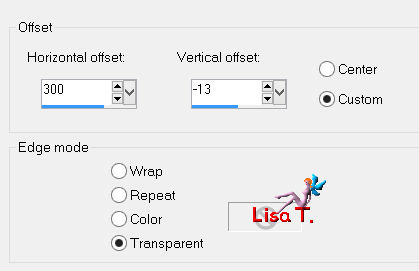
adjust/sharpness/sharpen
Step 10
selections/load selection from alpha channel/selection #2

a tip to move the selection if you change the tube :
selections/edit the selection/it becomes red
move it where you want with the « move tool »
uncheck « edit selection »
don’t forget to put the selection back to its original place

selections/promote selection to layer
selections/select none
effects/plugins/Mura’s Meister/Copies
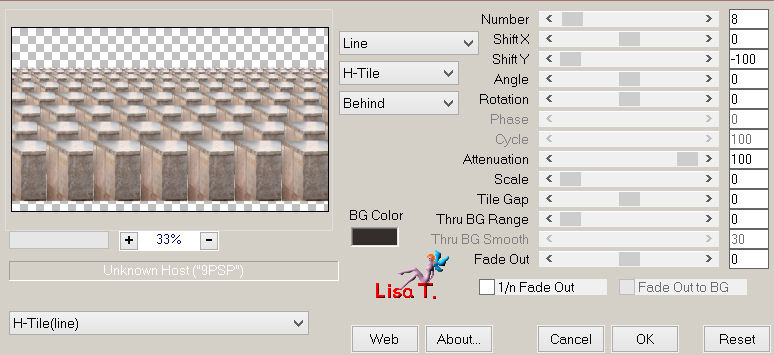
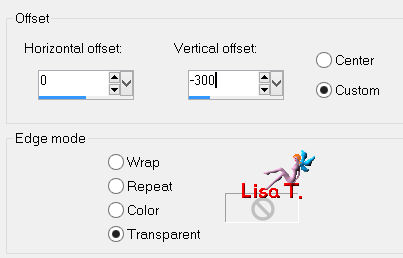
effects/image effects/offset
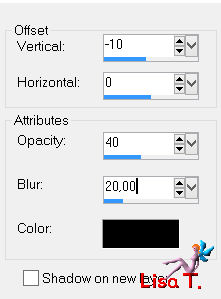
effects/3D effects/drop shadow
layers/arrange/move down
Step 11
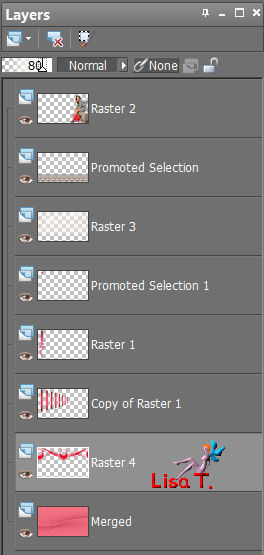
you layers palette looks like this
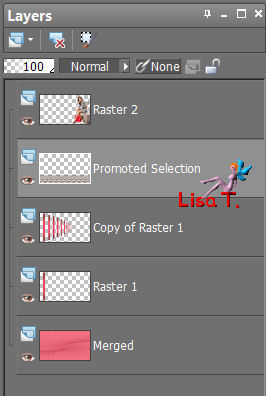
Step 12
in the layers palette, activate «copy of Raster 1 »
activate the pick tool (K) and drag the layer upwards to 425
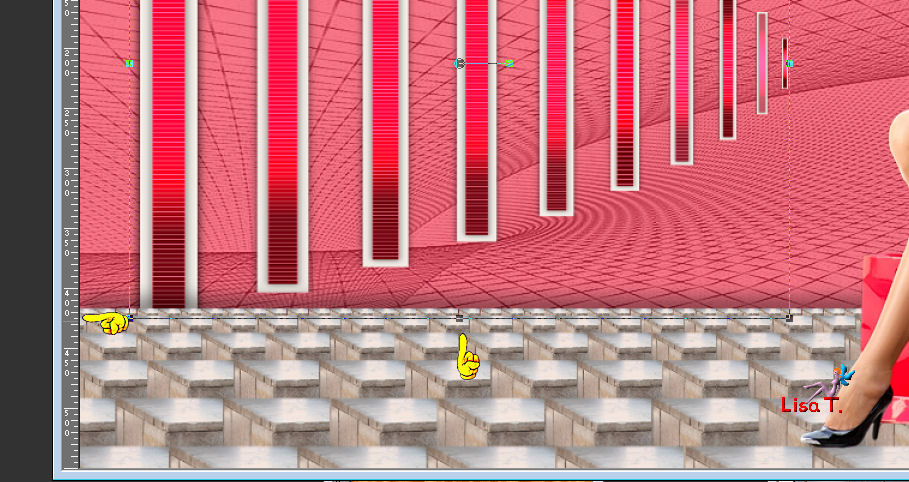
disable the pick tool (M)
Step 13
activate « Raster 1 »
effects/plugins/Redfield/Water Ripples/default settings
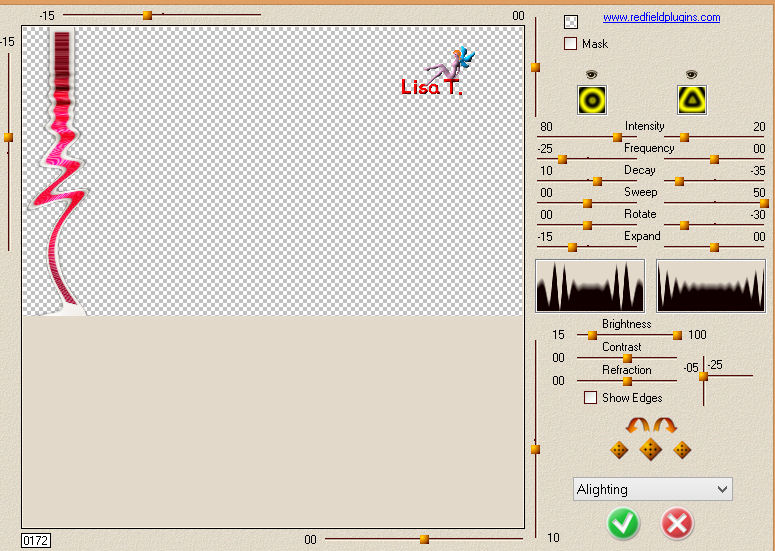
layers/arrange/move up
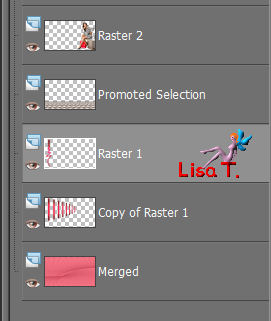
effects/3D effects/drop shadow with (1) and (-1) as in step 6
adjust/sharpness/sharpen
Step 14
in the layers palette, activate the top layer
layers/new raster layer (Raster 3)
selections/load selection from alpha channel/selection #3
set the opacity of the flood fill tool on 50%
fill the selection with color 2
effects/plugins/DragonFly/Sinedots II
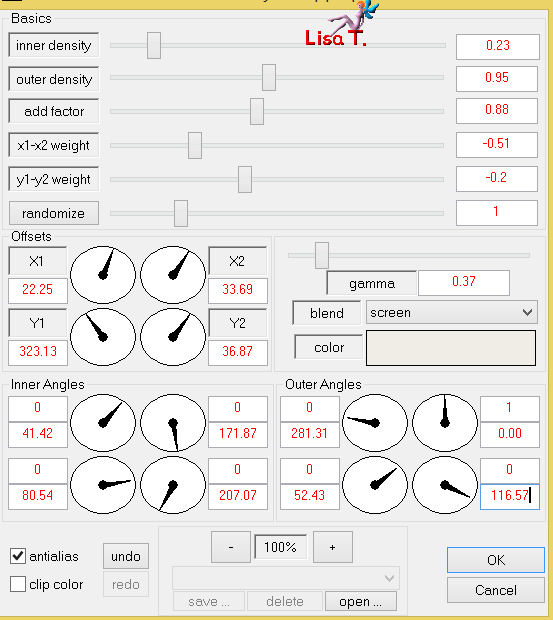
if you have some trouble with this plugin, this element is provided
selections/select none
set the blend mode on « overlay » (or « soft light »)
layers/arrange/move the layer under « promoted selection »
Step 15
activate « Raster 2 » (the character)
effects/plugins/Alien Skin Eye Candy 5 Impact/Perspective shadow/preset_81_franiemargot
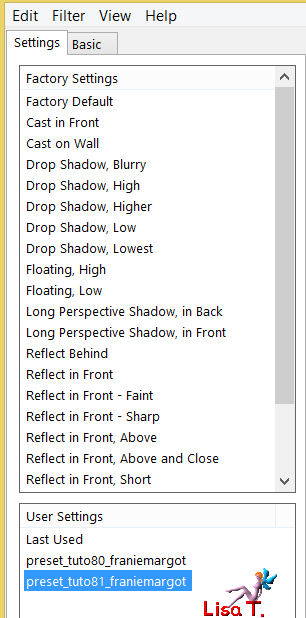
Step 16
activate « Raster 1 »
selections/load selection from alpha channel/selection #4
selections/promote selection to layer
selections/select none
effects/plugins/Alien Skin Eye Candy 5 Impact/Glass - Clear
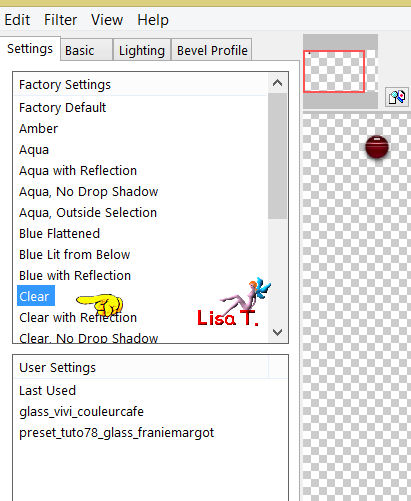
effects/3D effects/drop shadow
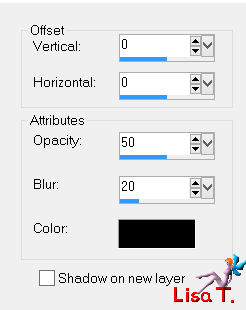
adjust/sharpness/sharpen more
Step 17
activate the top layer
layers/new raster layer/Raster 4
selections/load selection from alpha channel/selection #5
set the opacity of the flood fill tool on 100%
fill the selection with color 3
selections/select none
Step 18
effects/distortion effects/warp
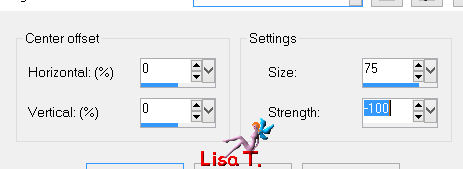
image/flip
effects/image effects/offset
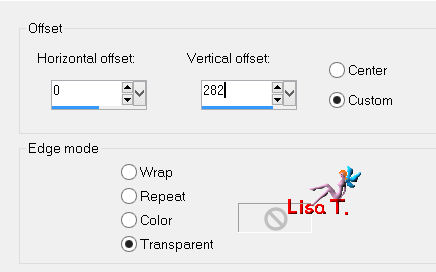
effects/texture effects/Texture « tuile1_franiemargot »
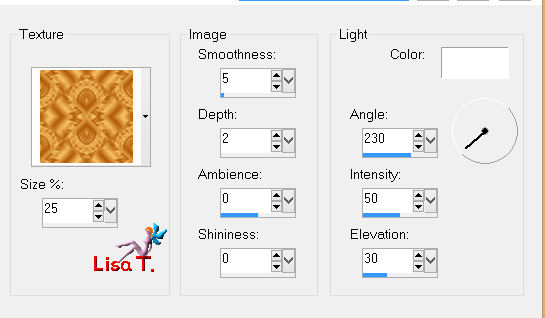
effects/image effects/seamless tiling
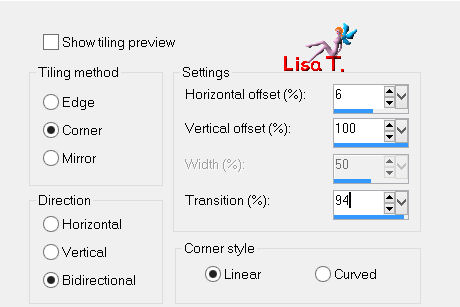
layers/arrange/move the layer down under the layer « merged »
opacity of the layer : 80%
Step 19
your layers palette looks like this
Step 20
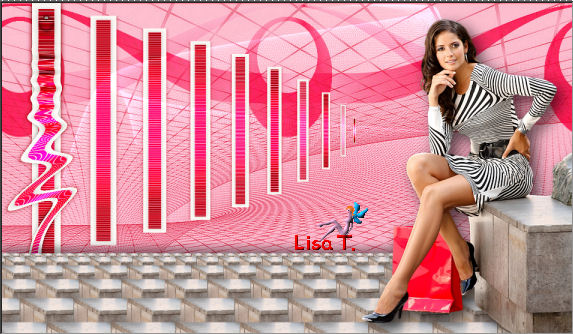
your tag looks like this
Step 21
image/add borders/check « symmetric » ->
2 pixels color 1
2 pixels color 2
2 pixels color 1
20 pixels color 3
select the last border with the magic wand tool
effects/rexture effect/Texture « tuile1_franiemargot » (as in step 18)
adjust/sharpness/sharpen
selections/select none
Step 22
image/add borders/check « symmetric » ->
2 pixels color 1
2 pixels color 2
2 pixels color 1
COPY
Step 23
image/add borders/50 pixels color 2
select this border with the magic wand tool
edit/paste into selection
adjust/blur/radial blur

adjust/sharpness/sharpen more
selections/invert
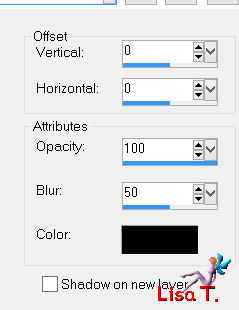
effects/3D effects/drop shadow
selections/select none
Step 24
image/add borders/chack « symmetric » ->
2 pixels color 1
2 pixels color 2
2 pixels color 1
Step 25
activate the tube of the animal
edit/copy - back to your work - edit/paste as new layer
image/resize/uncheck « resize all layers »/50%
move it as shown on the final result
adjust/sharpness/sharpen
effects/plugins/Alien Skin Eye Candy 5 Impact/Perspective Shadow/preset_81_franiemargot (as in step 15)
Step 26
apply your signature
layers/merge/merge all (flatten)
file/save as... type jpeg
Your tag is finished

You can send your creations to Franie.
It will be her pleasure to show it in her site


If you have any trouble following this tutorial
don’t hesitate to Contact Franie

If you want to be informed about Franie’s new tutorials
Join her newsLetter


You will find your creations here

Back to the boards of Franie’s tutorials
board 1  board 2 board 2 

|