

Original can be found
here

Franie works with PSP 18, and I use PSP 2018
But this tutorial can be realized with another version
of PSP
however, some differences might be noticed according to
the version you use

If you want to present Franie’s tutorials on your
forums or sites
please ask her first
If you publish your creation on a site or a blog
please put a link towards the tutorial if you create a
tag
Thank you to understand and respect the rules.

The tubes Franie uses have been sent by
the authors on different groups
And she has their permission to use them
If you see a tube that might belong to you, contact Franie
or myself
And a link towards your site will be added if necessary
Please, don’t use tubes found on the web with no
watermark
all tubers apply their watermark without any exception !!!!!
no watermark ---> stolen tube

Hints and Tips
TIP 1-> if you don’t
want to install a font -->
open it in a software as « Nexus Font » (or
other font viewer software of you choice)
as long as both windows are opened (software and font),
your font will be available in your PSP
TIP 2 -> from PSPX4, in the later versions of PSP the functions « Mirror » and « Flip » have
been replaced by -->
image -> Mirror --> image -> mirror -> mirror
horizontal
image -> Flip --> image -> mirror -> mirror
vertical

Filters used
Alien Skin - Eye Candy 5 Impact - Extrude
MuRa's Meister - Perspective Tiling


Material
2 tubes Art Contemporain
1 element (Sinedots)
1 styled line by @qua
1 text
1 selection to place into the folder « Selections » of
PSP
1 texture to place into the folder « Textures » of
PSP
1 color palette

Tubers’ authorizations

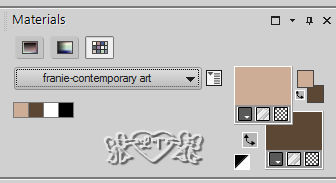
Franie’s colors
Don’t hesitate to change colors and blend modes
of the layers
to match your tubes and images
color 1 -> #cdad95
color 2-> #5c4736


Use the pencil to follow the steps
hold down left click to grab it and move it
 |

Realization
1
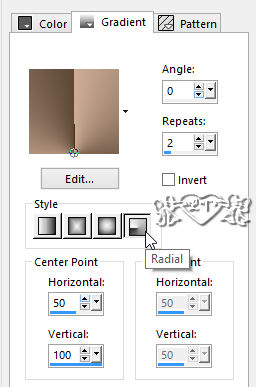
prepare the materials palette with FG and BG colors
prepare a radial gradient
2
open a new transparent layer
700 * 800 pixels
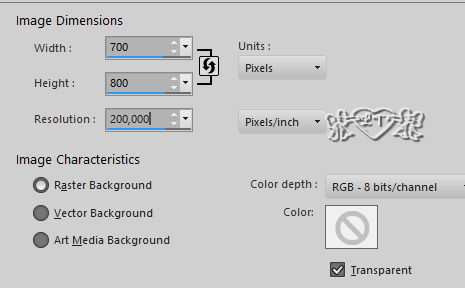
flood fill with the radial gradient
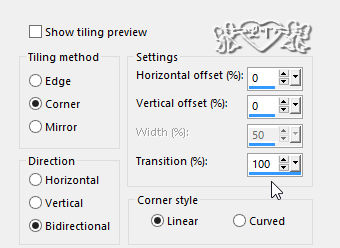
effects -> image effects -> seamless tiling
3
enable the selection tool -> custom selection

selections -> promote selection to layer
selections -> select none
effects -> distortion effects -> polar coordinates

layers -> duplicate
image -> mirror -> mirror vertical
layers -> merge -> merge down
image -> mirror -> mirror horizontal
effects -> texture effects -> weave

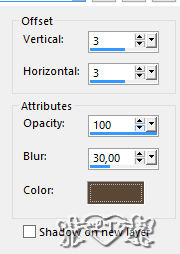
effects -> 3D effects -> drop shadow
/ color 2
4
highlight Raster 1
enable the selection tool -> custom selection -> same
settings as before
selections -> promote selection to layer
effects -> plugins -> AP Lines / Lines Silverlining

effects -> 3D effects -> drop shadow -> -3 / -3
/ 45 / 30 / black
selections -> select none
5
highlight Raster 1
effects -> texture effects -> texture -> texture
provided

6
copy / paste as new layer Element 1
don’t move it
blend mode of the layer : soft light
7
highlight top layer - make sure the radial gradient is
in the FG box (materials palette)
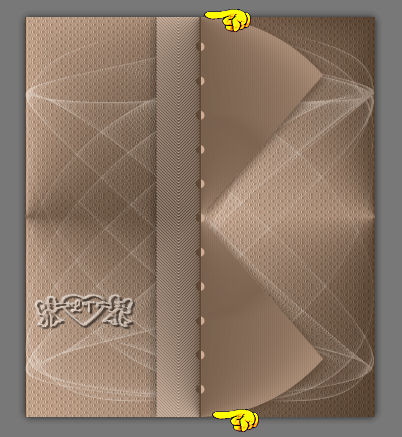
enable the Pen tool

draw a line as shown below -> a tip -> to
draw a perfectly straight line, press the shift key while
drawing
layers -> convert to raster layer
effects -> plugins -> Alien Skin Eye Candy 5-Impact
/ Extrude

effects -> 3D effects -> drop shadow -> 2 / -2
/ 50 / 15 / black
8
highlight Raster 1
layers -> duplicate
effects -> image effects -> seamless tiling / default
settings

effects -> plugins -> Mura’s
Meister / Perspective Tiling

layes -> arrange -> move up
selections -> load selection -> from disk / selection
provided
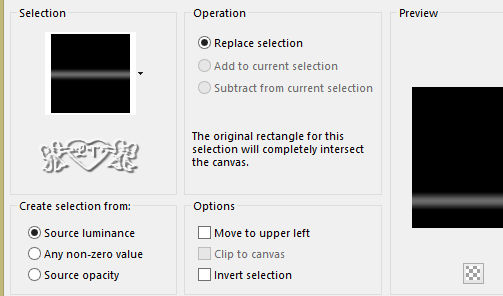
DELETE on your keyboard (once or twice
according to your colors)
selections -> select none
9
highlight top layer
copy / paste as new layer « art contemporain
5 » - don’t forget to erase the watermark
move to the left (see final result)
effects -> 3D effects -> drop shadow -> 10 / 10
/ 50 / 40 / black
10
copy / paste as new layer the text tube
move it to the right
effects -> edge effects -> enhance
effects -> 3D effects -> drop shadow -> 2 / 2
/ 100 / 5 / black
11
layers -> merge -> merge visible
edit -> COPY
selections -> select all
image -> add borders -> tick « symmetric » -> 40
pixels color 1
selections -> invert
edit -> paste into selection
edjust -> blur -> gaussian blur / 40
effects -> 3D effects -> drop shadow -> 15 / 15
/ 60 / 20 / color 2
effects -> 3D effects -> drop shadow -> -15 /
-15 / 60 / 20 / color 2
selections -> invert
effects -> 3D effects -> drop shadow -> 0 / 0
/ 50 / 25 / black
selections -> select none
12
selections -> select all
selections -> modify -> contract / 38 pixels
layers -> new raster layer -> flood fill with color
1
selections -> modify -> contract / 2 pixels
DELETE
image -> add borders -> tick « symmetric » -> 2
pixels color 1
13
apply your watermark
layers -> merge -> merge all (flatten)
save your work as ... type .jpeg

write the copyright © license number
apply your watermark
layers -> merge -> merge all (flatten)
save as... type .jpeg

Thank you for following this tutorial
You can send your creations to Franie.
 --->
to Franie --->
to Franie
It will be a real pleasure for her to show it in the gallery
of the tutorial

If you have any trouble with this translation,
if you notice something wrong
don’t hesitate to contact me, I will do my best to
fix the problem
 ---> to
Lisa T ---> to
Lisa T

If you want to be informed about Franie’s new tutorials
subscribe to her newsLetter


Back to the boards of Franie’s tutorials
board 1 board
2 board
2 board
3 board
3 board
4 board
4 board
5 board
5 

|