Tag Fisherman's Hut

I'm member of Tutorial Writers Inc

Original by Tine (Click on the banner)

Conditions of use of the material provided
It is forbidden to modifiy, change the name, take off the watermarks or alter the tubes.
It is forbidden to share them in groups or offer them on your site, blog or forum.
If you want to use them to create a tutorial, you must ask the permission of the authors.

Filters used : None
Material

2 tubes and one picture
The tube of the hut was created by Monique42
The tube of the tree was found on the web
Prepare your material
Open the tubes , duplicate them and close the originals.
Open the picture "ciel_nuageux" and reduce it
Use the paintbrush to follow the steps
Grab it with the left click of your mouse
 |
Step 1
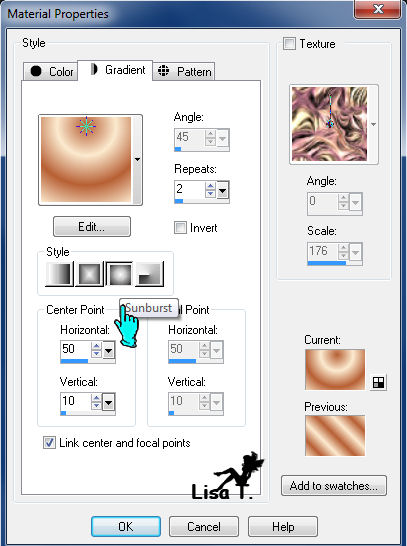
Foreground color : #b75f34
Background color : #fbeacf
Prepare a sunburst gradient -> repeats 2
center point -> horizontal 50 / vertical 10
Step 2
file/new -> 800 X 475 pixels -> raster background
flood fill tool -> fill with the gradient
adjust/blur/gaussian blur -> radius 10
effects/tecture effects/mosaic antique

effects/texture effects/blinds
width 3 -> opacity 32 -> foreground color -> enable horizontal -> disable light from left/top
Step 3
selections/select all
layers/new raster layer
activate the picture "ciel_nuageux"
edit/copy -> back to the tag -> edit/paste into selection
selections/select none
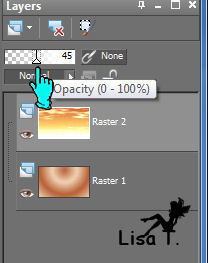
layers/opacity -> 45
Step 4
activate the tube "herfftakkenSusan T 2012"
edit/copy -> back to the tag -> edit/paste as a new layer
image/mirror
effects/image effects/offset
horizontal offset 187 -> vertical offset 5 -> enablecustom AND transparent
step 5
activate the tube "tubed by Monique42"
edit/copy -> back to the tag -> edit/paste as a new layer
effects/image effects/offset
horizontal offset -155 -> vertical offset -50 -> enable custom and transparent
step 6
image/add borders/2 pixels/white color/enable symmetric
image/add borders/18 pixels/black color/enable symmetric
magic wand tool -> select the black border
flood fill tool -> fill with the gradient
Step 7
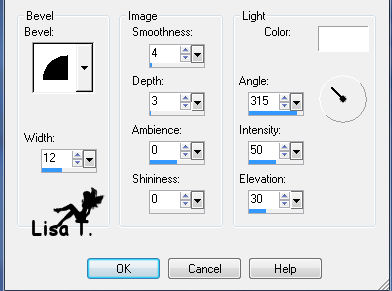
effects/3D effects/inner bevel
effects/texture effects/blinds
width 4 -> opacity 40 -> foreground color -> enable horizontal and light from left/top
Step 8
selections /invert
selections/modifiy/contract -> 2 pixels
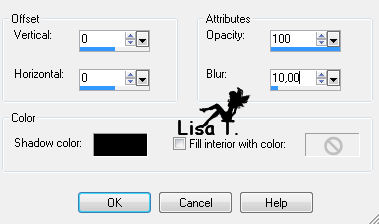
effects/3D effects/cutout
selections/select none
image/add borders/2 pixels/foreground color/enable symmetric

Your tag is now finished.
Thank you for having realized it
Don’t forget to sign and save file as… type JPEG

Don’t hesitate to send your creations to Tine

It will be her pleasure to show them in the gallery at the bottom of the tutorial page
Don’t forget to indicate her your name and the adress of your blog or site if you have one
Here is my try with my tubes

Back to the boards of Tine's tutorials
board 1   board 2 board 2 

|